When it comes to photography and your camera, metering modes are fairly simple to understand. And for a good majority of the shots you take, your camera’s default “evaluative” light metering setting will give you great photographs. But, like so many other things in life, there may be circumstances when you might want to fine tune something. Is there too much light in one area of your shot? Too little? Misplaced? Luckily, there’s something you can do to solve odd lighting issues.
In this post, I’m going to talk about what light metering is and what impact the different methods of metering can have on your photographs. I’ll also discuss how exactly you can go about altering the metering setting on your digital camera, as well as offer some photographs that display the effects of the various metering modes in photography.
What Is Metering?
Exposure is a primary pillar in photography. If your camera can’t gauge the amount of light coming through the lens properly, the result will be either under or over exposed photographs. And, as I’ve discussed in previous posts, proper exposure depends on accurately setting the size of the lens’s aperture, the speed of the shutter, and the level of the ISO. Here’s the thing – how in the world does your camera know (when using automatic modes) where to place each of those settings? Well, just as luck would have it, there’s something called “metering.”
In photography speak, camera metering, exposure metering, or just “metering,” is simply an operation your camera makes in reaction to the amount of light coming through its lens. Every DSLR has a light meter built inside that gauges that light, and based on it, sets the aperture, shutter speed, and ISO to an appropriate size, speed, and level. If you think about it, it’s sort of like your own eyes. If you walk from a dark room indoors out into the bright sunshine, the light that was once hidden is now exposed. Sensing this, your brain “meters” the light (gauges its level) and makes a determination on what settings your eyes should have, based on the conditions. In the case of this example, your brain may tell your eyes to shrink their irises and your eyelids to blink a few times until the inner workings of your eye can adjust to the influx of light. Your brain is the light meter, the light meter “meters” and your eyes are the aperture, shutter, and ISO.
Issues With Metering
Even though our cameras are built using state of the art technology, they aren’t perfect. There are occasions when the default metering setting on our cameras can fail us. As I mentioned at the beginning of this post, during the vast majority of photo shoots, the “matrix,” “evaluative,” “honeycomb” or multi-segment” metering modes of a camera can produce outstanding results, but under certain circumstances, that setting can’t keep up.
Have you ever tried to take a photograph where the subject was high in contrast? If so, and if you used the default metering mode on your camera, you may have produced a photograph that was either under or over exposed. The same is true if you photograph a subject that has a back light that’s very bright, such as a person standing on a beach with the sun behind them. Or one where the back light isn’t there at all, such as a photo of the moon. These are all tricky compositions that alternative metering modes would help with.
Metering Modes Explained
Below, I’ll cover the four general metering modes available to modern DSLR cameras. While some of the terminology may vary between manufacturers, the concepts remain constant. Use this post as a guide and when you want to work with the particulars of your own camera, refer to its operation manual.
Multi-area Metering
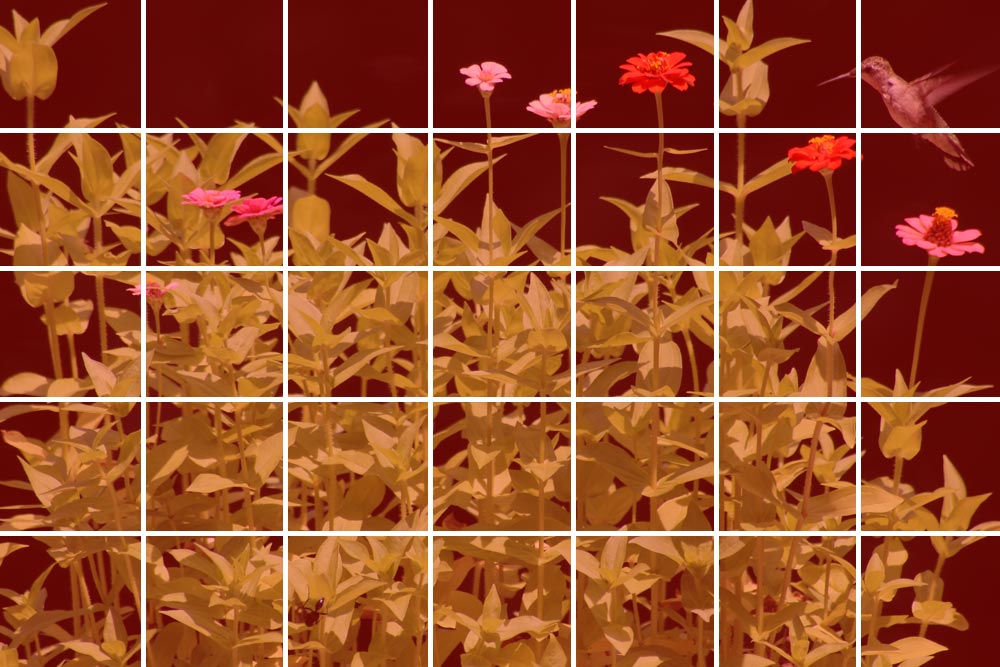
This metering mode may be referred to as evaluative, matrix, honeycomb or multi-segment, depending on camera brand. While using this mode, your camera analyzes the entire frame and determines what it thinks the proper exposure combination should be. Think of the frame as having a grid superimposed on it. The grid may include approximately 30 – 40 boxes. Inside each box, or section of the grid, your camera calculates an individual exposure setting and when it’s completed calculating, it averages out all of them. From this, the overall exposure is determined. Of course, your camera may weigh the focused on boxes more heavily than those that aren’t focused on, but the result is based on exposure levels from all boxes.
Spot Metering
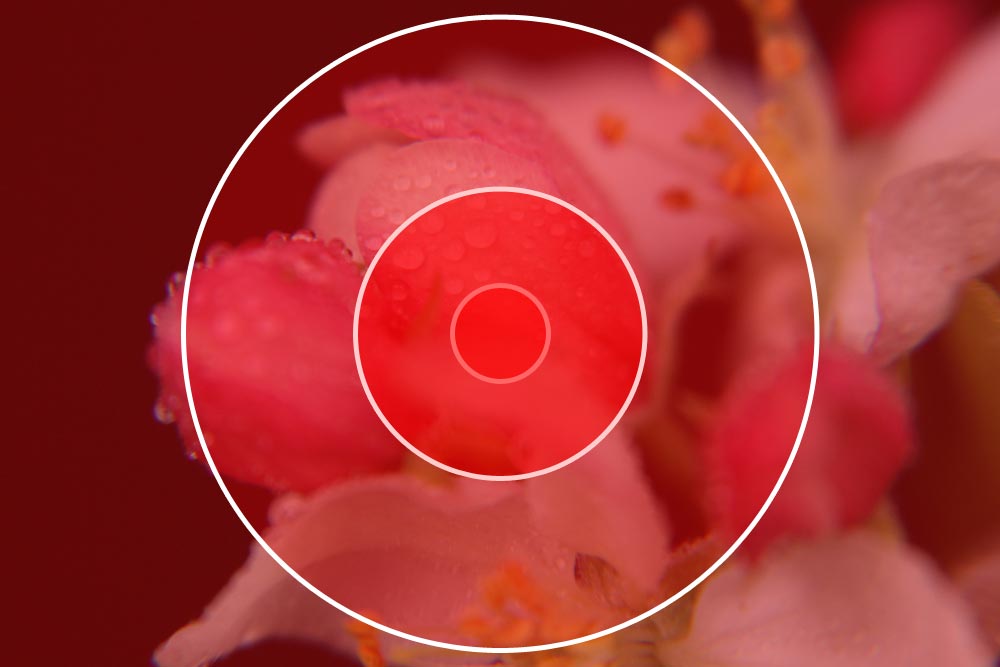
If you’re photographing a subject that occupies only a small area in your entire frame, utilizing spot metering may be the way to go. By using spot metering, you’re effectively telling your camera to limit its light metering to either the very center of the frame or its focus point. And by taking advantage of this setting, you’re essentially having the camera ignore all other areas of the frame. This is an excellent choice for bird lovers, nature photographers, some portraits as well as high contrast photography. With spot metering, the camera bases its calculation on 2-4% of the area of the frame.

Partial Metering
This type of metering is almost identical to spot metering, but with this mode, the camera accumulates data based on 8-13% of the frame as opposed to 2-4% of it. Again, with partial metering, the camera limits its metering to either the very center of the picture area or its focus point.

Center Weighted Metering
The center weighted metering mode is great when you’ve got a subject that’s situated toward the center of the frame and has a background that’s somewhat extreme. Since the camera weights its metering toward the very center, whatever is at the edges of the picture area won’t have a large effect on the light metering. Again, this is helpful in high contrast situations as well as many other types of scenes where you want to put the focus of the lighting on the subject, rather than the entire photo.
How To Change Your Camera Metering Mode
While the sequence of events it takes to change metering modes across the various camera makes and models may vary, the idea is fairly identical. You need to simply identify either the controlling button or the menu setting and pick which mode you’d like to work with. And since I’ve got a Canon T3i sitting in front of me as I write this, I’ll show you how to go about altering the setting on that camera.
Obviously, the first thing you want to do it to turn your camera on. If you’re in one of the priority modes or are in program mode, you should see a display screen that looks like this one below.
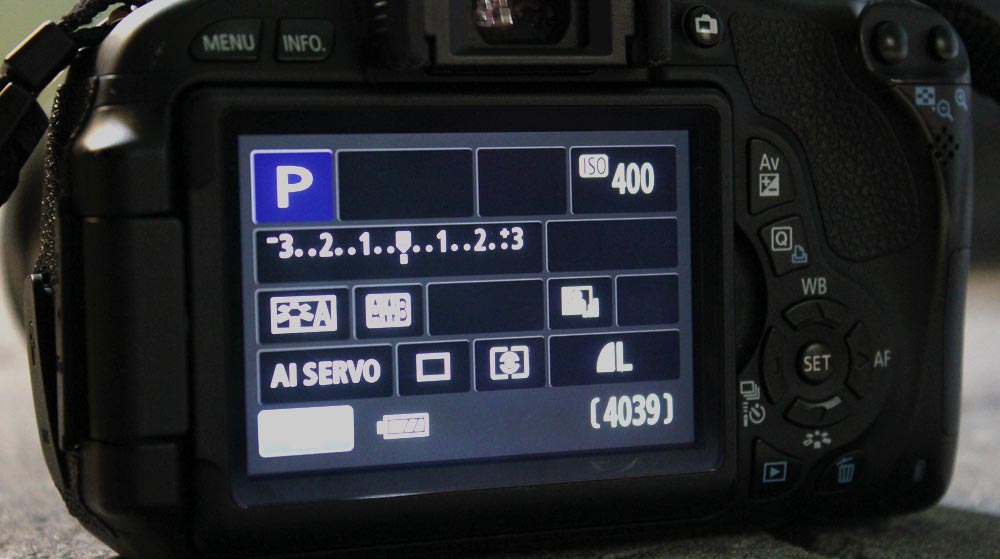
If you push the “Menu” button that sits above the display screen and use the left/right arrows over to the right of the display screen, you should be able to navigate across the various menu options. In the case of changing the metering mode, you should choose the second box in from the left. From there, use the up/down arrows to the right of the display screen to navigate to the metering mode option.
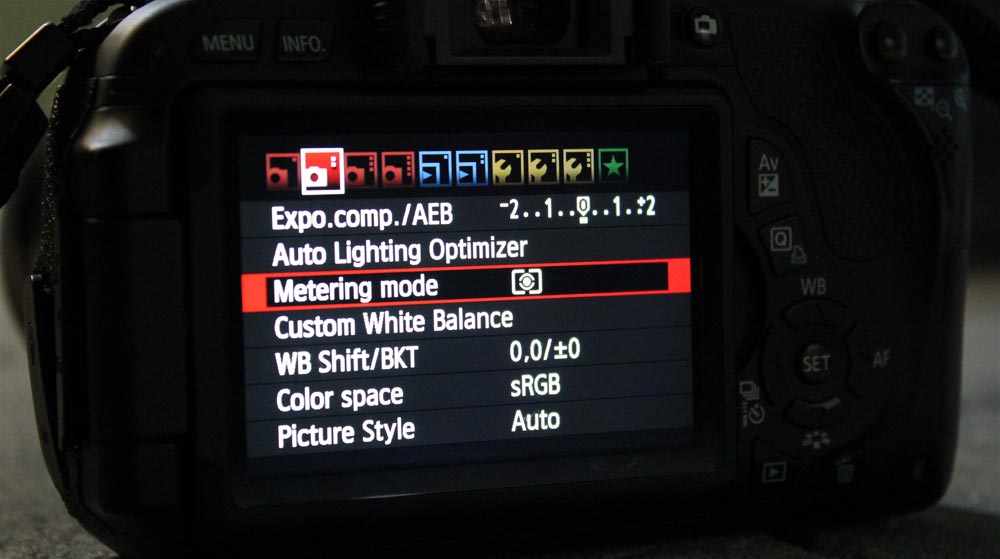
Finally, once inside the metering mode menu, use the left/right arrows to the right of the display screen again to choose between and select which mode you’d like to use. After that, push the “Set” button inside the four arrows to the right of the display screen and you should be ready to go.
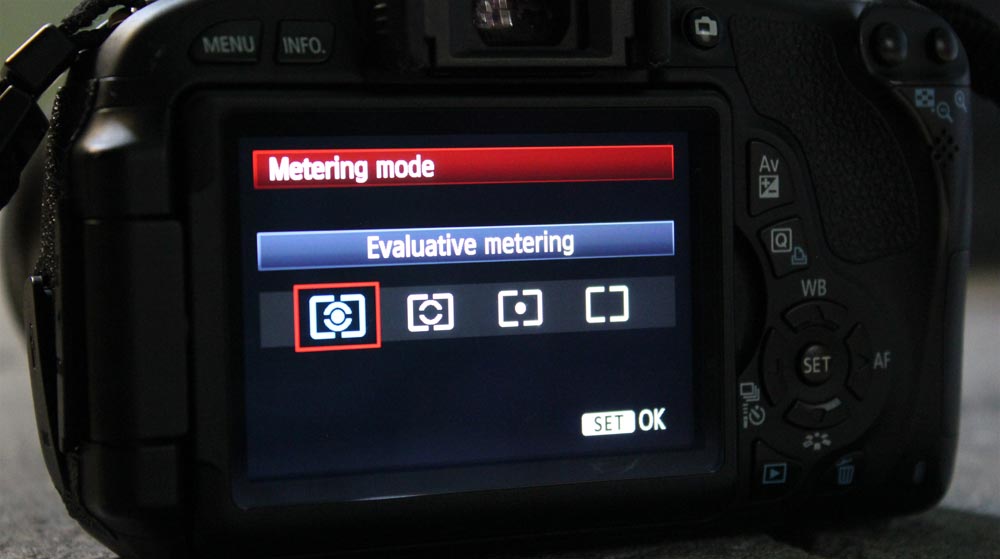
Please note that, as I mentioned above, other cameras have different ways to complete the same task. Some have physical metering mode buttons directly on the camera case, so be sure to read your manual.
Example Photographs Using Different Metering Modes
For this experiment, I went outside and looked for a subject that would be fairly isolated from its background, meaning, something that offered some contrast. I found what I was looking for in a small cluster of flowers. I sat on the ground and set the camera so the flowers were situated in the center of the picture area and I made sure the majority of the background consisted of sky. Even though it’s overcast out there, what I was able to recover shows some nice differentiation between the four metering modes.
The four photographs below were taken using four different metering modes; evaluative metering, partial metering, spot metering, and center-weighted average metering. And as you’ll see, the photo that was taken using spot metering came out, by far, the best. The photo taken that used the center-weighted average metering mode looks the darkest and least defined, while the evaluative and partial metering modes look consistent with each other and just average.


How to Set the Canon Rebel Metering Mode on a Canon Rebel T3i (EOS 600D)
Here’s a bonus for you. If you own the Canon Rebel T3i, you’re in luck. I’ll teach you how to change the metering settings for this camera.
Before I begin, I’d like to let you know that this post isn’t only good for the T3i (600D), it’s also good for the T2i, T4i, T5i, T6i, T7i and the T8i. Oh yeah, and probably the as of yet to be released T9i. The settings in the menu area for this particular setting are almost identical for all of the cameras.
I’ll get into how to change this setting below, but first I’d like to quickly discuss metering modes in general as an understanding of this concept may help out many a new photographer quite a bit. While the default metering mode will set nearly perfect exposure for a good majority of your photos, there may be times when you need to change the mode when you’re going for very specific goals. As I explain what each mode does, try to think of instances where one other than the default “Evaluative” mode may have helped you while photographing something. I know a few different modes surely would have helped me just a few weeks ago. I was taking some landscape photos of mountains in the distance that were framed by some trees in the foreground and the exposure values that the camera chose were awful. I had to use the exposure compensation feature a lot, just to see the scene in the rear LCD screen accurately. If I had changed metering modes, I wouldn’t have had to use the exposure compensation.
Let’s get into what each of the four available metering modes means. And for the uninitiated, “metering” is when the camera assesses a scene based on a chosen mode and applies an exposure value to that scene.
Evaluative: This metering mode divides your entire scene into a grid and applies an exposure value to each sector of that grid. Then, the camera averages all of those values into one overall value and that’s the exposure for the scene. This is the default setting that comes with your T3i and again, it’ll give you good results for most of your images.
Partial: This metering mode is perfect for scenes with wildly different lighting values in different areas of the scene. For instance, say someone is standing in a dark room near an open window on a sunny day. The sun coming through that window will be so bright that it will blow out the entire scene, causing the exposure to drop way down. You most likely won’t even be able to see the person standing in the room. Partial metering takes only the center 6%-9% of the entire frame and meters based on that area. So, if you point the center of the camera at the person standing in the room, that’s the light that the camera will measure, giving you much better results than the Evaluative mode would.
Spot: If you have a very detailed scene and you need to be absolutely sure that one part of your frame will be metered correctly, this is the mode you want to use. It’s the same exact thing as Partial, but it just measures a smaller area. They say that area comprises only 2%-4% of the entire scene. So this is a detailed mode indeed.
Center-Weighted Average: This metering mode is a combination of the three above. It takes account of the entire scene, but weights the results toward the center. I’m not sure you’ll see too much difference between this mode and the Evaluative one though.
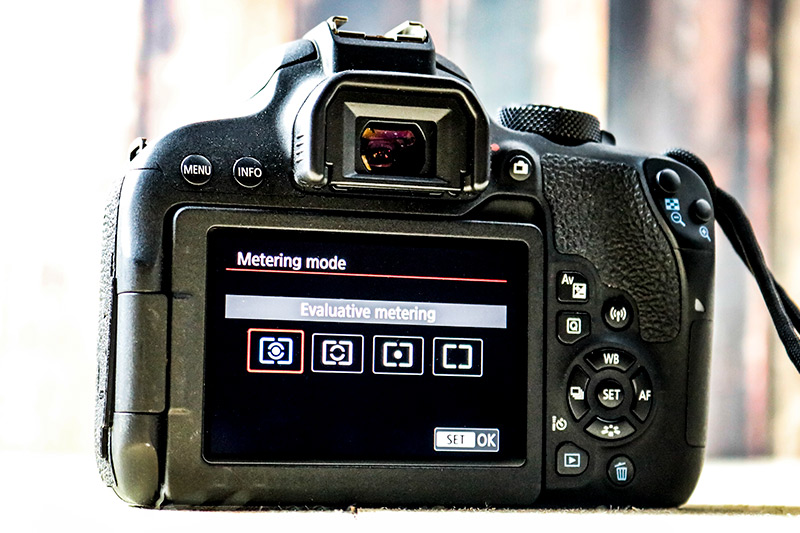
Now let’s move into how to set these modes. It’s super easy to do. On the Canon T3i, simply turn the camera on and then choose one of the advanced modes to shoot with, (aperture priority, shutter priority, manual mode). Then, press the Menu button on the back of the camera. From there, press the left or right arrow button on the rear of the camera until you reach the screen that has an option called Metering Mode. Once you see that, use the up or down arrow button to highlight it and then press the Set button to select it.
On the next screen, you should see four options. These are the ones I described above. To select one, use the right arrow button to highlight it and then the Set button to select it. Then, press the Menu button again (or half-press the shutter button) to exit the menu area. And that’s it. Go shoot and have fun!
I hope this post helped you learn something about metering modes when it comes to photography. If you have any questions or comments, please leave them below. If you’d like to check out some more photography tutorials, please take a look at my Photography category by following the link at the top of this page.

Leave a Reply