I recently interviewed an extraordinary photographer and when asked what his favorite part of being in his line of work was, he replied, “I get to show people how I perceive the world.” That sort of struck me because the only way people are going to see how you perceive the world is if you show them something effective. Effective, meaning you captured what you meant to capture in such a way as to demonstrate the emotion you had when you were taking the photo. It’s not easy being a good photographer. Capturing essence is an art very few have been successful at achieving. Luckily, the photographer I interviewed is quite talented and is one of those successes.
In this post, and the next few posts, I’m going to discuss some of the tried and true methods of capturing essence. If you learn and follow what great photographers have attempted to pass on through the years, every time you hold a camera, you’ll know you aren’t alone. Learn, practice, learn, and then practice some more. Hold on to what others teach. That’s what the greats do.
Rule of Thirds
If you’ve ever taken any courses in photography or art, you may have heard of The Rule of Thirds. It’s not a difficult concept to understand. I’ll explain what it is below.
The rule of thirds, most simply put, is a guide that helps a photographer position important elements in his or her photographs. This rule can be followed either while taking the photograph itself or during the photo editing process afterwards. It’s basically a tic-tac-toe layout that’s superimposed over a scene.
The rule of thirds helps create balance in a photo. Much like reading text, the human eye has a tendency to “read” photographs from specific start points. A start point might be one of the intersections of the superimposed grid or it may be along one of the lines itself. It’s important to remember, the start point is rarely the absolute center of the photo, so when lining up a shot, be sure to consider this principle.
The experts tell us that any rule in photography is meant as a guideline and ultimately meant to be broken, if there’s a good reason for it. If you take a look at this picture of an Iris below, you’ll see that while I somewhat followed the rule of thirds, I didn’t follow it precisely. I used my better judgement to position the flower so it looks best in its frame.
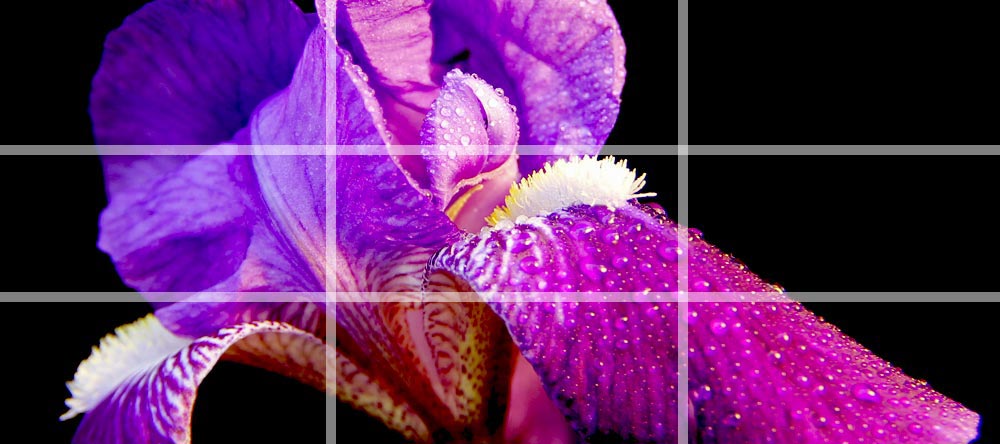
I think the most important takeaway is that I didn’t center the flower. While I could have centered a tall narrow flower for dramatic effect, leaving vacant area on both sides, the flower in the above photo didn’t suit that purpose.
So, to recap, the rule of thirds in photography is a tic-tac-toe styled guide to help photographers “offset” their shots. You may use either the intersecting areas of the lines or the lines themselves as those guides. The important thing to remember is that, except for very purposeful photographs, centering an item can look less than ideal.
Guiding the Viewer’s Eye
Another rule of photographic composition is called Leading Lines. You may have seen photos like this where the photographer has taken a photo of a long, winding river or road that begins at the bottom or the top of the photo and winds to the opposite side. When viewing these types of photos, your eye has little choice but to follow the lines in the picture. Other examples of leading lines may be “S” curves of cattle being herded, trees in a forest or cars in traffic. By creating lines that guide the eye, the photographer is effectively recreating the drama of the situation.
Photographers also use Repetitive Shapes to guide viewer’s eyes. Patterns are exceptional at leading a viewer’s eye to multiple points in the photo, seemingly all at once. If you’ve ever seen a photo with repeating patterns, you may recall your eyes jumping all over the place, but ultimately ending up where the photographer has intended.
Foreground & Background
A photo’s foreground and background play an integral and integrated role in any photograph. How the foreground relates to the background is just as important as what each element portrays. In order to capture an effective relationship, there are a few areas you need to keep in mind when taking photos:
Depth
In many photos, depth can accentuate the essence you’re attempting to capture. For instance, if you’re taking a photo of a biker in the foreground, perhaps positioning them or taking advantage of them riding on a long, straight or curvy road would enhance the understanding of the biker’s plight – distance. Picture a highway cutting through a desert. In the case of this example, you’d want to use a deep depth of field to capture the clarity of what’s behind the biker, because that’s as, if not more, important than the biker him or herself. To reduce the importance of the background and to focus primarily on the foreground, you’d want to use a shallower depth of field.
Connection
Similarly to the previous section, you can connect the foreground to the background of an image by utilizing leading lines in a setting. This would be done best in photos of roads, rivers or streams, etc…with a deep depth of field. Again, by using a shallow depth of field, you can keep the focus on what’s important to you at the time. On many occasions, when using leading line or leading objects in a photograph, the objects in a photo’s background can bring focus to the foreground. A good example of this would be the source of light shining on the object in the foreground.
Distraction
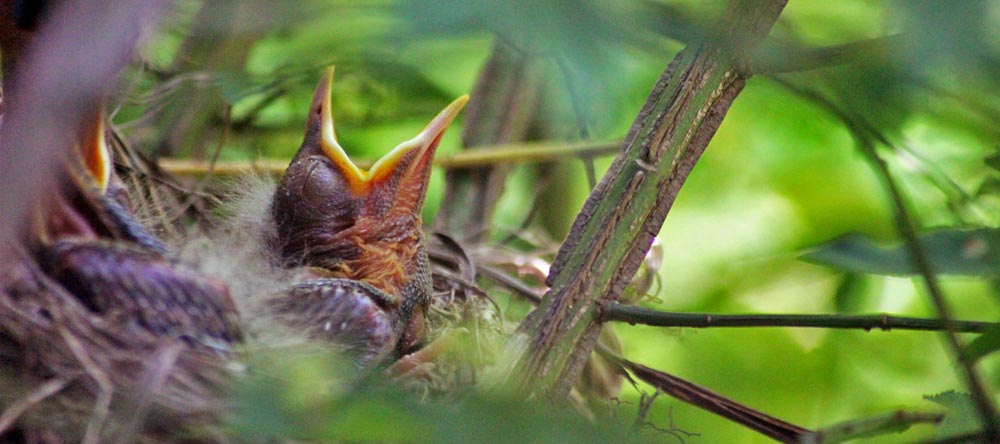
Many a photo has been ruined by carelessly “not” focusing on the camera’s depth of field. Let’s say that you wanted to take a picture of someone standing in front of a very complex shrub or small tree on a piece of land. If the branches of the tree are of similar size to the subject’s face, the face may actually get lost in the picture. By adjusting the depth of field to a shallower one, you can filters out those branches. The same is true if you’re focusing on something in the background and what’s in the foreground is in focus. Chances are, the viewer of the photo will never notice what the intent of the photo is. Using a more shallow depth of field can assist in this situation as well. For an example of this, please see the next photo:
Distance
Proximity to the primary object in a photo is important. If the photographer is too far away from the object or not zoomed in enough, that object may get lost in the background. By bringing the object in closer to the foreground, the photographer will keep it as the primary focus of the photograph. The same is true of the opposite. You wouldn’t want to have the primary object too close to the foreground, thereby drowning out the entire background. In this case, no relationship would exist.
Movement
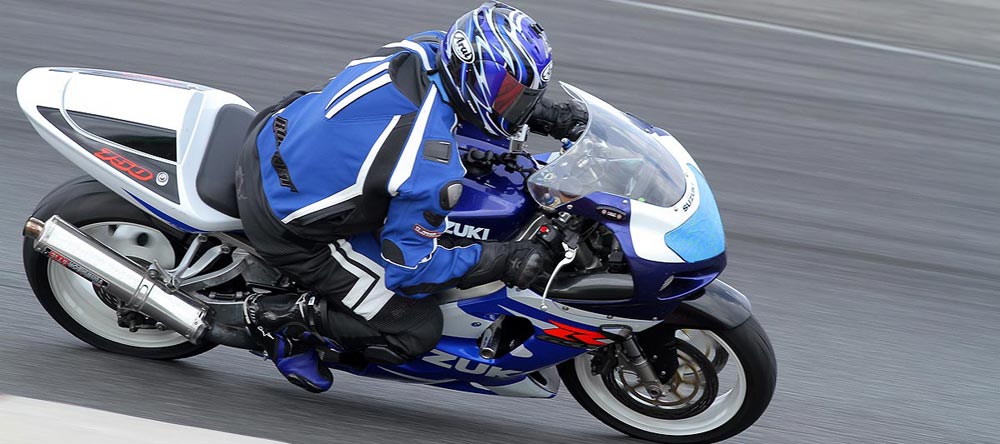
A photographer can add movement to a photo by tracking what’s in the foreground and using the proper settings on the camera (slower shutter speed) as to create a blur in the background, while keeping the object in the foreground in focus. Think about photos of race motorcycles. The background is almost always blurred as to create movement. The more blur, the faster the object. Take a look at the photo below to get a clearer picture of what I’m referring to.
Depth of Field
In the photography world, depth of field can be defined as the range of a photograph that is acceptably sharp, or clear, as opposed to the areas that are out of focus, or blurry. The cause of the difference between the varying depths of field between photographs depends on a few factors. The factor folks out there identify with most is the size of the lens’s aperture. If you refer back to one of my previous posts on DSLR camera settings, you’ll find a paragraph or two under the Aperture Priority section where I discussed aperture’s effect on depth of field. Basically, the smaller the aperture (higher the number), the greater the depth of field. The larger the aperture (smaller the number), the shallower the depth of field.
Other factors also influence depth of field, such as the type of camera you’re shooting with, as well as distance between the camera and the object it’s focusing on. A wide aperture that’s a good distance away from the subject will have less impact on depth of field than a wide aperture that’s closer to the subject.
So, how does all this effect the composition of a photograph? Well, by varying the depth of field, you can create nice, clear landscape shots and zoomed in, narrowly focused portraits. Different depths of field control drama in a photo.
I’m going to give two photos as examples of what I’m referring to. I took these pictures years ago and happen to still have them saved.
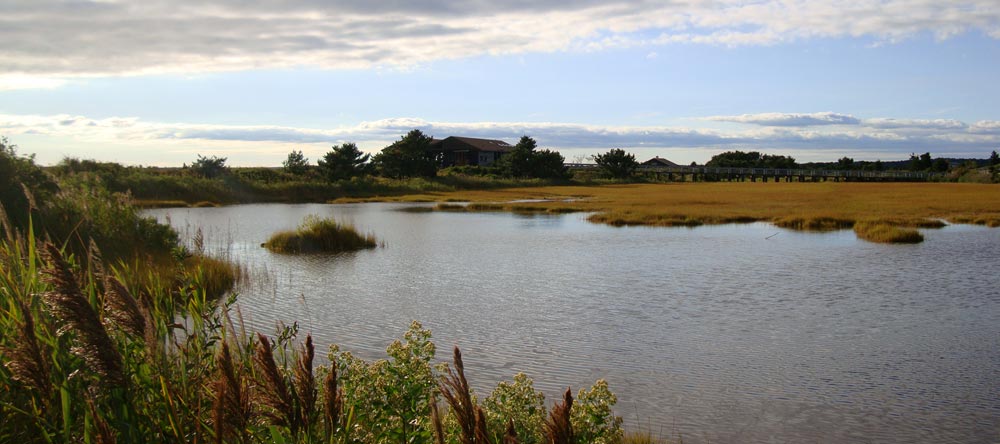
This first photo was taken on the Connecticut coastline. My intention was to capture clarity as far back as I could, while still keeping the foreground clear. I think I accomplished that by keeping the zoom lens short, hence having a small aperture. In this photo, there is a deep depth of field.
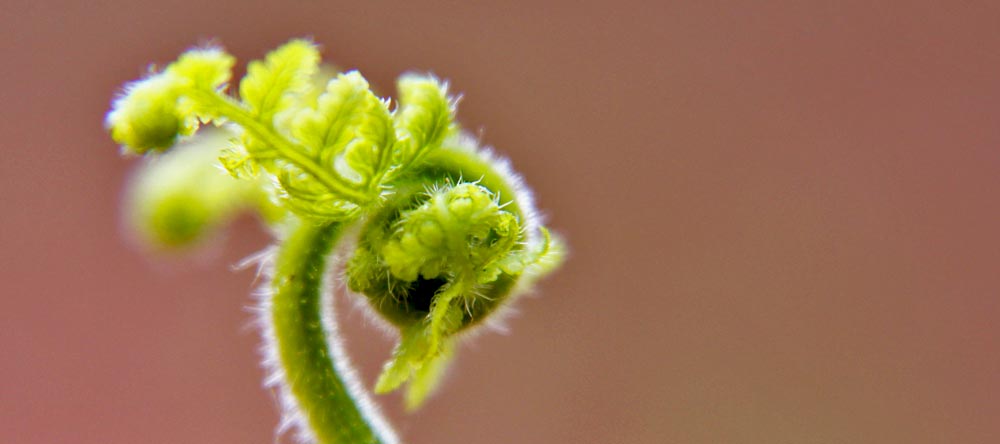
In this next photograph, my intention was to focus only on the leading edge of a young fern. Since there was distraction in the background, I made sure to set the camera to use a large aperture, which gave the photo a very shallow depth of field.
When trying to gauge the results of photos that uses varying depths of fields in their composition, remember that the zone of acceptable focus, or sharp area, extends one time in front of the point of focus and two times behind. This principle will help when it comes time to push the shutter release.
In my next few posts, I’m going to cover other elements that can help photographers capture photographs that truly inspire. If you’re interested in reading those posts, please take a look through the photography category at the top of this page. Also, if you have any comments or questions regarding this post, please leave them below.
Photography Composition Tip: Simplify Your Images
Have you ever viewed another photographer’s work and really liked it? I have. I have a jealous streak that runs through me and when I see something I like, I make it my business to figure out a way to do that same thing, just as good as the other person did it. This happens a lot when I view photography because there are so many great styles out there. I see a whole lot of them and want to make all of them my own. Unfortunately, I don’t have enough time to do that. Perhaps that’s a good thing.
I was looking around the other day when I stumbled across a page of very interesting photography. The photos were outstanding. All of the shots were more of the close up type and they focused on just one or two things. You see, for the longest time, when I came upon a scene, I was awed by it and wanted to capture the entire thing all at once. My goal was to allow my photography viewers to experience what I’ve just experienced. The only problem with this is that they’ll never be able to view the entire thing and even if they could, through my photography, they’d never get the feeling I got when I stood there in person. And since my widest camera lens is nowhere near wide enough to capture everything, I was left with photographs that captured half of what I wanted and that looked messy and cluttered. Looking back, I think I should have picked a priority target and photographed just that target. This is what the photographer I just referred to did. He chose the most interesting thing in the entire scene and captured the spirit of just that. I’m telling you, some of his photos were magical.
I guess I’m here today to suggest that you stop trying to take in everything with your photography and learn to prioritize your shots. Go for the feeling instead of the documentary. Picture being in Africa, taking photos of lions. Which do you think would evoke more of an emotion in your audience, a wide angle shot of as much land as possible or a very up close shot of a lion roaring. I think the up close shot would be better. That’s the one that would be shared among friends on the internet.
Think about standing on a tall mountaintop near an ocean beach. The waves are huge and the water is expansive. You see people walking around down on the beach and they look so small next to the water. Do you try to capture the entire scene or do you zoom in on just one or two of the people and try to capture their tiny bodies in contrast with the water? I’d suggest the second option. I’d say that contrast would evoke more of an emotion in your viewer.
My point with all this is to simplify your photography. When you look at your scene, try to pick out what matters. Think about things for a few moments. What would you want to see? Try to imagine how someone would feel if viewing your photos. Then, cut away everything else and zoom right in on those subjects that will make someone say, “Wow.”
Improve Your Photography by Changing Position
One of the toughest things to change in photography is position. For some reason, the human mind likes to stay put when it makes a decision. As much as we think we change, we stay the same more often then not. While that’s fine in many situations, when it comes to photography, that’s not the best course of action to undertake. Let me explain what I’m taking about.
A few weeks ago, I was out on a photo shoot. I had driven through the mountains and during the latter part of the day, I stopped at a beautiful spot. The mountains were in the background and a long wooden fence wandered down the hill I was standing on, towards those mountains. I set up my tripod and began snapping photos. The only problem was, on the other side of the fence was a distracting sidewalk that showed clearly in the photos I was capturing. It ran right along the fence.
I’ll be honest here when I say that I had some mental issues when it came to moving my tripod. I had already set it up in what I thought was the perfect position and to change that would somehow mean that I made a mistake. When I got over myself, I nudged the tripod towards the fence slightly and lowered it a bit and by doing this, I completely hid the sidewalk from view. The top board of the fence completely covered it.
The reason I’m writing this section is to encourage you to stay flexible with your photography. Pretend that it’s a dance and that you’ll need to move as much as possible while engaging in it. This is easy when you’re shooting handheld, but much more difficult when you’re using a tripod. Getting that set up perfectly takes time and to notice something that’s in the way at the last moment can be discouraging. Don’t be discouraged. Keep moving. Reposition the tripod if necessary and keep your eye on the shot you want. Look for object that you do want in your shot to hide those you don’t.
Please let me know if you have any further suggestions for this type of thing. We could all use as many photography tips as possible. Thanks!

Leave a Reply