Swapping, lifting and inserting, rearranging – they all mean the same thing when it comes to moving clips around in the timeline in the Cut page of Resolve. Basically, this tutorial is about how to move a clip in the timeline from one position to another. I’m sure you can imagine why someone might want to do this. They’ve already dragged their necessary clips to the timeline, but as they begin working, they realize the clips are out of order. Time for some rearranging, I’d say. Luckily, the process is quick and easy. It just involves a bit of clicking and dragging.
My Multi-Colored Clips
For this exercise, I’ve placed three short clips on the timeline and I’ve assigned new colors to two of them. Now I’ve got blue, green, and pink clips. This was simply to make what I’m about to do easier to see.
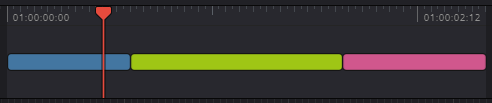
As you can see, I’ve only included a graphic from the top timeline in the Cut page. That’s because all the clicking and dragging I’ll be doing will be on this timeline. Having this condensed timeline is one of the benefits of working in the Cut page. No other page in DaVinci Resolve has a feature quite like this one.
Moving a Single Clip to a New Position on the Timeline
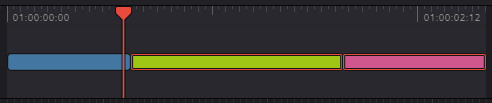
My goal is to move the pink clip so it sits in between the blue and green ones. To do this, I’ll simply click on the pink clip and drag it to the left, directly to the position between both clips. Once there, I’ll continue to keep my mouse pointer pressed until I see the clip appear in a greyed out form. This is what It’ll look like.

Mind you, I dragged the pink clip directly to the left, through the green clip. If I were to click and drag upward, so the pink clip moved above the green clip and then I left go of my mouse pointer without positioning the pink clip correctly, I’d actually be moving the pink clip to the incorrect spot. Something like this:
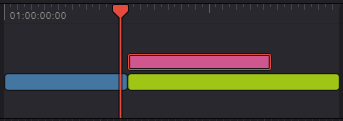
It’s important to click and drag to the correct location.
Moving Multiple Clips to New Positions on the Timeline
If you’d like to move two or more clips to new locations on the timeline, it’s just as easy as the process above. All you need to do is use the Ctrl key to select random clips and the Shift key to select inline clips, just like you’d select images in a folder on your computer. In the example below, I’ll select the pink and green clips using either the Ctrl or Shift keys (in this case, it doesn’t matter which I use). Notice how both clips are highlighted (outlined) in red.
Next, I’ll click and drag both clips to the left, so they sit before the blue clip.

And that’s all there is to it. If you have any questions regarding repositioning either a single clip or multiple clips on the timeline in the Cut page of Resolve, please ask in the comment section below. Thanks!
If you’d like to learn more, click through for all of my free DaVinci Resolve Tutorials.
Leave a Reply