I’d like to take a moment to introduce one of the most important panels in all of DaVinci Resolve. It’s called the Inspector Panel (or Inspector Window or simply Inspector) and it’ll quickly become one of your best friends while editing video. This panel is available in the Media, Cut, Edit, Fusion, and Fairlight pages. In the most basic sense, the Inspector controls the properties of the elements contained in a timeline. While a video clip can sit in the timeline and play video, the Inspector can alter the settings of the video clip. It can change the zoom, position, rotation angle, anchor point, pitch, yaw, speed, stabilization, and so much more. Because of all these controls, the Inspector is the go to tool for video editors worldwide.
In this tutorial, I’d simply like to introduce you to the Inspector. I’ll use the Inspector in the Cut page as my example, but much of what I share in this post will be true for this panel across the other pages in Resolve.
How to Open the Inspector Panel in Resolve
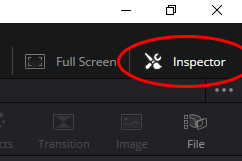
You can actually open the Inspector panel, even if there are no clips in the timeline. The problem is, if you do that, the panel will be blank and will show a message that says, Nothing to Inspect. Since that’s not what we want, at least one clip needs to be in the timeline. For this example, I’ve added three clips to the timeline. To open the Inspector, I’ll click to select one of the clips in the timeline and then I’ll head to the upper right corner of Resolve and I’ll click the Inspector link.
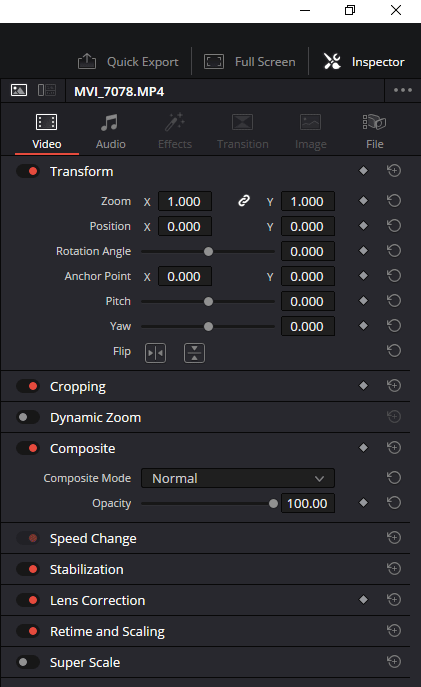
After I click to open the Inspector, the panel will populate with all types of properties and settings. It’s important to remember that each group of settings inside of the Inspector belong to the clip in the timeline that’s selected. If you change the settings for one clip, only that one clip will be affected.
To sum up, here are the fast instructions for opening the Inspector panel:
- Drag some clips to the timeline.
- Select the clip you’d like to “inspect” in the Inspector panel.
- Click the Inspector link in the upper right corner of Resolve.
- Inside the Inspector panel, click the section that contains the settings you’d like to change.
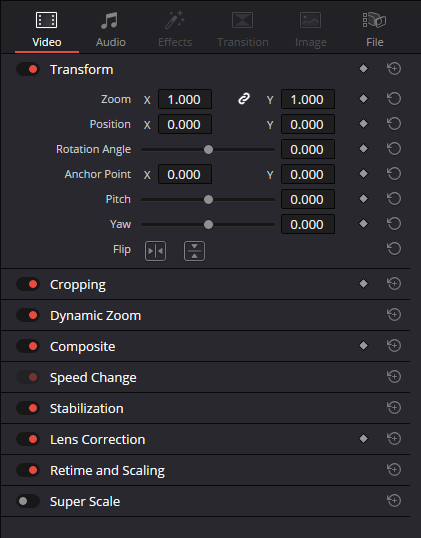
In future tutorials, I’ll be addressing all of the settings sections within this panel. For now, the list of settings in the Cut page Inspector Video section are:
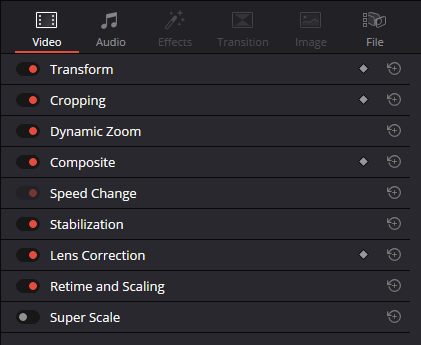
- Transform
- Cropping
- Dynamic Zoom
- Composite
- Speed Change
- Stabilization
- Lens Correction
- Retime and Scaling
- Super Scale
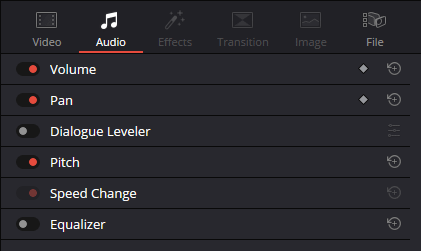
In the Audio section of the Inspector, there are more available settings. They are:
- Volume
- Pan
- Dialogue Leveler
- Pitch
- Speed Change
- Equalizer
Inspector Tabs
At the top of the Inspector panel are tabs.

Certain tabs are available for certain pages, depending on what assets or features are currently in the timeline. For instance, in the Cut page for a project I’m currently working on, only the Video, Audio, and File tabs are able to be accessed. The same is true for the Edit page. If I were to add effects, the Effects tab would turn light grey, meaning it’s available for use. The same is true for Transitions, etc…
Activating Each Property
As I mentioned above, I’ll be covering each property in detail in future tutorials. For now though, I wanted to mention that to activate each property (turn it on and make it useful), you’ll need to click the gray dot that’s to the left of its name. If the dot is already red, that means the property is activated and ready to use. To expand the options, simply click the name of the property. For instance, the Transform option is currently collapsed (two graphics above). To expand it, I’ll click the name Transform.
After the property is expanded, the settings are exposed and are able to be changed.
Resetting a Property
The wonderful aspect of this panel is that no matter how many changes to a clip you make, you can always easily reset what you’ve done. This is great because many of us do lots of experimentation and get ourselves in trouble. It’s nice to have the option of resetting just one property or everything inside a section.
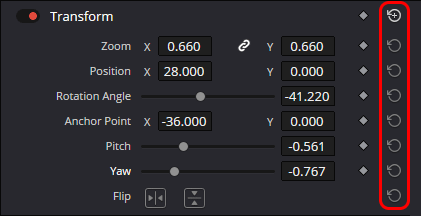
If you take a look at the circular arrows in the graphic above, you’ll see two types. The top arrow with a + sign at its center, if clicked, will reset everything in the section. The arrows below belong to the specific property it’s in line with. As you can see, I’ve made many changes to this clip. The changes I made were wild and weird. To reset everything, I’ll click the top arrow. That will allow me to start over.
The Inspector panel is huge and it controls many aspects of the projects that are worked on inside of DaVinci Resolve. You’ll see lots of references to this panel in future tutorials, but if you have any questions regarding it now, please ask in the comment section below. Thanks!
If you’d like to learn more, click through for all of my free DaVinci Resolve Tutorials.
Leave a Reply