As you work in Resolve and as you add more and more transitions to clips, you’ll find that you really only use two or three transitions overall. So basically, all those potential transitions you see in the Transitions panel won’t be used. Once you find those two or three you use most, you can add them as favorites in the Favorites panel (as shown in my previous post). What’s very cool is that Resolve actually offers a default Dissolve transition in a toolbar for quick access and it also allows us to set a standard transition that’s easily accessed in the toolbar as well. Because so few transitions are used overall, it’s important to access the ones we do use as quickly as possible.
In this tutorial, I’ll introduce the default and standard transition buttons in the toolbar, explain how to add the standard transition in three different locations of the timeline, and show you how to set your own standard transition to be accessed in the toolbar.
Standard & Default Transition Buttons
I’m currently working on a project with three clips in the timeline. I have the Transitions panel in the Cut page open and I’d like to show you where the standard and default transition buttons are located. But first, allow me to explain what these two things actually are. The standard transition is a transition you can assign to a button for regular use. You’re able to change this transition at any time. You can easily choose which one you’d like to assign to this button with just a few clicks. I’ll explain how to do that below. Conversely, the default transition is one that Resolve has assigned to a button that the user can’t change. This is always the Dissolve transition. It sits to the right of the standard transition.
Directly below the Transition panel is a toolbar with a few buttons located inside of it.
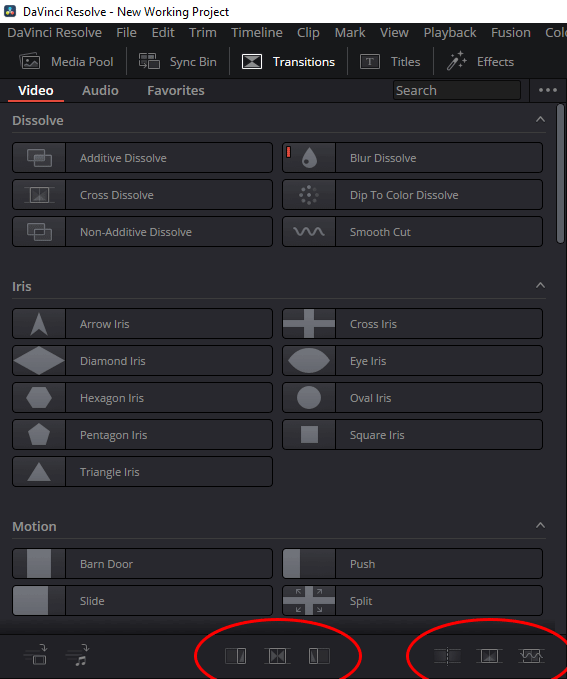
In the above graphic, you’ll see two red circles. Inside of the red circle to the left, there are three buttons. From left to right, they are: Apply to End of Clip, Apply to Edit Point, and Apply to Start of Clip. These three buttons belong to the standard transition, which is the one that’s editable; the one we can change to any transition any time we want. Inside the red circle to the right are the default Dissolve transition buttons. From left to right, they are: Cut, Dissolve, and Smooth Cut.
Adding & Removing the Default Transition to & From the Timeline
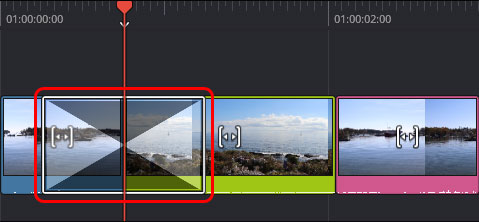
To add the default Dissolve transition to the timeline, simply move the timeline so the playhead is near the clip breakpoint. Then, click the Dissolve button in the toolbar. It’s inside the red circle above. After doing that, the timeline should look like this:
To remove the transition from the timeline, click the Cut button in the same circle. Alternately, you can click on the transition in the timeline to select it and then press the Delete key on your keyboard.
Adding the Standard Transition to Three Parts of a Clip in the Timeline
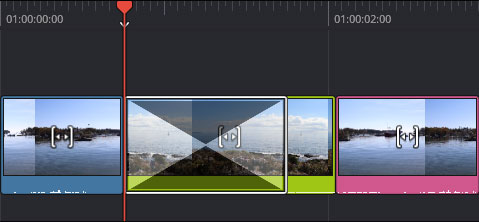
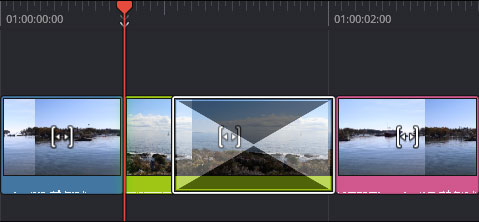
The buttons in the left circle above pretty much explain it all. The left button, if clicked, adds the standard transition to the beginning of a clip. The center button adds the transition to the breakpoint between two clips, and the right button adds the transition to the ending of a clip. I’ve already shown you in the graphic above what a transition looks like at the breakpoint, so I’ll now show you below what one looks like at the beginning and ending of a clip.
To remove these transitions, again, click to select in the timeline and then press Delete on your keyboard.
How to Set a Custom Standard Transition
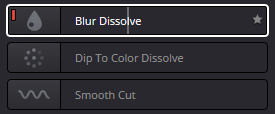
Current standard transitions are marked with a small red tic inside of the transition button in the Transitions panel. Currently, I’ve got the Blur Dissolve transition set as the standard. Take a look.
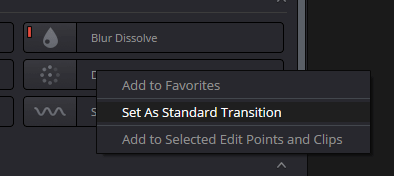
To set another transition as the standard, simply right-click on any transition in the panel and select the Set as Standard Transition option in the menu that appears. That will change the current one to the new one. After that, when you click any of the standard transition buttons in the toolbar below, the new transition will be applied to the timeline.
And that’s a wrap. If you’ve got any questions regarding default or standard transitions in DaVinci Resolve, please ask in the comment section below. Thanks!
If you’d like to learn more, click through for all of my free DaVinci Resolve Tutorials.
Leave a Reply