Once you’re finished working on your project and would like to export it, you have a few options. You can either use the Deliver page, which I’ll cover in a future tutorial, or you can take advantage of the Quick Export feature available in the Cut, Edit, and Color pages. In this tutorial, I’ll show you where the Quick Export option can be found and how to use a few of its more popular features.
How to Quick Export a Video in Resolve
I’ve got a very simple demo project open in my install of DaVinci Resolve. For this tutorial, I’ll go through the steps of using the Quick Export feature. To start, I’ll head to the Quick Export link in the upper right corner of the workspace in the Cut page.

After I click that, the Quick Export dialog box will appear. This is what it looks like:
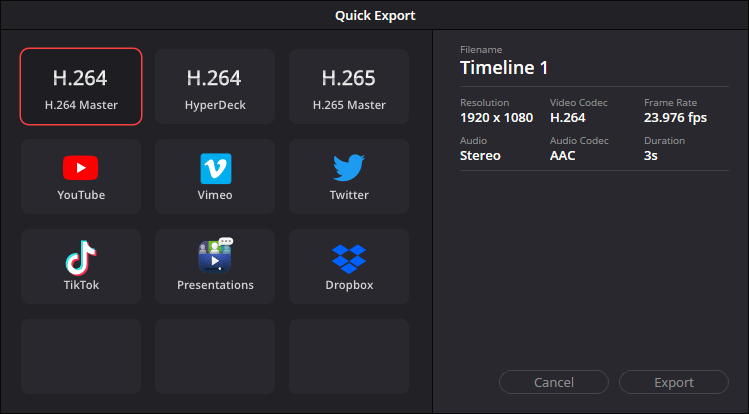
In the Quick Export dialog box, you’ll notice a few options. On the left side of the dialog, there are preset buttons. If you click on each preset button, you’ll notice its properties on the right side change. Most of these presets use the same settings, so you might not notice much difference while clicking around. The first three presets (the top row) save the file out as a .MOV file. If you click the YouTube preset, the file will save as a .MP4. The same is true for the Twitter option. You’ll also notice that the setting values are fixed, meaning they aren’t able to be changed, which is fine because this is the quick export option, not the fully customizable one.
Also, each of these presets can save your video file locally on your computer and some of them can save to your computer as well as upload to a video service.
How to Render a Video in Resolve
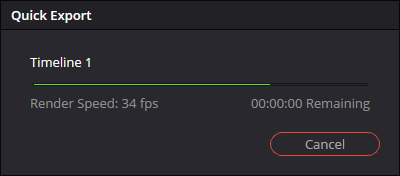
To render your video, click the proper preset and then click the Export button with your mouse pointer. When finished, you should see the Choose Export Path dialog box.

Locate your desired save location, name the file, and then click the Save button. Your video will export and save on your computer in the location of your choosing.
How to Export & Upload a Video to YouTube From Resolve
DaVinci Resolve has a handy feature that allows for not only exporting (rendering) a video, but uploading it to an internet video account as well. So yes, if you take advantage of this feature, you can save a file on your computer and simultaneously upload the file to YouTube or some other website. Here’s how you do it.
PS – Currently, you’re able to upload to Blackmagic Cloud, YouTube, Vimeo, Twitter, TikTok, and Dropbox, straight from Resolve.
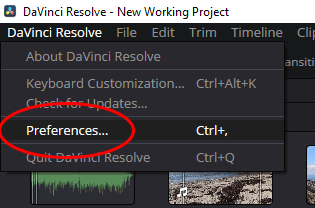
To start, you’ll first need to log into whichever account it is you’d like to upload to. Head to the DaVinci Resolve > Preferences menu item in the upper left corner of the workspace.
Then, click on the System link at the top of the dialog and the Internet Accounts link on the left side. This will open the section where the login features reside.
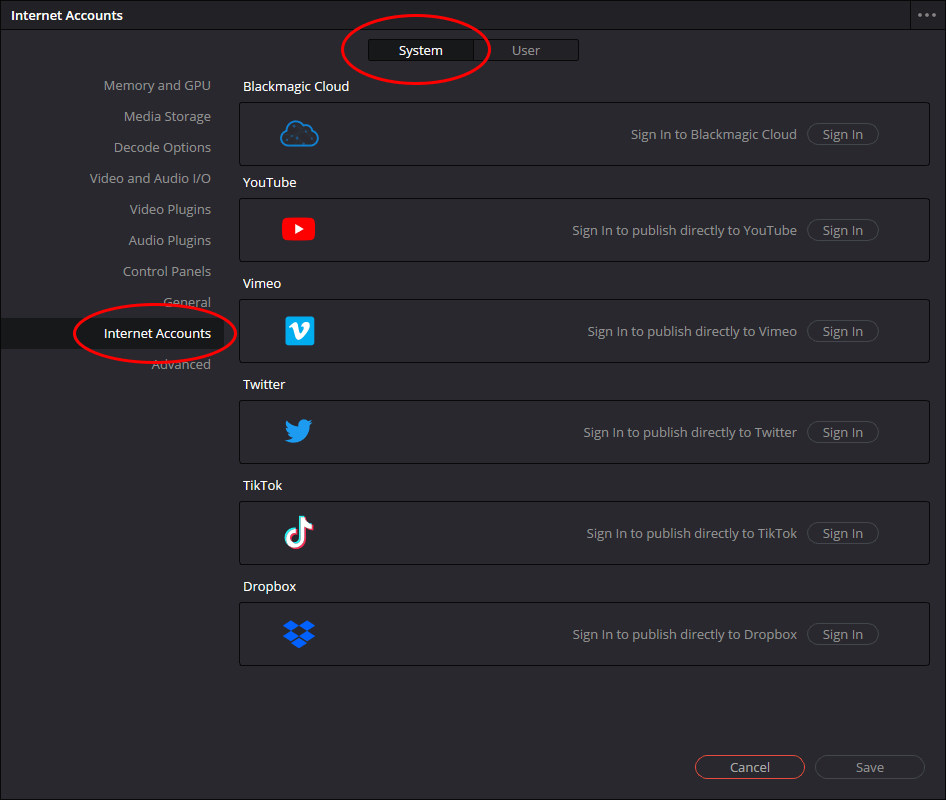
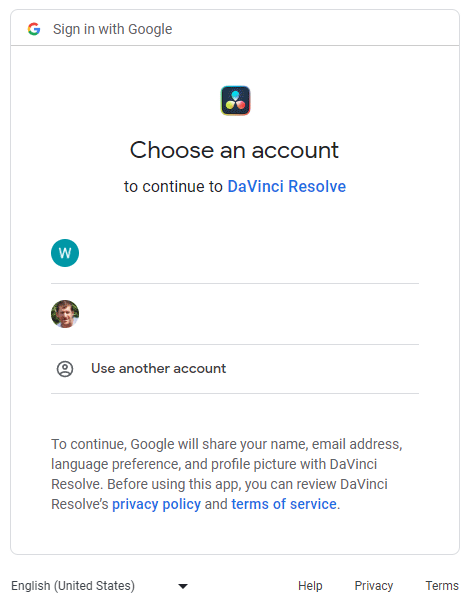
To sign in to an account, click the Sign In button to the right of that account. I just clicked the button for YouTube and this is what appears in my browser:
Choose the account you’d like to upload to and then follow the instructions from there.
NOTE: On the next sign-in screen, you’ll see a check box that says: Manage your YouTube videos. Be sure this box is checked. Very important.
When finished signing in to the account, click the Save button in the Internet Accounts dialog and click the Quick Export button again like is required for the regular quick export. This time, click the internet account button that represents the website you would like to upload to. In this case, it’s YouTube, so that’s the button that should be clicked. Be sure to check the Upload Directly box and fill in the following fields. When finished, click the Export button. Again, you’ll be asked where you’d like to save the file to on your computer. Decide on a place and press Save. Once you do all this, you’ll see the video file export and also upload to YouTube. Once complete, you can check your YouTube channel to see that it’s been uploaded. If it hasn’t for some reason, you can always take care of that manually like you normally would. And that’s all there is to it.
If you have any questions regarding how to export or render a video in DaVinci Resolve or upload a video to YouTube (or others) from DaVinci Resolve, please ask in the comment section below. Thanks!
If you’d like to learn more, click through for all of my free DaVinci Resolve Tutorials.
Leave a Reply