One of the coolest features of any video editing application is the dynamic zoom. You’ve seen this effect all over the place. Picture aerial video captured by a drone. The video was taken from a stationary location. Let’s say the drone was simply hovering 100 feet above a road or a bridge or a neighborhood. While the footage was captured from a stationary location, that same video can be edited to appear as if the drone was rising or descending, traveling side to side, or both. Basically, inside of most video editors, there’s a feature that allows us to make it appear as if the camera was moving, when it really wasn’t. And in this tutorial, I’ll explain how to use the feature as well as what it looks like when implemented.
The Current Workspace
As you can see from the below screenshot, I’m in the Cut page in Resolve and I’ve got one clip in the timeline and that clip is showing in the monitor. The clip is basic; it’s a drone shot from above some crashing waves. The drone is stationary and doesn’t move at all. This clip is just about 20 seconds long.

Accessing the Dynamic Zoom Tool
To start off, I’ll click the Tools button below the monitor and then I’ll click the Dynamic Zoom button. I’ve circled both of these buttons in red below.
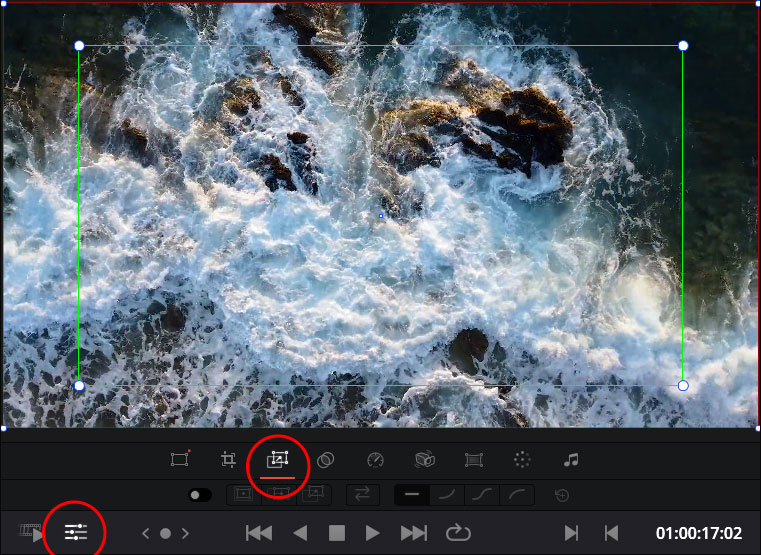
Please note that this tool is turned off by default as indicated by the grey button below the monitor as well as the grey button in the Inspector.

There’s a reason this tool is kept off by default. If it were on, it would be running. It’s in a sort of default state, which is a moving state. So if you don’t want your video clip to be zooming in an unexpected way, make sure to keep this button in the off position. But if you’d like to use it like I am in this demonstration, by all means, turn the tool on by clicking that grey button.
Setting the Dynamic Zoom Tool
If you look a few graphics above, you’ll see the image of the crashing waves in the monitor with a green box and a red box superimposed over those waves. The way it works is like this; both the green box and red box are able to be resized. When this tool is turned on, the video will start off being the size and position of the green box and will transition to the size and position of the red box. In this case, the green box (the zoomed in state) is smaller than the red box, so the clip will start smaller and then grow in size (to the zoomed out state). It’s pretty simple, really. To make it even more clear, when using this tool, the video will always start with the green and end with the red. That’s an easy way to remember it. Green light – go. Red light – stop.
Panning & Easing
Below the monitor is the Dynamic Zoom toolbar. Take a look:

Moving from left to right, I’ll detail what each button is. On/Off, Zoom Preset, Pan Preset, Angle Preset, Swap, Linear, Ease In, Ease In and Out, Ease Out, and Reset All. You’ll notice a few preset words in those descriptions. If you click a preset button, you’ll get exactly what the button says. Remember though, these are just presets. Each tool is completely customizable. For instance, instead of the zoom preset offering just a slight zoom, you can resize either/both red and green box to make the zoom much more dramatic. You can also change angles, pan directions, and make it so you get an angled zoom. The sky is really the limit here. My suggestion would be to experiment with each button to see what it does. You can also play with the ease buttons. These control the speed at which the transitions take place and when those speeds change, if at all. While experimenting, click a corner to resize a box and click and drag a box to move it. If you’d like to reverse what occurs, simply click the swap button. When ready to watch the video, press the Play button below the monitor.
The Motion Path
When you choose either the pan or angle preset, you’ll notice a red line traveling from the green box to the red. This line is called the motion path. This is the path upon which the transition will occur.
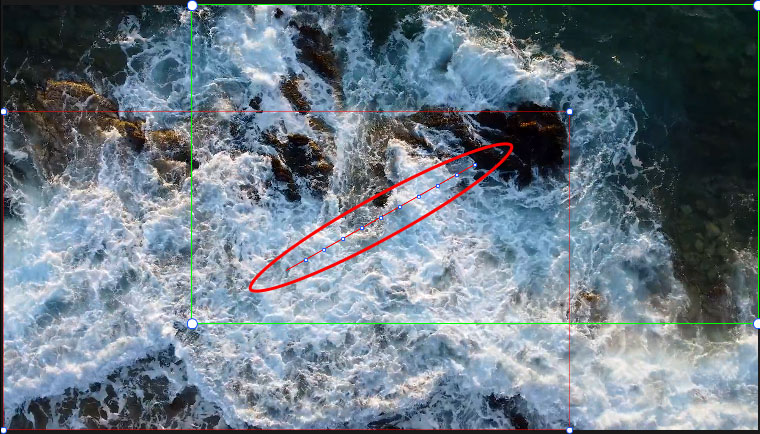
Along the line, you’ll notice small dots. These dots indicate the speed at which the transition will take place. Dots that are closer together indicate faster speeds and dots that are farther apart indicate slower speeds. You can click the ease buttons to see how those dots change with the various speed settings.
Dynamic Zoom Demonstration
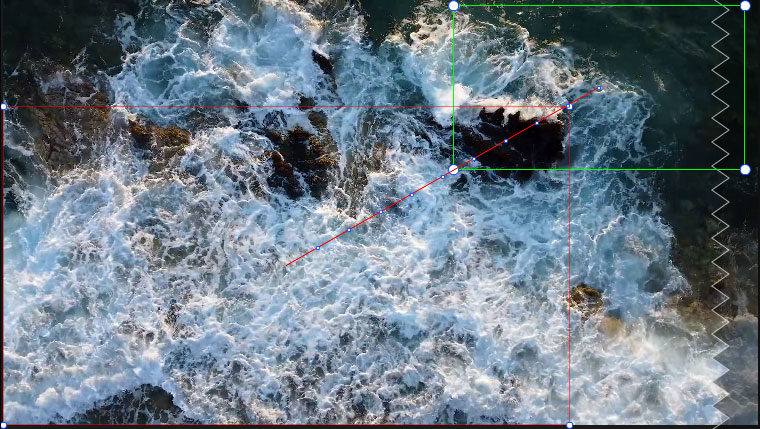
Now that we know what all the buttons mean and what the options can do, I’ll show you a sample demonstration video. To create this video, all I did was click the Angle Preset button and then resize the green box so it was smaller than it was originally. Remember, there was no movement in the original video. The drone was merely hovering in a fixed position above the ocean. In the video, notice how it appears as if the drone was closer to the water and as it rose up, it traveled to the left.
This is what the boxes look like in the monitor of DaVinci Resolve.
This is the sample video.
As you watch this video, you’ll realize why videographers like to capture video in 4K and 5K. The high resolution while editing this type of video is necessary.
If you have any questions regarding how to use the Dynamic Zoom feature in the Cut page in DaVinci Resolve, please ask in the comment section below. Thanks!
If you’d like to learn more, click through for all of my free DaVinci Resolve Tutorials.
Leave a Reply