Rarely does someone start recording video at the perfect time and then stop recording at the perfect time. More often what happens is that tons of video is taken from multiple cameras and multiple angles and then all that footage gets cut up in a video editing program during post-processing. Capturing too much footage has never been a bad thing. Perhaps it’s troublesome and time consuming for the person who’s editing it because he or she has to wade through all that footage, but as for making sure you captured everything that matters, more is always better.
The questions are, how can someone quickly sift through all that extra footage? Is there a way to trim down each clip quickly and easily so the footage becomes manageable and usable in the timeline? Can this be done in DaVinci Resolve? The answers to these questions are easily, yes, and yes. One of the most rudimentary methods for cutting footage from video clips is to use what’s referred to as in and out points. It’s a super easy method and I’ll teach you how to do it down below.
In & Out Points
What are in and out points? I’ll explain how they work here and then I’ll show how they work below. Let’s say you captured one minute of video footage on your camera. You’ve imported the footage to the Cut page in DaVinci Resolve and after previewing the footage, you realize that only about 40 seconds in the middle of the clip really matter. By adding an in point to the 10 second mark and an out point to the 50 second mark of the clip, you can essentially cut away the beginning 10 seconds and the ending 10 seconds, leaving only the 40 seconds in the center to add to the timeline. It’s super simple and magnificently helpful. Here’s how we do it.
Adding In & Out Points to a Video Clip
Take a look at the clip in the monitor below. Notice how I circled the in and out points in red. The point to the left is the in point (the point where the clip begins) and the point to the right is the out point (the point where the clip ends).
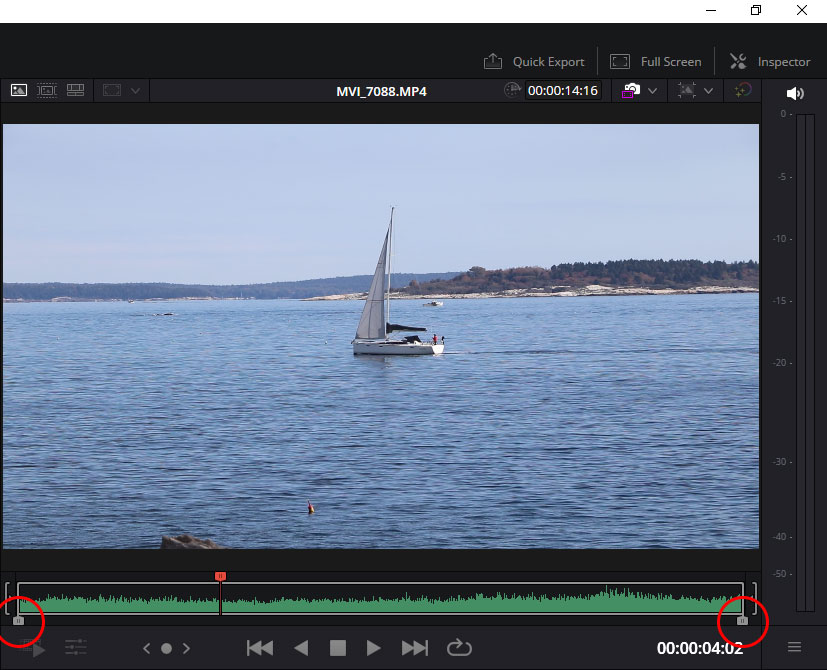
Also notice how the video takes up the entirety of the monitor. If I were to click and drag the in point to the right and the out point to the left to shorten the clip, I can trim off the beginning and the end. The reasoning for this varies; perhaps the clip was too long and the middle is all I need. Perhaps there was some sort of obstruction in the beginning and end. Who knows. All I know is that I need to trim the clip.
Now take a look at the next clip where I dragged the in and out points.
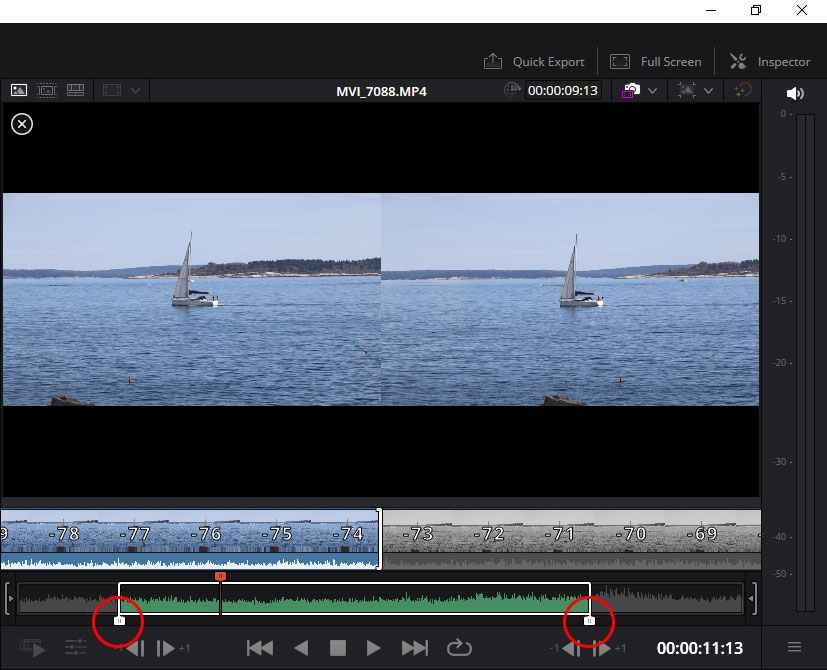
You can see how the clip is now shortened. At this point, only the middle of the clip will play in the timeline after I drag it there (next tutorial). You can see the new positions of the beginning and the end of the clip and you can also see a split screen for the video. The left part of the split screen is a screenshot of the beginning of the clip and the right is a screenshot of the end. This split screen is very helpful when trying to determine where to place the points (clicking and dragging).
PRO TIP: There are some helpful keyboard shortcuts for adding in and out points. If you move the preview playhead to the place you’d like to set the in point and then press the “i” key on your keyboard, the in point will automatically appear where the playhead is set. Then, if you move the playhead to where you’d like to see the out point and press the “o” key on your keyboard, the out point will appear where the playhead is set. Just remember, “i” is for in and “o” is for out.
Playing Back the Preview
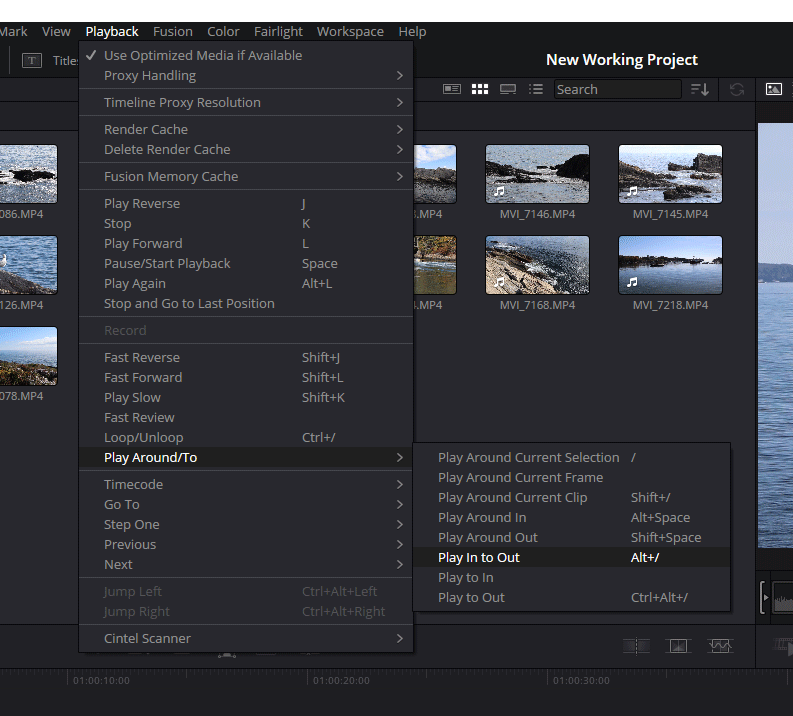
Now that I’ve moved the in and out points of the clip, I’d like to play the preview to see if what I’ve done is desirable. To play back the entire clip, I can press the spacebar or click on the Play button in the preview window. The problem with doing this is that those two options will play the clip back in its entirety. If I wanted only the shortened version of the clip to play back (the area between the two points), I’d have to visit the top menu and select Playback > Play Around/To > Play In to Out. The keyboard shortcut for this command is Alt + /.
If I wanted to play back over and over automatically, I’d click the Loop button under the play controls in the monitor.

One last thing. After I move the in and out points to shorten the clip, if I look over at its thumbnail in the Media Pool, I’ll see two vertical lines. Those lines represent the new playable area.

And that’s it! If you have any questions regarding how to set the in and out points of a video clip in the Cut page of DaVinci Resolve, please ask down below. Thanks!
If you’d like to learn more, click through for all of my free DaVinci Resolve Tutorials.
Leave a Reply