I managed to get my hands on an awesome book of knots and I intend to show you how to tie every last one – right here. I’ll start off with the easy ones and then move onto the more complex of the bunch. The book says that there are over 200 knot tying techniques, but I’m not sure there are that many actual knots contained within. After I’m finished with this book. I’ll purchase the arborist knot tying book as well. That one not only shows instructions for trying the knot in question, it also explains when you’d want to use it, which is super helpful. Let’s get going.
PS – If you’d like to see a larger version of a photo, right-click on it an open the image in a new browser tab.
Table of Contents
Click the link of the knot you’d like to see.
Simple, Overhand, or Thumb Knot
Overhand Knot with Drawloop (Slipped Half Hitch)
Two Strand Overhand Knot
Double Overhand Knot
Triple Overhand Knot
Strangle Knot
Single Hitch
Two Half Hitches
Round Turn & Two Half Hitches
Overhand Loop Knot & Half Hitch
Overhand Loop
Double Overhand Loop
Surgeon’s Loop
Simple Noose
Scaffold Knot
Multiple Scaffold Knot
Overhand Bend
Fisherman’s Knot
Double & Triple Fisherman’s Knot
Flemish Bend
Common Whipping
West Country Whipping
Double Figure-of-Eight Bend
Zeppelin Bend
Adjustable Bend
Hunter’s Bend
Surgeon’s Knot
Harness Bend
Klemheist Knot
Simple, Overhand, or Thumb Knot
This is the knot that ties itself. It’s the one you use when tying the ends of thread that you just guided through the eye of a needle. If you had a rope in your pocket and pulled it out, only to find that it was tangled up, this is the knot it would have found itself in. It’s a stopper knot and the most simple of stoppers at that. If you were to thread a rope through a hole and if you wanted that rope to stop at a certain point, just tie this knot and it’ll be stopped. I’ll only show one or two photos for this knot because it’s just so easy to tie. You really don’t need any further instructions.
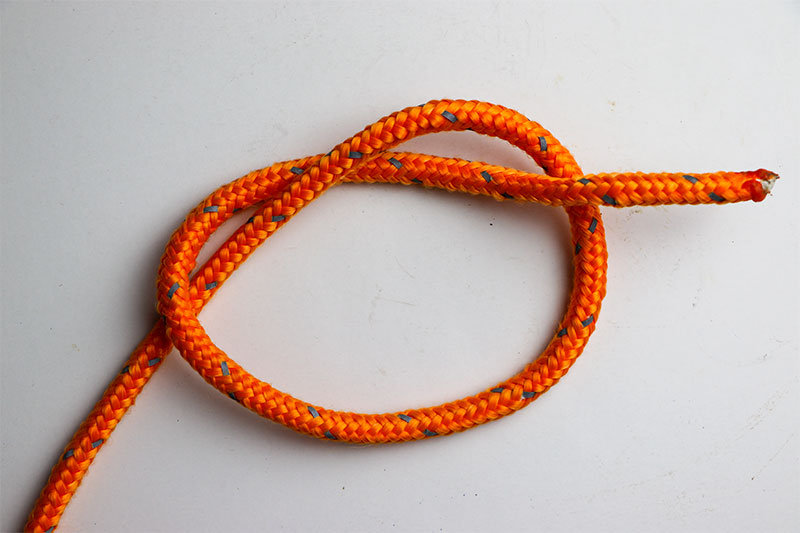
In this case, we’ve got a working end and a standing end of rope. The working end is exactly what we think it would be. It’s the short end that we’re looping around the rest of the rope to create the knot. The standing end is the long end of the rope that’s sitting on the table.
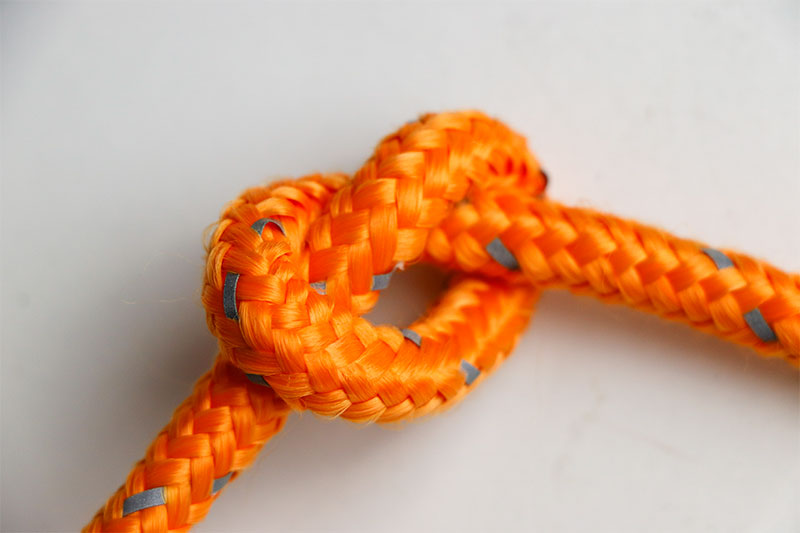
To make the knot, create a loop with the rope and then snake the working end through the loop. Take a look at the photos for clarification.
To tighten the knot, all you need to do is pull the two ends away from one another. Continue to pull until you can’t anymore. That’s going to make for a tight knot.
While the knot in my picture isn’t all too tight, if using this one as a stopper and a tremendous amount of pressure is put on it, it’ll almost turn to stone. Don’t expect this knot to be untied very easily. It’s a tough one.
Overhand Knot with Drawloop (Slipped Half Hitch)
Today we’ve got an extremely handy knot. It’s not one that the knot people talk about much, but it sure does have its uses. It’s basically the same knot as above, but it’s got a loop at the end. This loop serves a few purposes. First, the end of the loop (the working end of the rope) beefs up the actual overhand knot. So if you’re using this one as a stopper and need the knot to be slightly more substantial than originally tied, you can add a piece of rope to accomplish that. Also, the loop that’s included in this knot acts as a slip. In other words, once the overhand knot has tightened up, you’ll be able to pull the end of the loop (the end of the rope) and pull the entire knot out so it becomes untied. Hopefully. That all depends on how tight the knot became. If it’s something you used to pull a truck 100 miles, then you may never get that knot out. Otherwise, this one works just fine.
I do want to let you know one thing before I get to the photos though. Don’t be tempted to use this loop for anything other than what I described above. It can’t hold any weight. Because the loop is held in place by friction only, if you decided to hang something from the rope, you’d pull the loop right out.
There are a few ways to tie this knot. They end up the same, so take your pic. The way I tied it in this example is simple, but in practice, I would probably tie it the way I’ll explain below.
First, tie a loose overhand knot, just as I did in the above post.
Next, take the working end and slide it through the loop.
Finally, pull the standing end and the top of the new loop apart, so the overhand knot tightens, squeezing the working end of the rope.
It’s a good looking knot, but as you can see, if you hung that loop over anything and put weight on the rope, the loop would pull right out.
The other way to tie this knot would be the same way as tying a shoelace. You’d simply pull a loop through when you’re creating your overhand knot as opposed to pulling the end of the rope though. It’s that easy.
Two Strand Overhand Knot
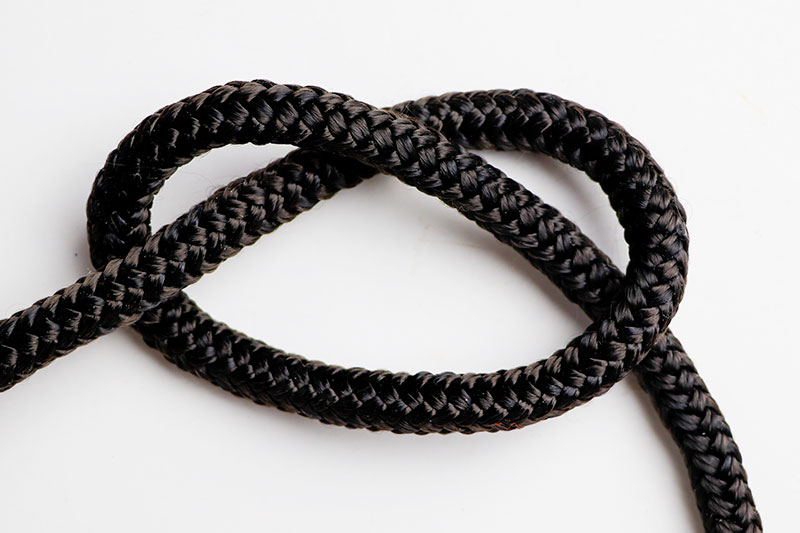
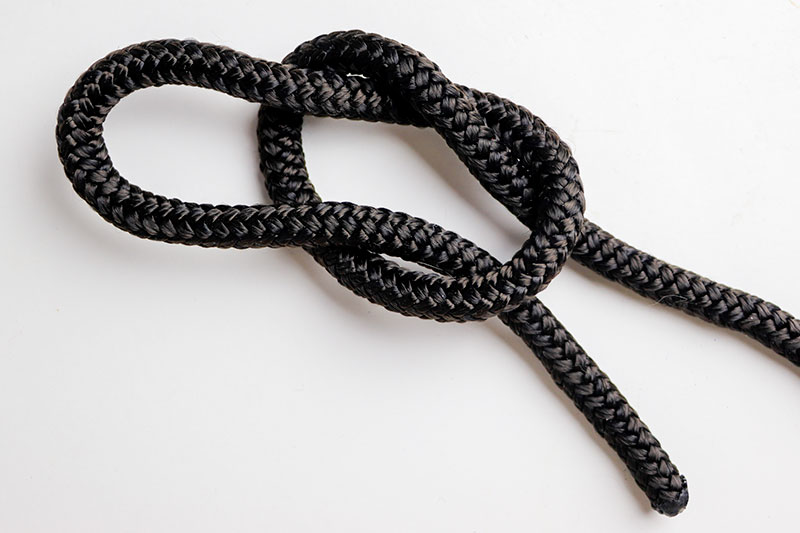
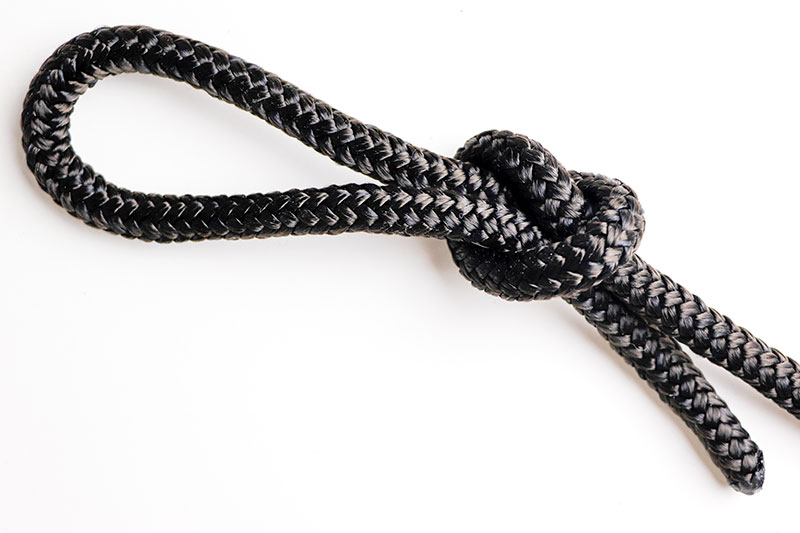
This is the identical knot to the regular overhand knot. The only difference is, you use two parts of the rope as opposed to only one. If you make a loop at the end of your rope, you can simply fish that through and tie an overhand just the same. What’s best about this knot is that it gives you a fairly large stopper as well as a possible loop that you can actually hang things from. If you’re tying just the two ends of a rope or string, you can use this knot to tie things together. Think about tying the string on a pair of sweatpants or a pair of swimming shorts. We use this knot all the time and most likely don’t realize it.
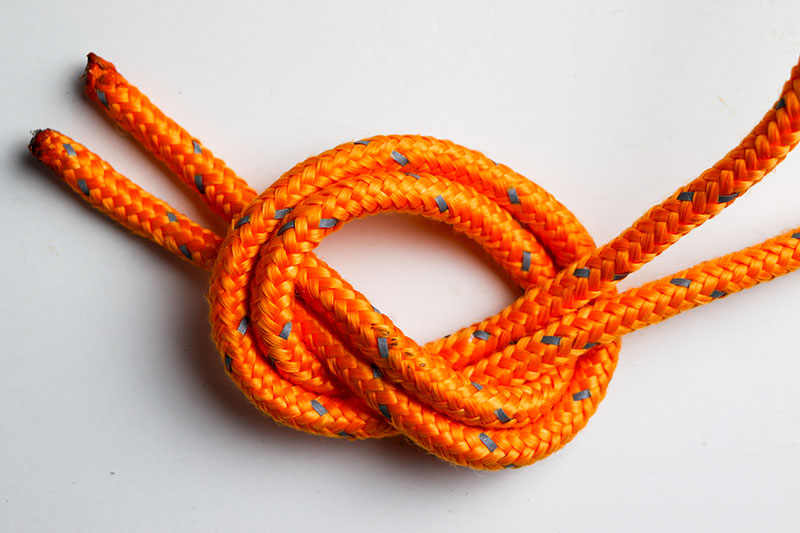
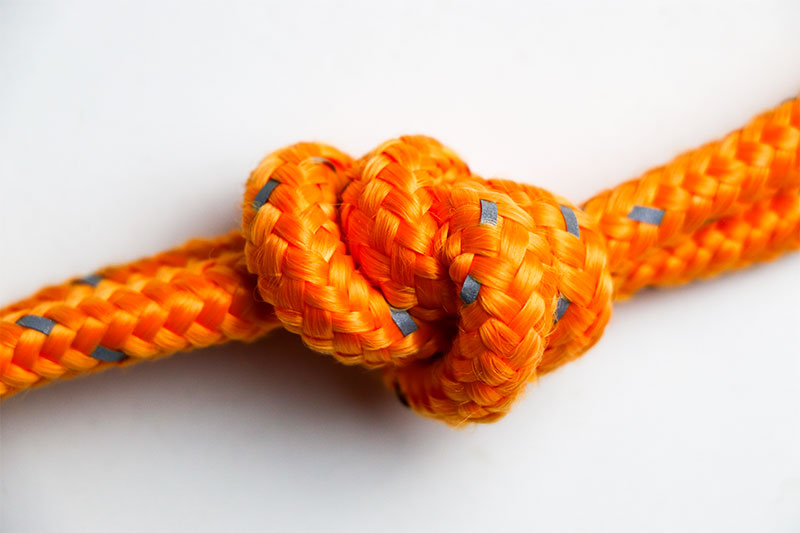
Here is an example of a loose two strand overhand knot and then when it’s all tightened up. Now that’s a good stopper!
Double Overhand Knot
This knot serves two purposes. First, it’s used as a somewhat large stopper knot and second, it creates the foundation upon which other knots later on will be built. While this doesn’t make an overwhelmingly large stopper, it is larger than a single overhand knot. In my opinion, this is the first interesting knot in the bunch. Just wait until you try it. I think you’ll like it.
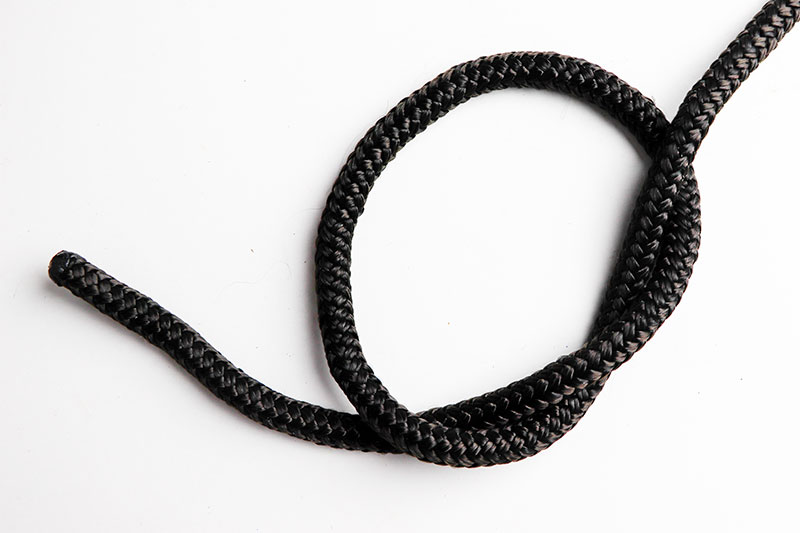
Here we go. Grab your piece of rope and make a loose overhand knot.
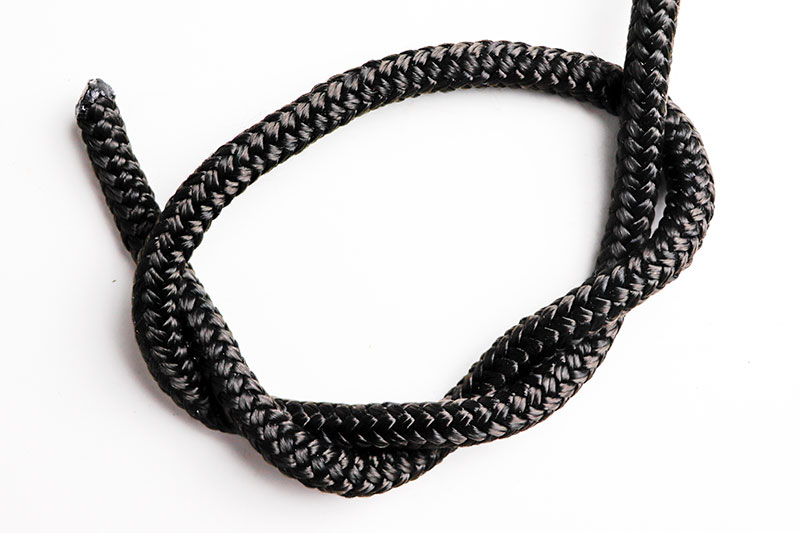
Next, take the working end and fish it around the loop one more time.
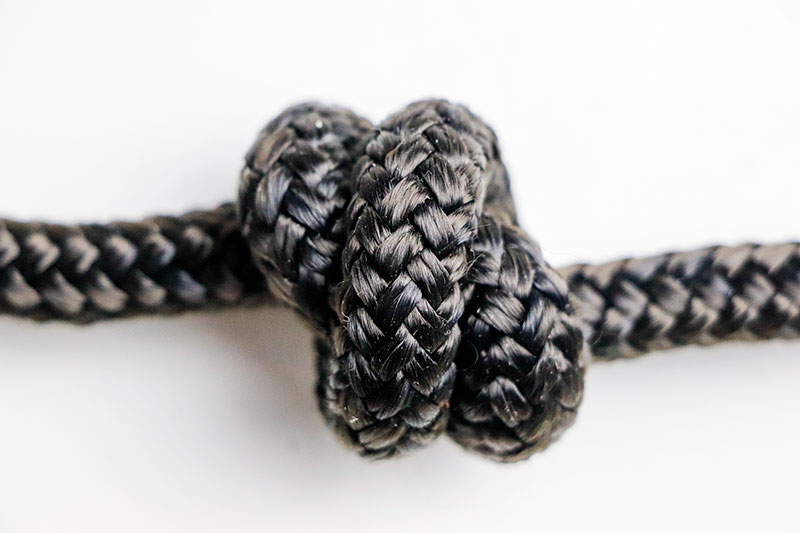
Pretty easy, right? Now comes the fun part. Take hold of the standing end and the working end and gently pull those two ends apart from one another. As you do this, you’ll feel the two ends beginning to twist on their own. With your hands, twist the ropes in the directions they want to go. They’ll twist opposite one another. Twist the ropes and continue to pull. You’ll see the rope arrange itself into a beautiful stopper. This is what the stopper should look like.
And that’s it! You’ve got yourself a solid little stopper knot.
Triple Overhand Knot
If you liked the double, you’ll love the triple. While it’s merely a continuation of what I just showed you above, it’s a very solid stopper knot. And the best part about these overhand knots is that you can keep on going. You don’t have to stop at triple. As a challenge, why don’t you go ahead to see how many you can make it up to before losing total control. That would be fun.
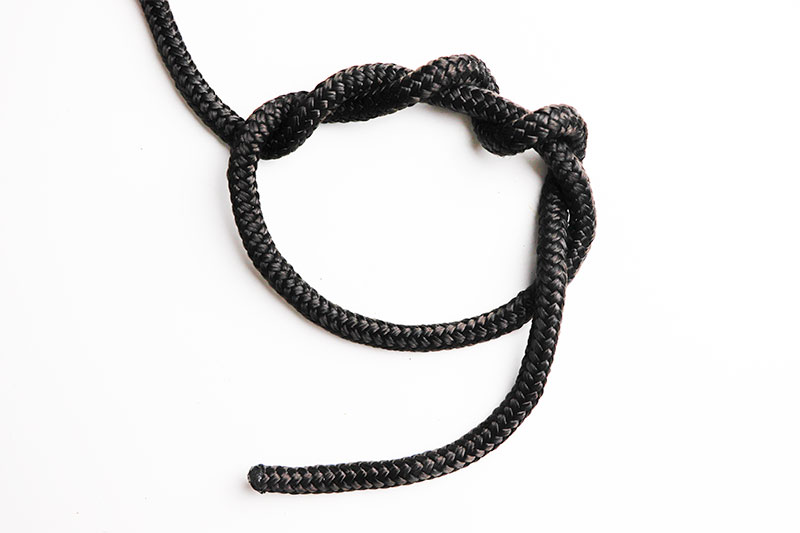
Anyway, to tie this wonderful knot, make yourself a double overhand and then simply add one more turn around the loop with the working end. What you’ll end up with is something that looks like the first photo below.
Next, begin to pull the two ends of rope apart, exactly as you did for the above knot.
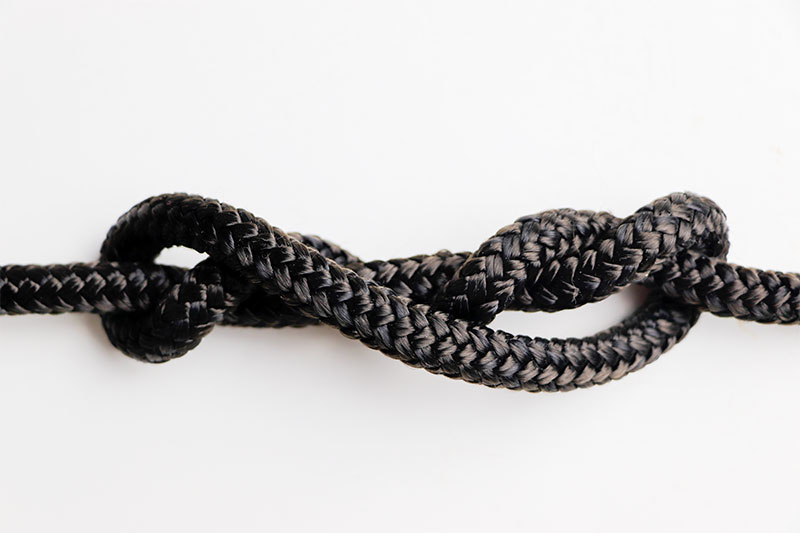
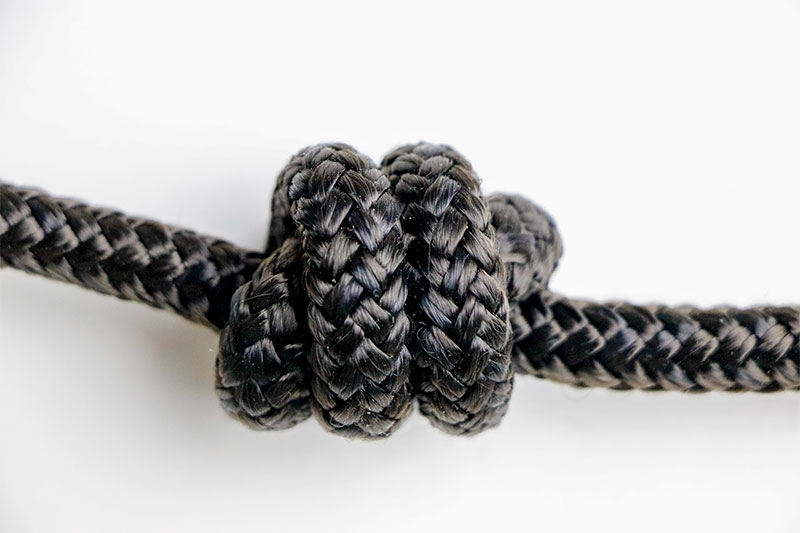
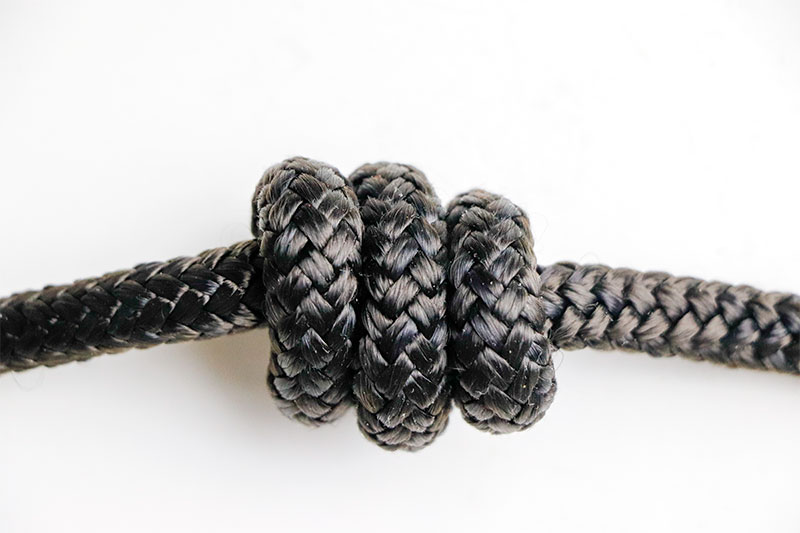
Continue to pull those rope ends apart and twist them in opposite directions from one another. You’ll feel which way they want to turn. With this knot though, you’ll want to be careful. It’s easy to pull the ends of rope apart and think you’re finished. You actually need to twist and arrange the rope so it’s tight up against itself. Take a look at the two photos below. They’re of both the top and bottom of the completed knot.
Notice how snug the turns of rope are against each other? Besides using this knot as a large stopper, you can also use it if making crafts with rope. Perhaps taking advantage of something like this would be appealing in macramé or something similar.
Strangle Knot
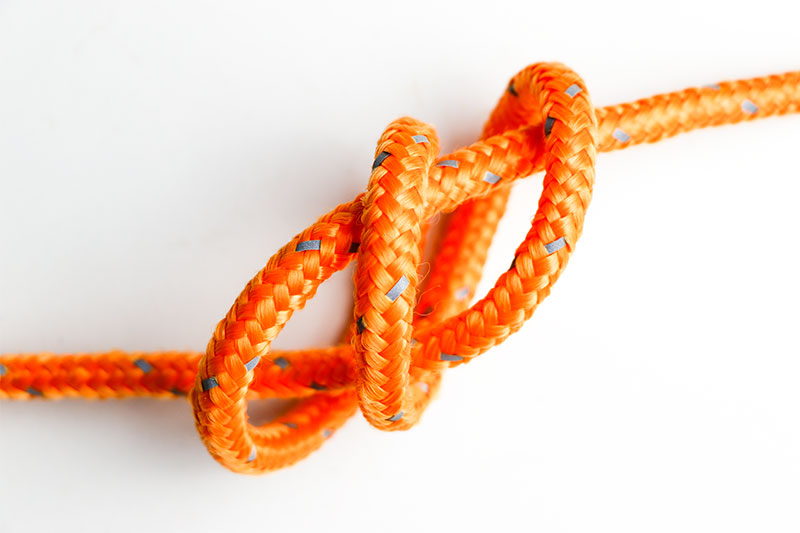
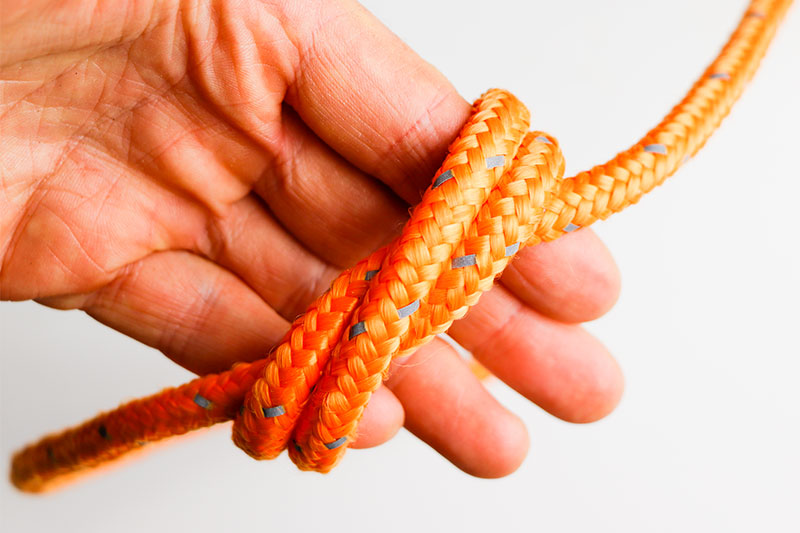
Believe it or not, the strangle knot is simply a double overhand knot that looks a bit different than it usually does. This is a useful binding knot that’s great for holding things together. Think about a rolled up carpet or one of those large pieces of project cardboard that can be rolled up as well (like a poster). Whenever we roll these types of things, we always wonder how we can keep them bound. Well, here’s our answer. This handy knot creates friction and the harder its pulled upon, the more friction that’s created, keeping the object bound even more.
Let me show you, in the first photo below, how this completed knot appears when it’s not around anything. This will give you a good idea of how the rope travels among itself.
The second photo shows the same knot around my fingers.
Here’s how to tie the strangle knot. Find yourself something to wrap your rope around like this:
Do you see how the rope travels around the log twice in the third photo? If you loosen the rope a bit and snake both ends underneath the center part of the rope as well as the opposing part, you’ll have a completed knot.
You can’t get any easier than that. By the way, this is also useful tied with a drawloop, so you can pull it out even more easily.
Single Hitch
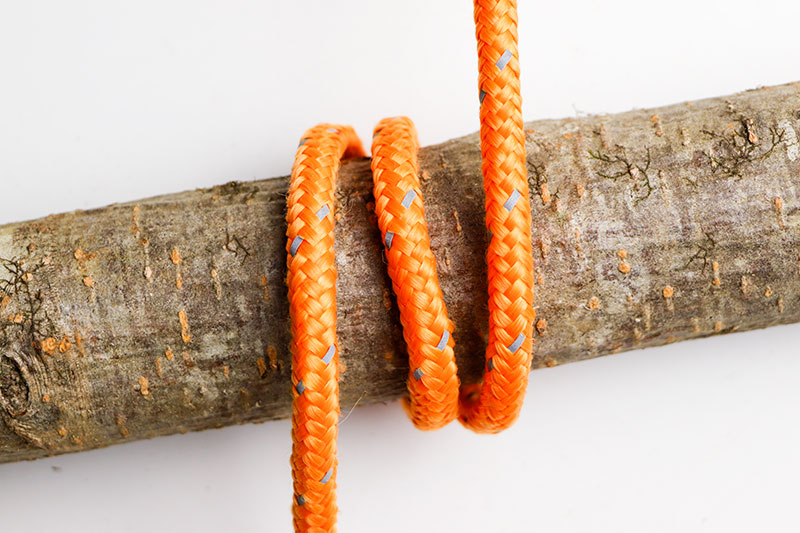
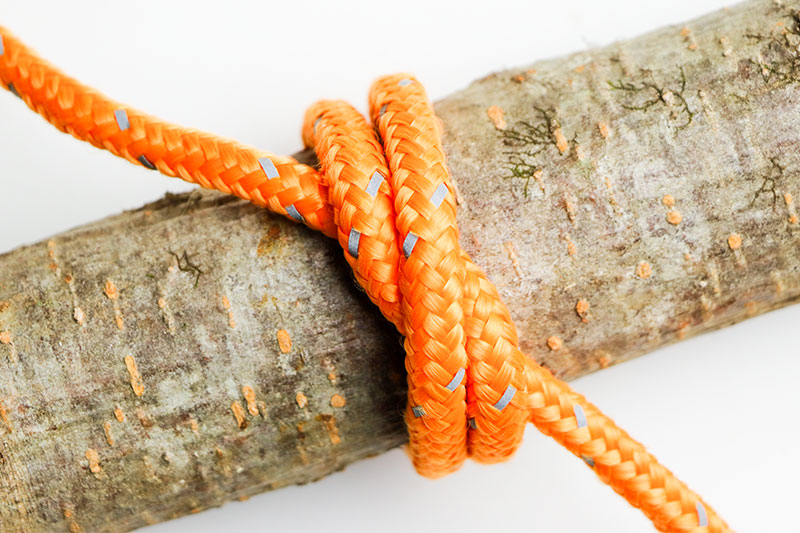
Like the overhand knot, the single hitch is one we’ve all surely tied. It’s the simplest method for attaching a rope to a loop, ring, or some other stationary object. The single hitch alone isn’t a reliable knot to use for such things, but it’s there and we should all learn about it. Plus, additions can be made to it to increase its reliability and effectiveness.
To tie the single hitch, find yourself a ring of some sort and then snake the working end of your rope over the bottom portion of that ring. Then, bring the working end back under the ring, over the top of your rope and then through the loop you’ve created. Pull both ends of the rope tight and there you have it.
If you’d like this same knot, but with a drawloop, then instead of taking the working end of the rope and snaking it through the loop, take a longer piece of the working end and fold it over upon itself. Then, snake that fold through the loop. Pull tight and again, you’ve got yourself a single hitch. But this time, you’ve got a drawloop involved as to pull it out more easily.
Two Half Hitches
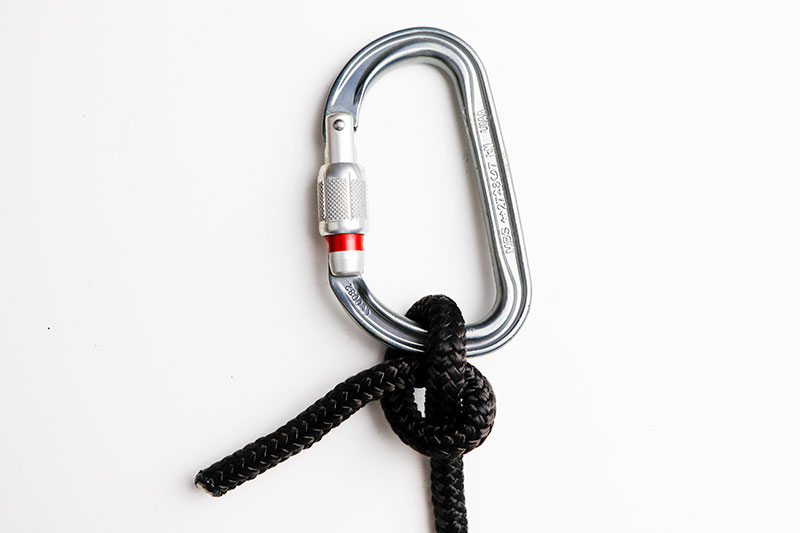
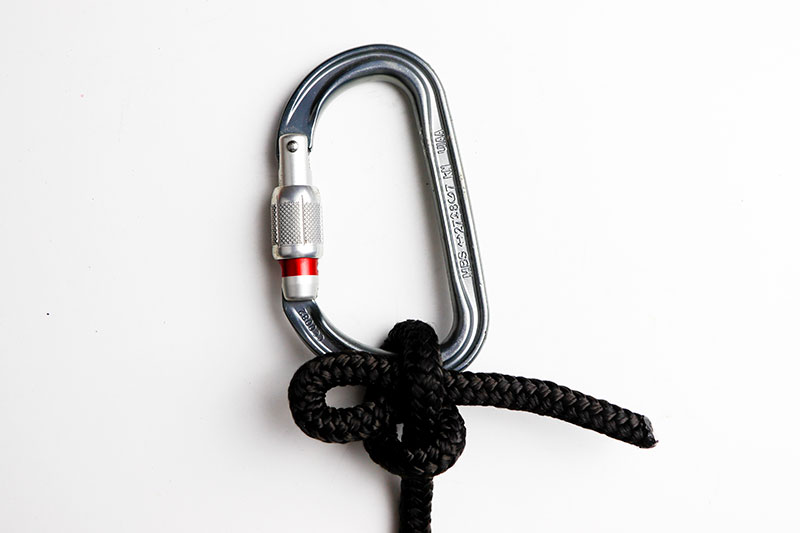
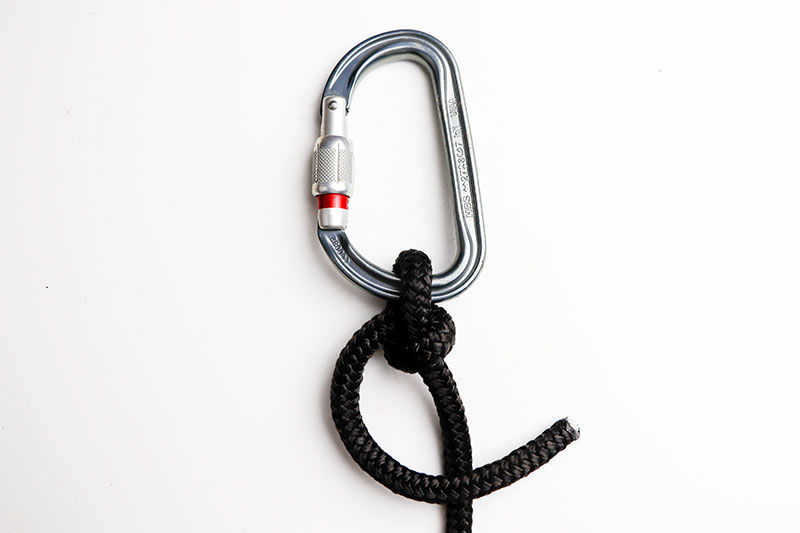
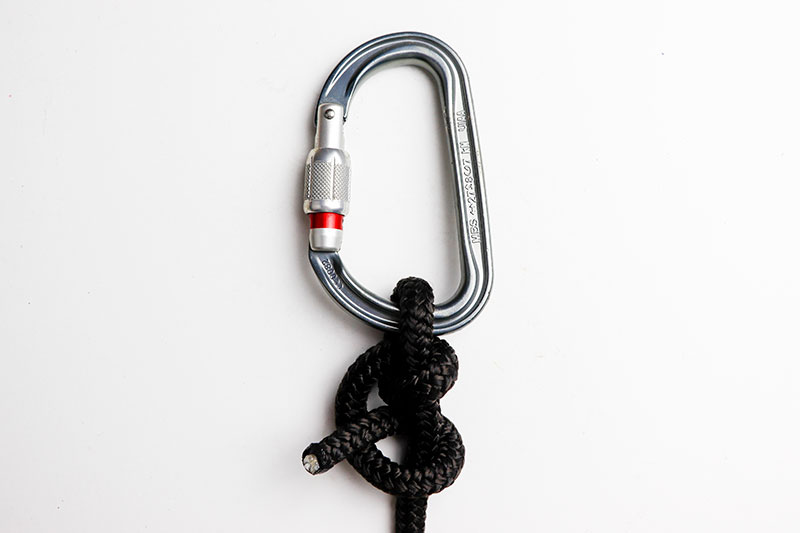
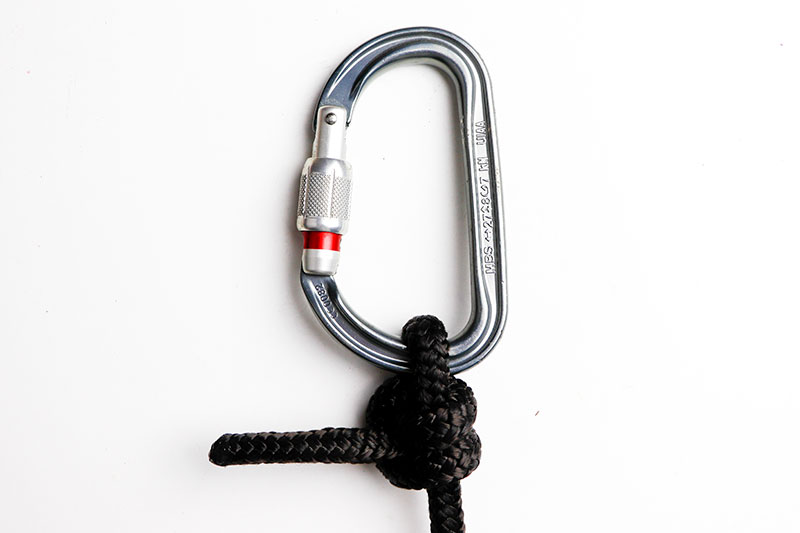
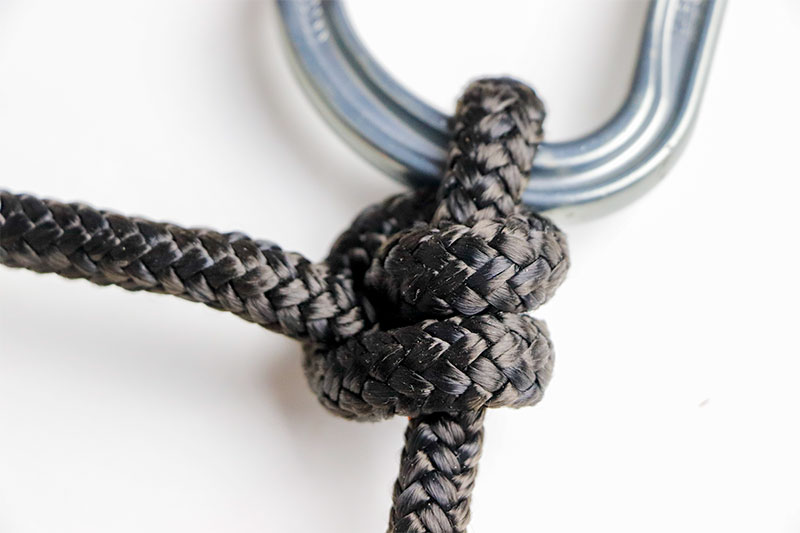
If you’re looking for a more substantial method for attaching a rope to something, look no further than the two half hitches knot. This version of the above is much more secure as there’s a lot more friction between the rope and itself involved. The best part of this knot is that it’s extremely simple to tie. And if I didn’t know any better, I’d guess that you’ve already tied one of these.
To start out, tie yourself a single hitch like above. Just be sure to leave yourself some length on the working end.
Next, take the working end of the rope and guide it under the standing end and through the loop you create.
Pull both ends of the rope tight and there you have it. The two half hitches knot.
Round Turn & Two Half Hitches
Here’s another classic knot that’s used widely. Think tying a boat to a dock or towing a car or truck. Personally, I like this knot because it goes around the ring twice as opposed to only once. That’s got to make it stronger. Also, I just wanted to mention that if you ever wanted to use this knot for an ultra secure situation, you can always tie an overhand knot on the tail of the rope as a stopper. Pulling this one out with that stopper in place will be nearly impossible. I love using stoppers when I’m climbing trees. I consider them insurance.
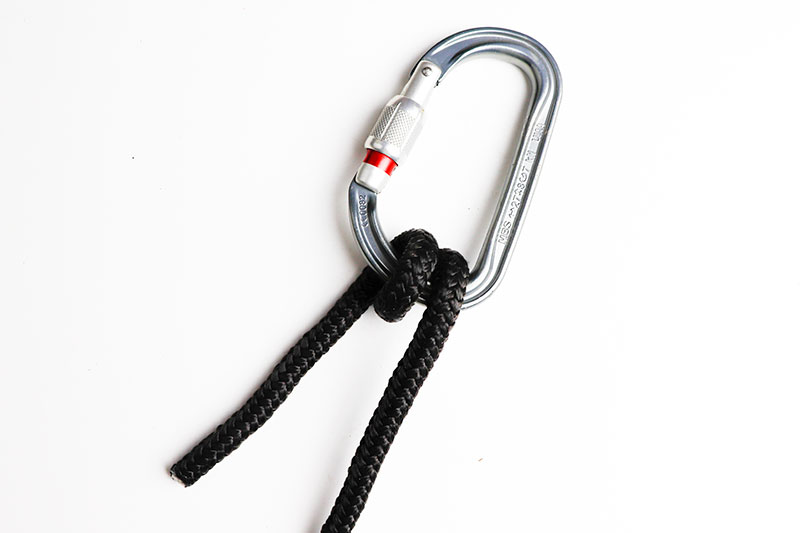
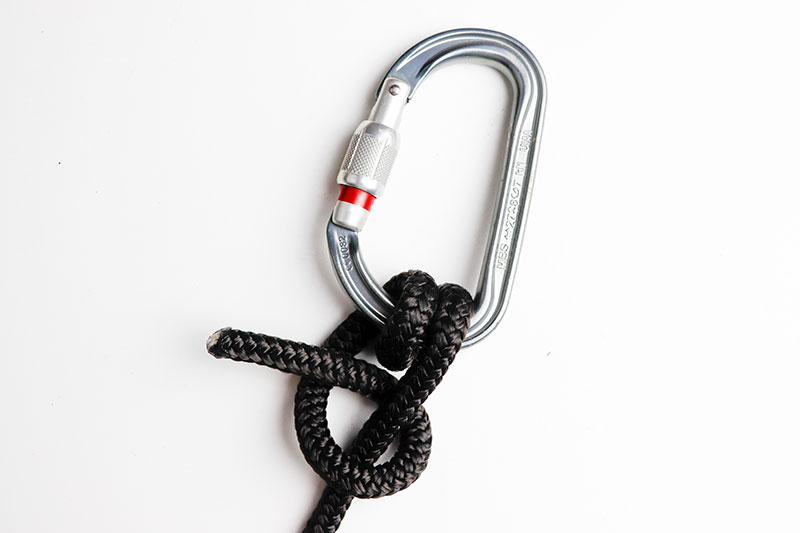
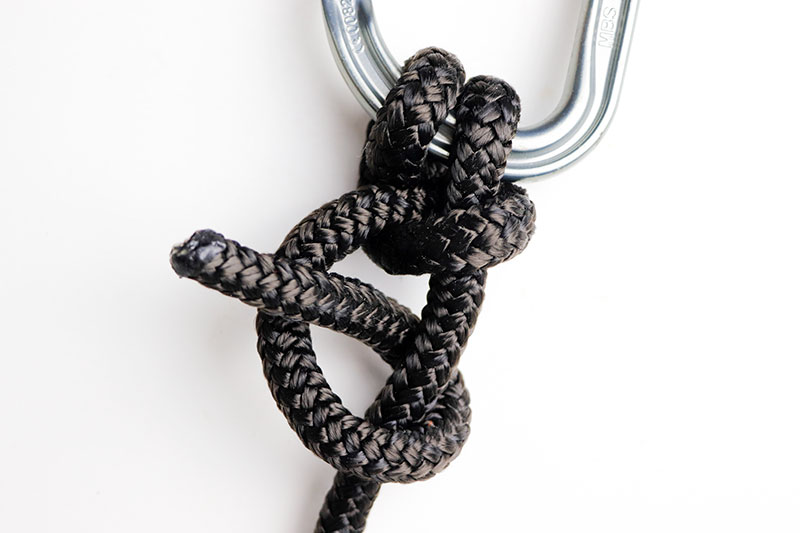
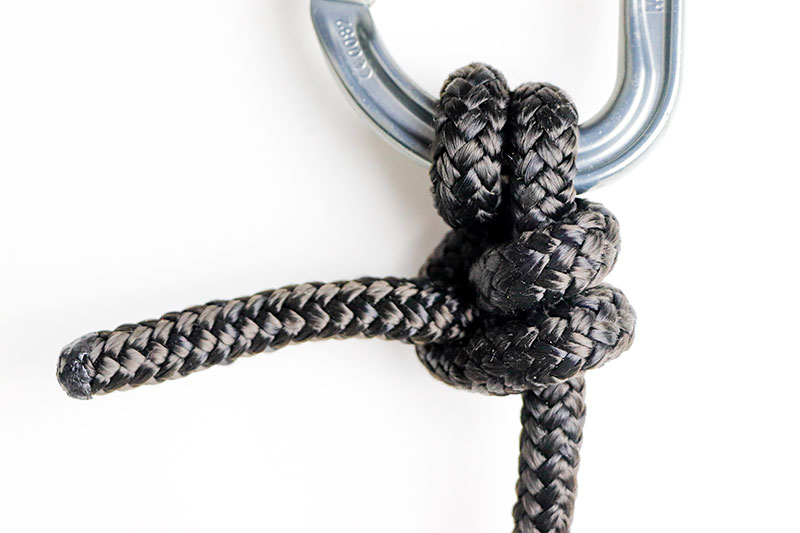
To tie this knot, make two turns around the ring like below. Start above the ring and turn the working end below. Twice.
Next, tie a half hitch with the working end around the standing end. Make sure your working end of rope is long enough. I had to shorten mine to make a nice picture. I would have kept it longer in real life.
Tighten that first half hitch up snug and then repeat the process with a second half hitch. Remember, over and then under.
Finally, slide the knot up and pull the ends of the rope to tighten the knot. This is called dressing a knot. Whenever you hear someone say, “Hey, dress that knot nicely,” they mean for you to arrange the ropes in the knot so they’re neat and tight. This will increase the performance of the knot.
Overhand Loop Knot & Half Hitch
This is a great knot if you’d like to lasso your friends. It combines a sturdy knot that won’t pull out with a loop that easily tightens. No one can tie this knot without trying to lasso whoever it is who happens to be standing next to them. Give it a try. I bet you’ll misbehave.
If you’re of the more mature type, this loop knot combo may benefit you as you attach bait to a fishing line. It’s also popular for tying string around boxes. I’m sure bakeries use this one all the time.
To tie this knot, go ahead and make a loop with your rope. Then, tie a simple overhand knot around the standing end of the loop.
Please note that I kept the tail (working end) of this rope short for the photo. You’ll need to have yours slightly longer.
Next, tie a half hitch around the standing part of the rope like below.
And finally, pull the proper ends of the rope to tighten both knots together. I think you’ll find this one very sturdy. It also slides quite nicely.
Overhand Loop
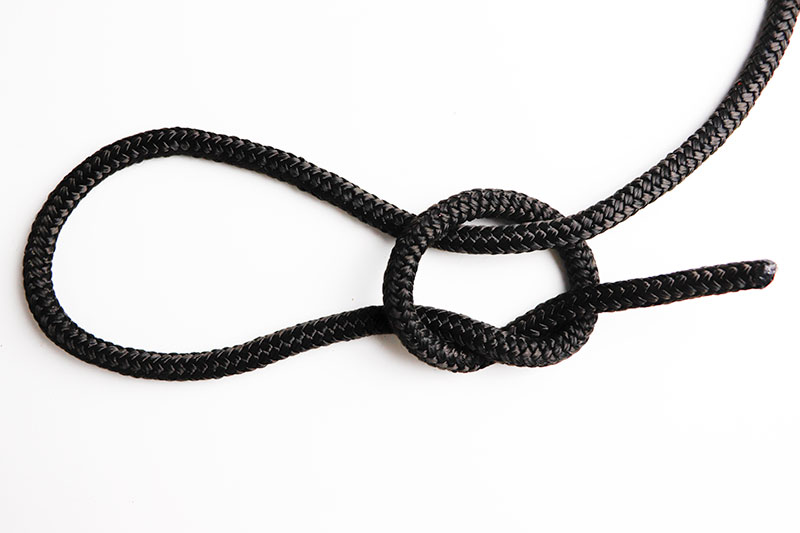
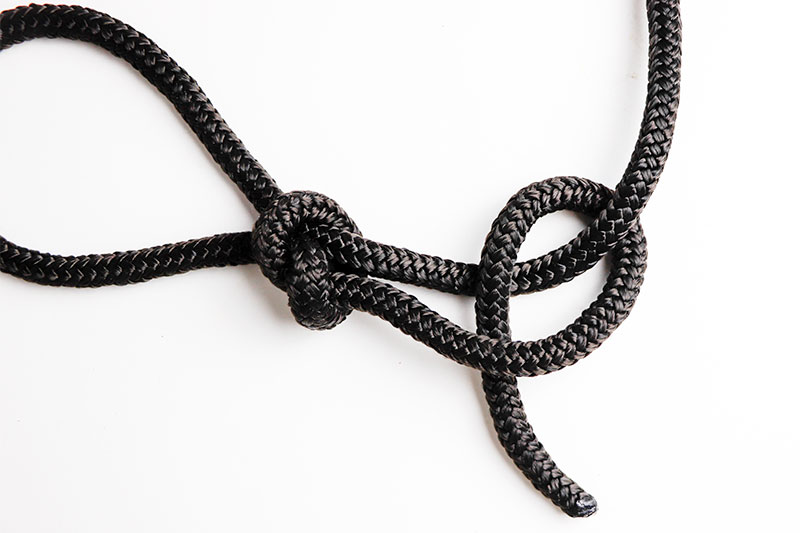
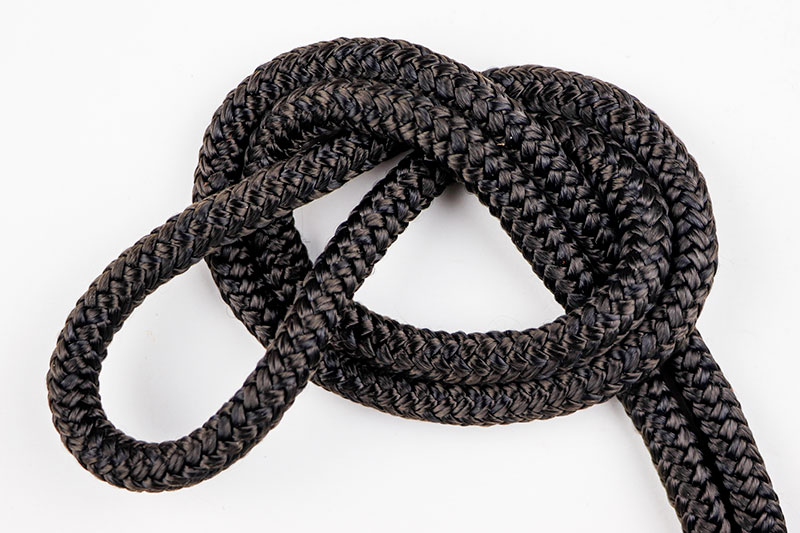
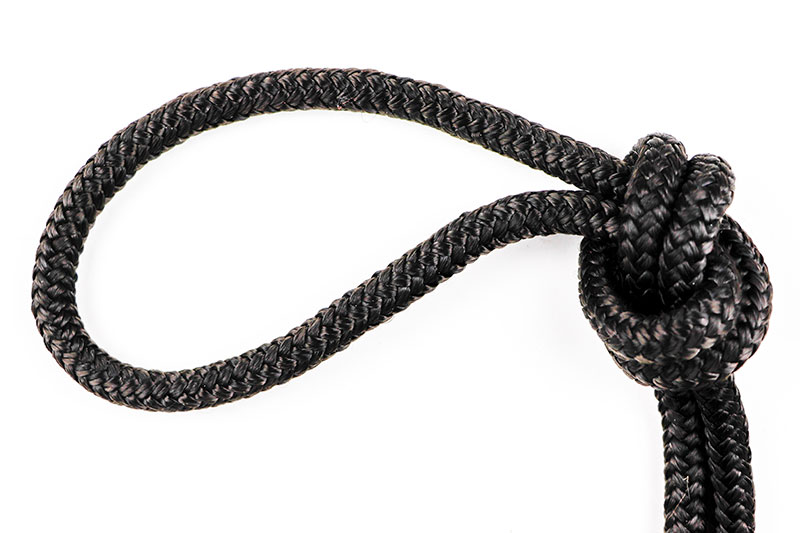
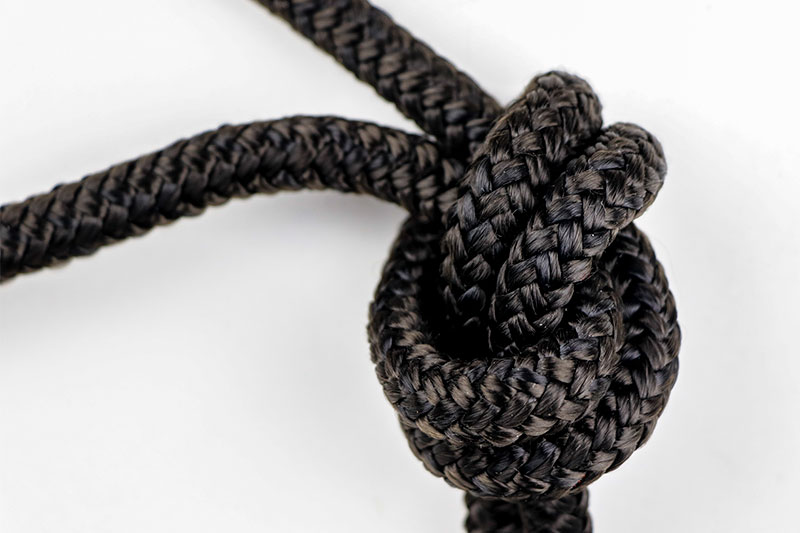
This knot is just as easy to pull off as the overhand knot is. The only difference is that you need to make a loop in your rope before you tie it. This knot also serves many purposes and you can actually put weight on this loop. The knot will tighten substantially though, so be prepared to cut this one with a knife to release whatever it is you tied up.
To tie this knot, make a loop at one end of your rope. Then, just as you would with a regular overhand knot, place the working end (loop) over the standing part of the rope.
Next, snake the working end under the standing part and then through the hole.
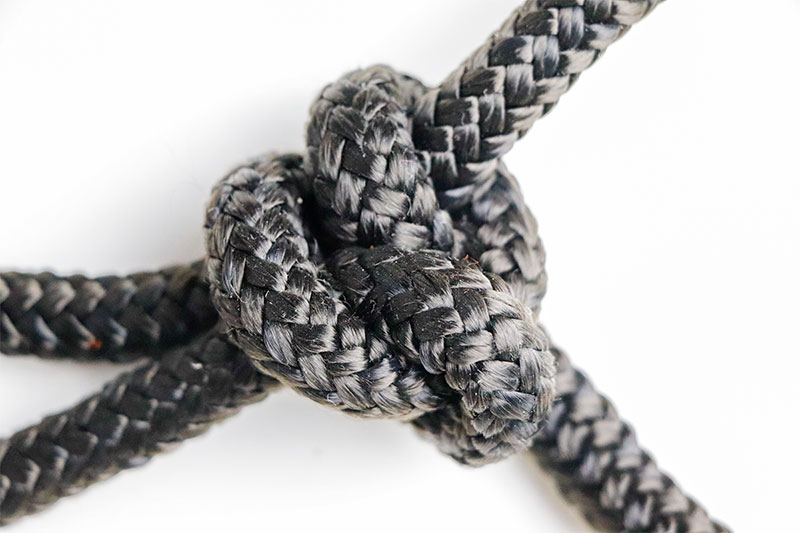
Pull the ends of the rope apart from one another and you’ve got your knot. Here’s the bird’s eye view and a more up close view.
Double Overhand Loop
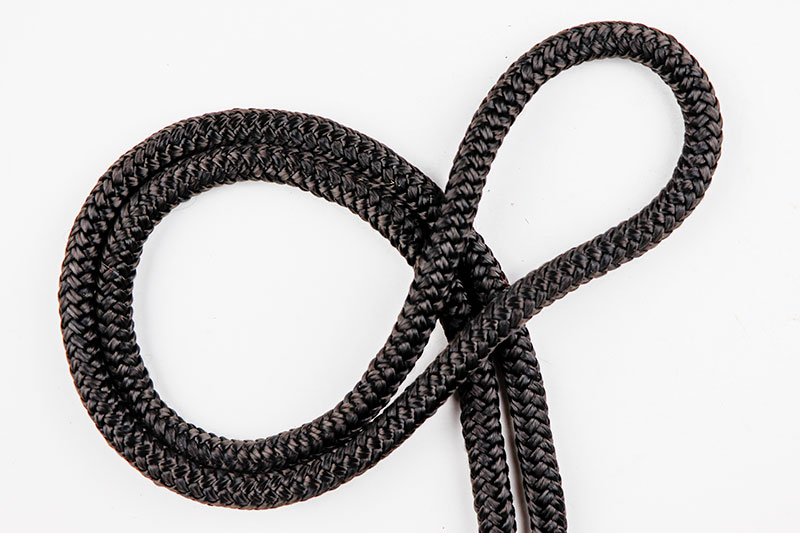
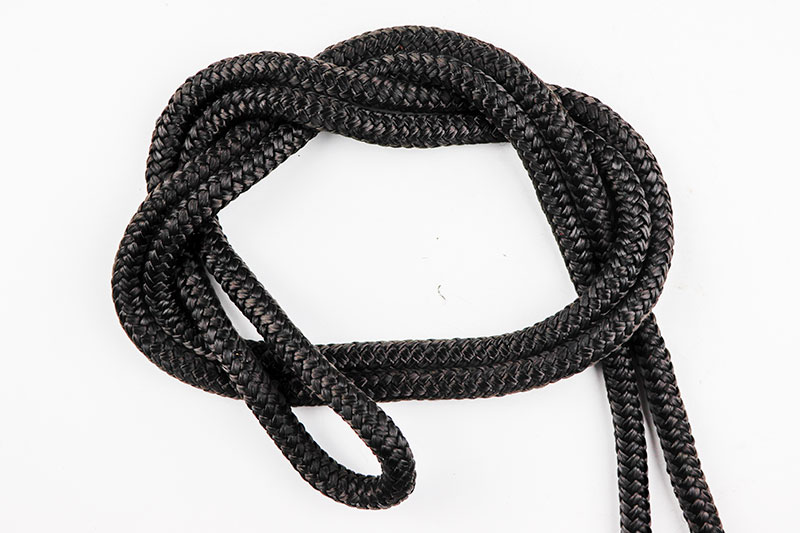
Now we’ll take things up a notch. Let’s try the overhand loop knot again, but this time, we’ll make it a double. Just like the overhand loop knot, we’ll take the working end and loop it over the standing part. But this time, we won’t stop there. We’ll bring that working end over the standing part one additional time.
I’ll give you a piece of advice here. If you want this knot to end up as pretty as possible, it’ll be important for you to neaten up the rope just as I did here. If the rope is unorganized, you’ll certainly be able to tie this one, but it’ll be very ugly.
To tighten this knot, we’ll follow the same instructions as I shared for the double overhand knot above. Pull both ends of the rope apart while twisting. This one is tougher than the single version. It wants to get tangled up and messy. You need to make sure it stays neat during this process. Again, while pulling, make sure you twist the ends of the rope in opposite directions. You should end up with something that looks like below.
There are additional photos of this knot below. Both are up close. One is of the top of the actual knot itself and one is of the bottom.
See the way the knot looks like a barrel and how it crosses over on the bottom? That’s exactly how it should appear. This is a beautiful knot.
Surgeon’s Loop
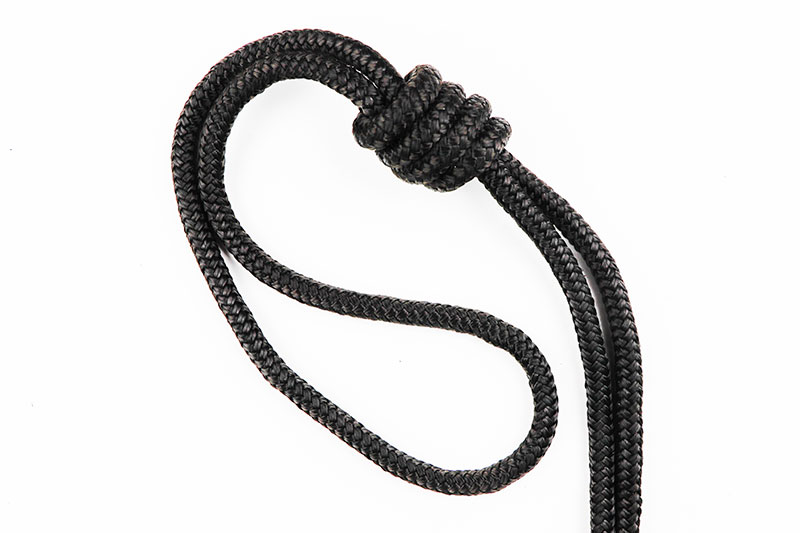
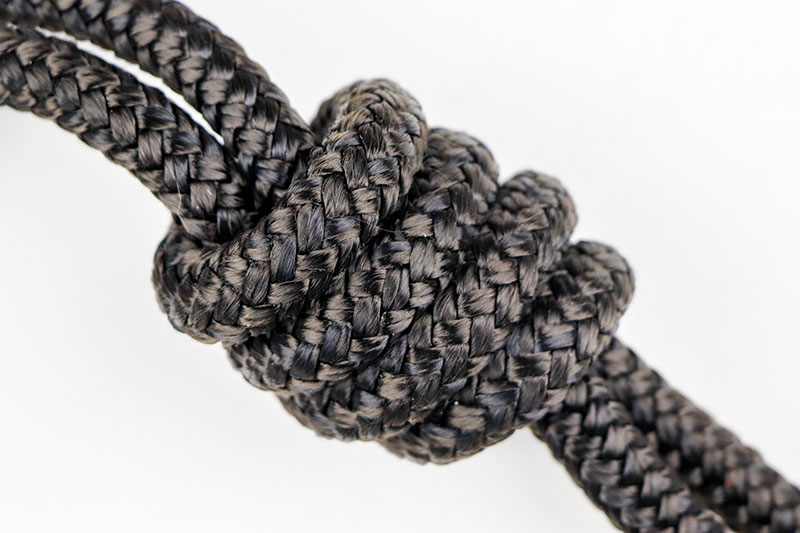
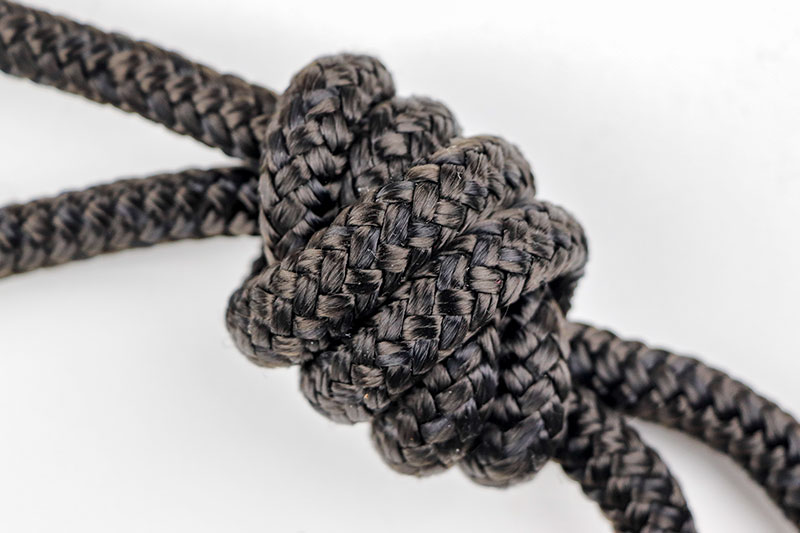
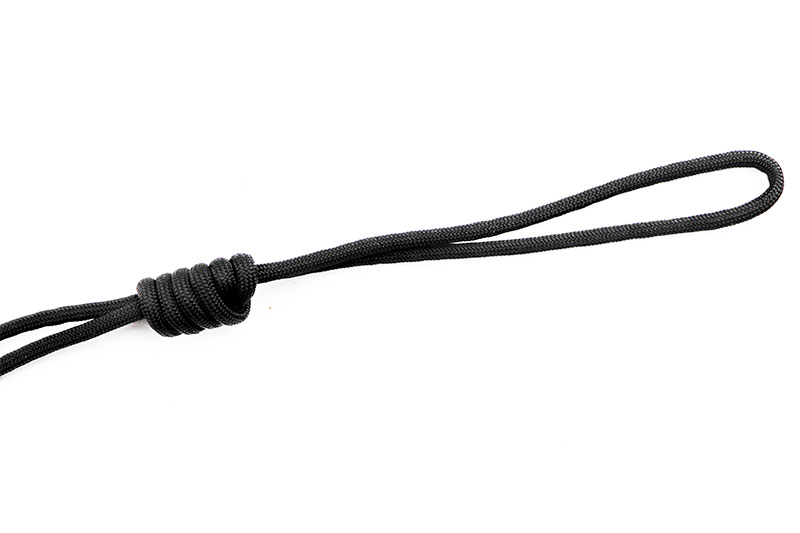
Here’s a tricky one for you. It’s essentially a triple overhand loop with a fancy name. It’s tied exactly the same way as the triple overhand knot is above, but with a loop. To tie this knot, follow the instructions for a double overhand loop, but add in an extra wrap around the standing part of the rope with the working end. Here are some photos.
EDIT: I went to tie and take photos of this knot and discovered that it’s nearly impossible to work out. Because of the three wraps, the rope becomes twisted beyond workability. Even the book I’m using says to use your fingers to “eliminate any unevenness” and to “make a smooth barrel shaped knot.” I found this knot completely unrealistic. If anyone has any advice for tying this one, I’d love to hear it. I’ll do some additional research into it and I’ll update this post if I find anything.
UPDATE: Apparently this is a very easy knot to tie, just not with the rope I was using. Just so you know, the double overhand loop knot I showed directly above is also considered a surgeon’s loop knot. The variation I was attempting in this post included three wraps as opposed to just two. And with the thicker rope I was using, there was no way it was going to turn out the way I had intended. It was too rigid. It twisted and turned too easily. Or, actually not easily enough.
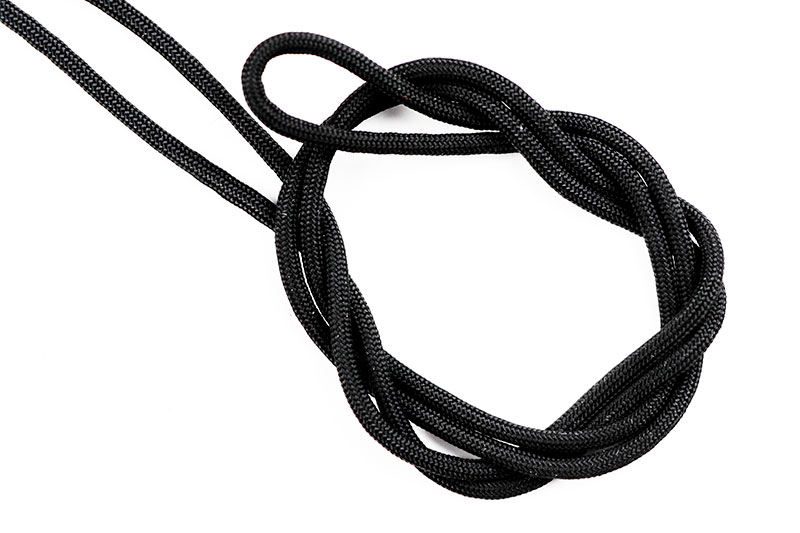
Let’s try this one again. This time, with some paracord. To start, I’ll make a bight and then give it three wraps with the working end loop. It’s messy, but if you look at the below photos closely, you’ll see how the rope is woven through.
At this point, all I did was pull both ends of the rope (the bight and the standing end) and wait until the knot was pretty snug. Then, I began twisting the ends of the rope in opposite directions, just like I did with the above double overhand loop. Since the paracord is much softer and more flexible than the other fatter rope I was using, it fell right into place. Yes, I did need to adjust some of the overlapping parts of the rope to get a nice finish (to dress it), but that was expected. Take a look at the final knot.
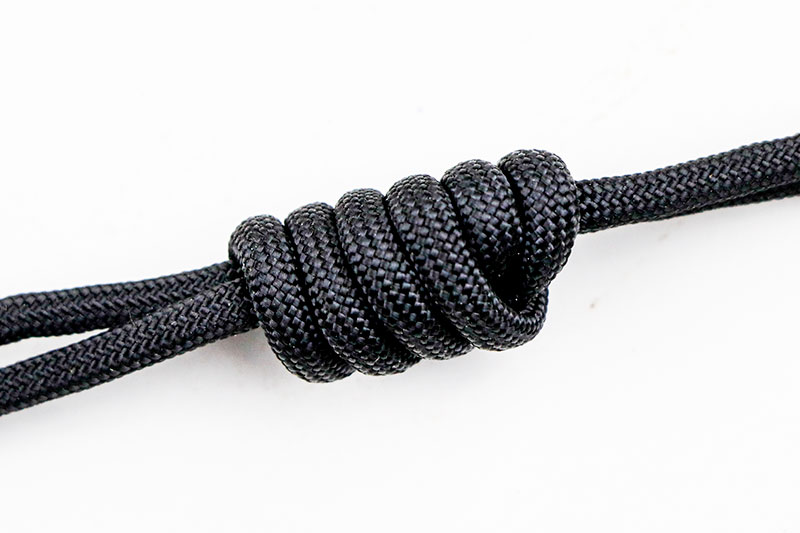
Below is the surgeon’s loop, or otherwise known as the triple overhand loop.
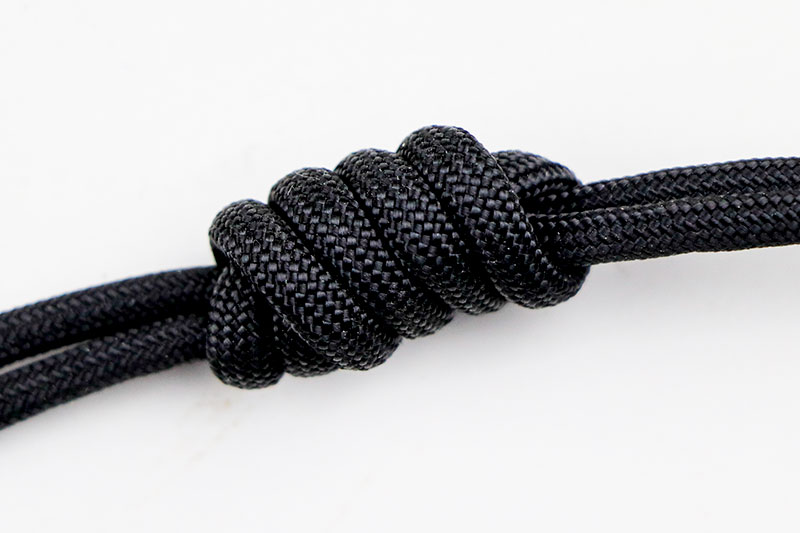
Also are both the bottom and top of the knot, up close.
I do want to mention how tight this knot gets. It gets tight quickly. I actually had trouble untying the rope once I pulled it snug, so don’t think you’re going to untie this one. You’ll need a knife to unleash whatever it was you leashed.
Simple Noose
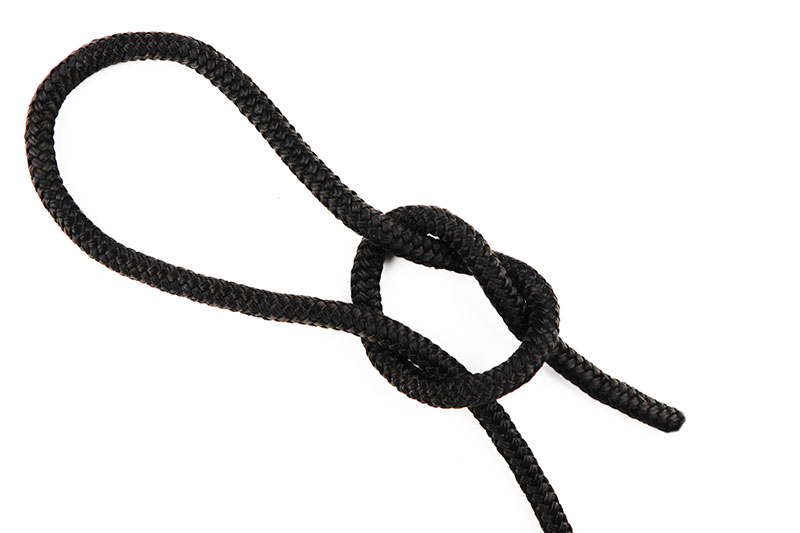
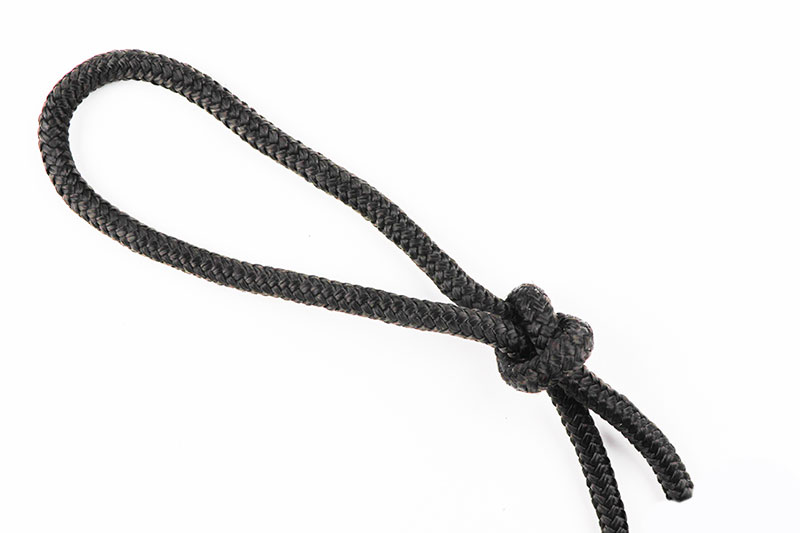
This is an extremely easy knot to tie, but there is one thing to be careful of. When tying it, you need to be cognizant of where you snake the working end of the rope. Follow these instructions carefully if you want the working end of the rope to lay flat against the standing end.
Make a bight (bend, loop) with your rope and then take the working end and bring it over the standing part. Then, continue under the working end and then through the loop. Take a look at the photos below to see where the working end goes.
Next, pull the working end of the rope until the knot is tight.
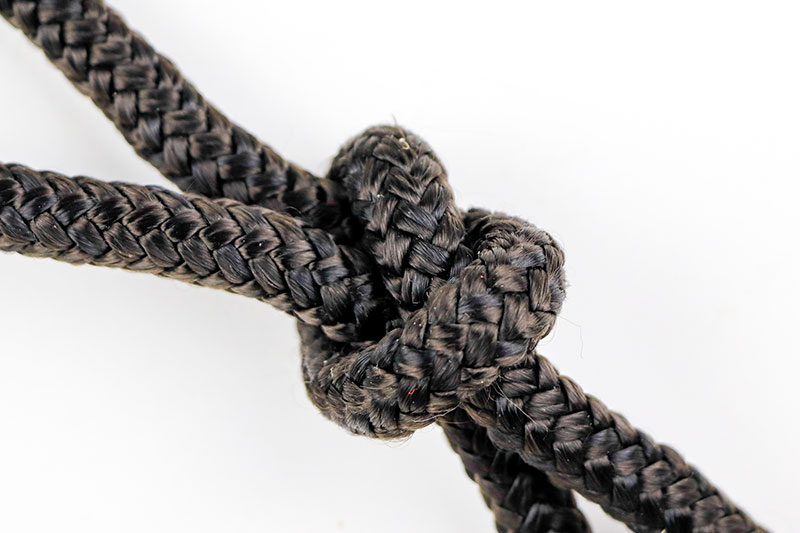
Do you see how the working end and the standing part are parallel? That’s the way this is supposed to be. Take a look at this knot more close up.
It’s a simple knot. Actually, it’s just an overhand knot tied a certain way.
Scaffold Knot
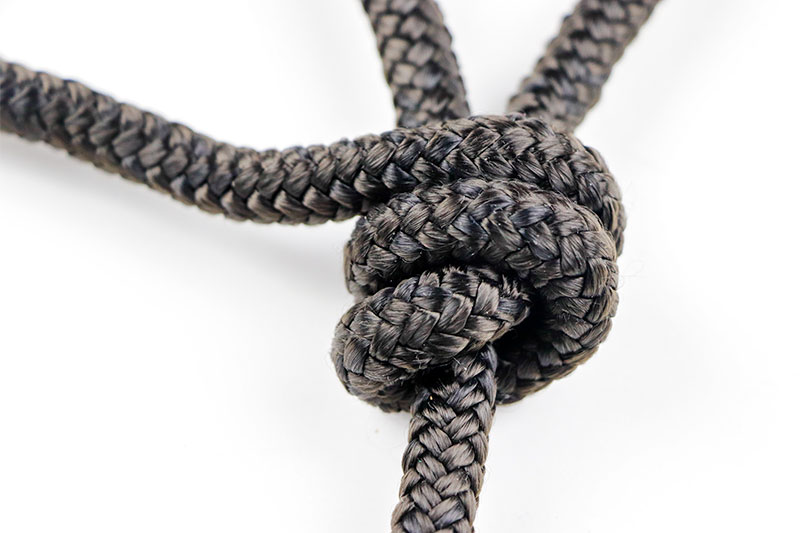
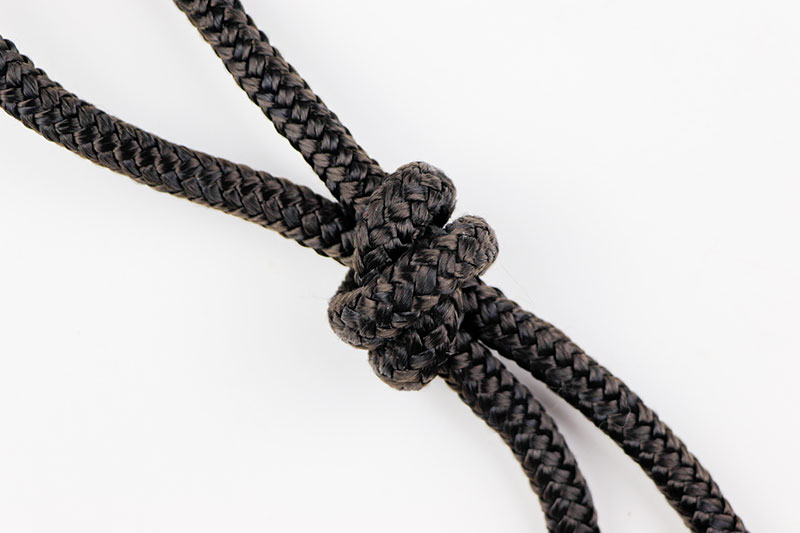
This one is a bit trickier because you’ve got to work the end of the rope around the rest of the rope a certain way. Once you get used to it though, it becomes an easy knot to tie. It’s actually just an expansion of the previous knot (simple noose). Both are sliding knots that tighten well under pressure. The more pull that’s on these knots, the tighter the knots get.
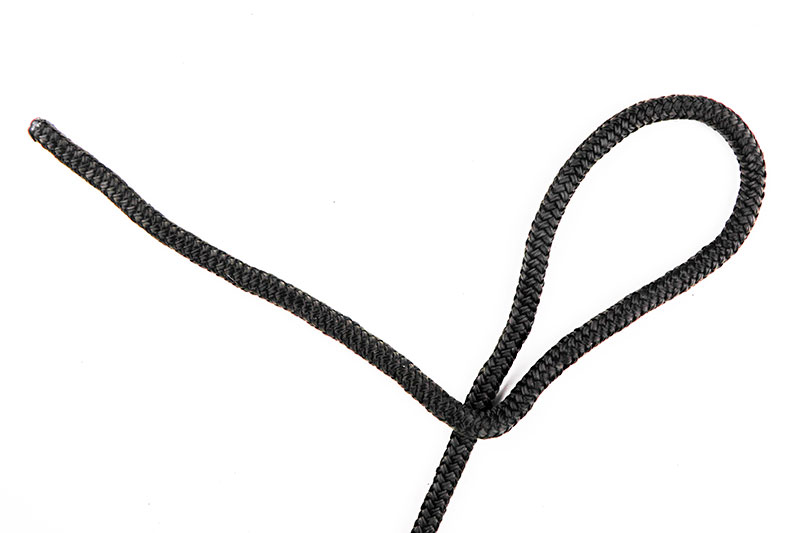
To tie this one, make a bight with your rope and cross the working end over the standing end.
I suggest keeping the loop you make in parallel near the crossover point.
Next, take the working end and bring it under the standing end. Wrap the working end around both pieces of rope. Notice how the working end lies towards the loop end?
That working end is making its way back up towards the loop.
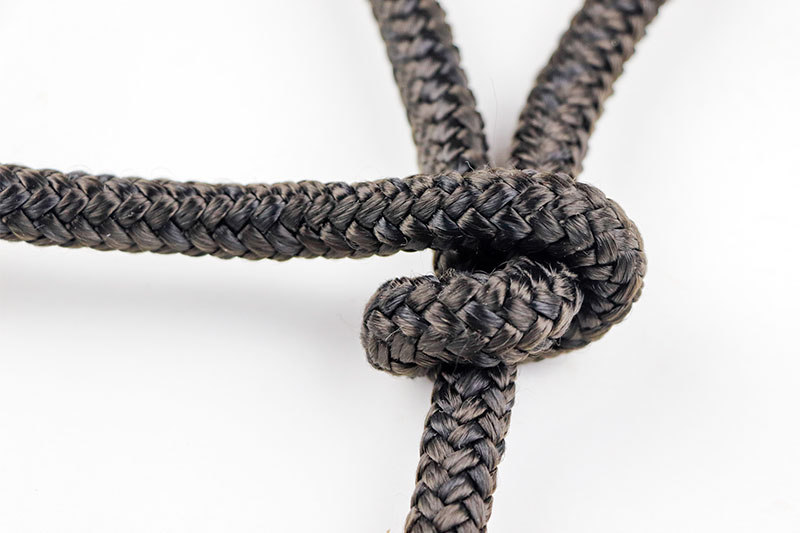
After that, do what you just did, again. Basically, make two wraps around the two pieces of rope.
And finally, take the working end and slide it under both wraps away from the loop. This is how the knot should appear.
This is a great slip knot. Let me know what you think.
Multiple Scaffold Knot
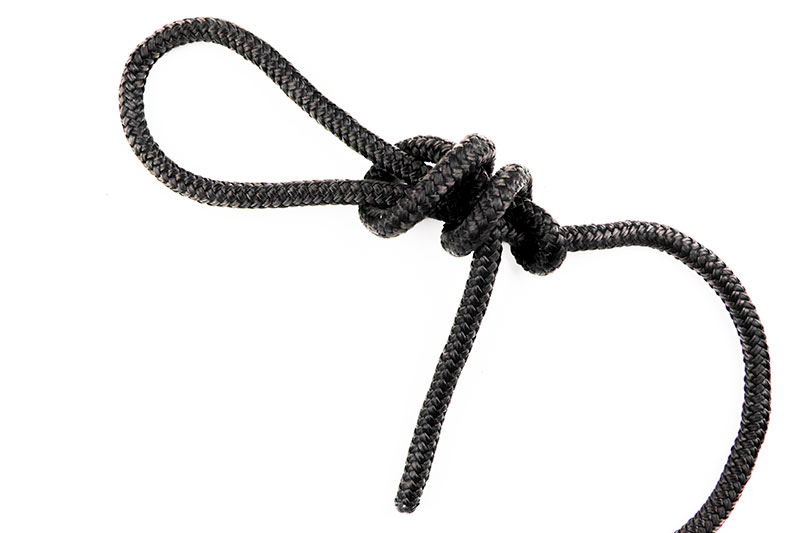
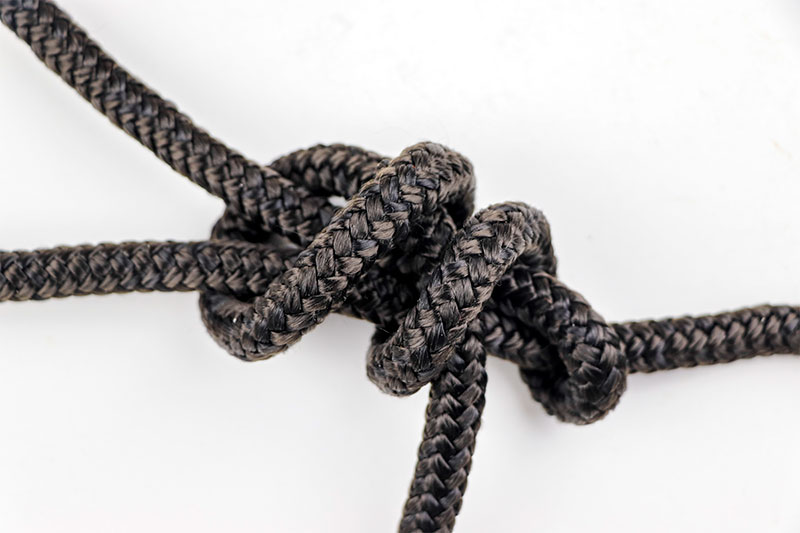
This is the same exact knot as the regular scaffold knot, but with one additional wrap. This knot doesn’t offer much beyond it’s less complicated counterpart, but it sure looks good. And if you pull on this one enough, it’ll eventually turn into the one above. As a noose type knot though, it’s a good one. Personally, I wouldn’t waste my time with this knot. If I want to use a slip knot noose, I’d use the one wrap scaffold knot above.
To tie this one, follow the instructions from above. The only thing you need to do is make one extra wrap around the standing part of the rope.
If you look closely, you can see where the rope travels. It’s not complicated, but it takes a minute or two of practice to get it right.
Below are photos of this one. To tighten it, pull on the working end while keeping the knot intact in your other hand. You don’t want to just pull on the end of the rope or the knot will fall apart.
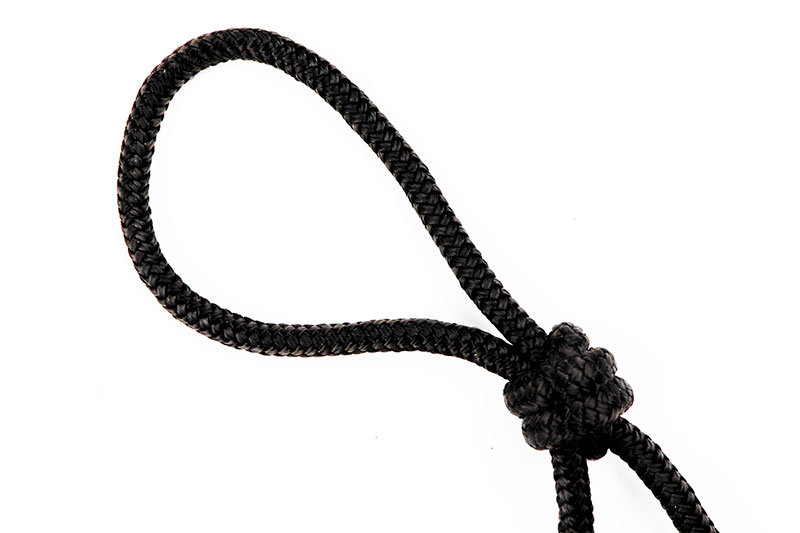
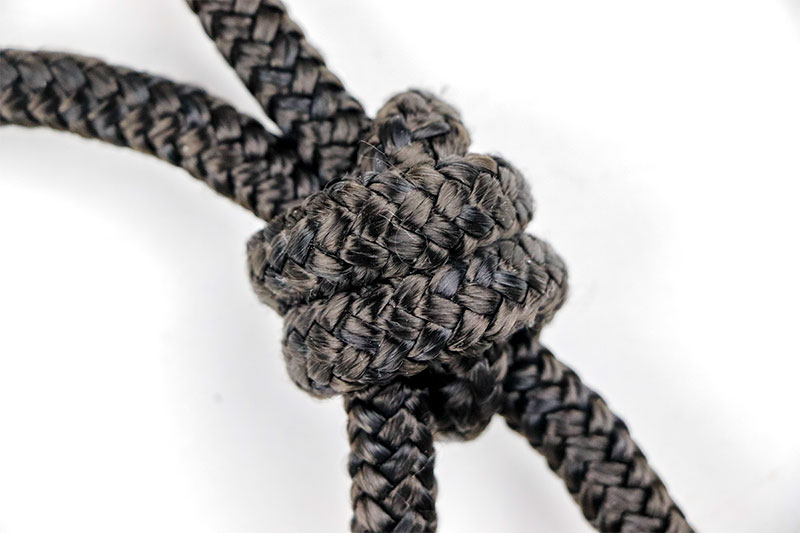
Overhand Bend
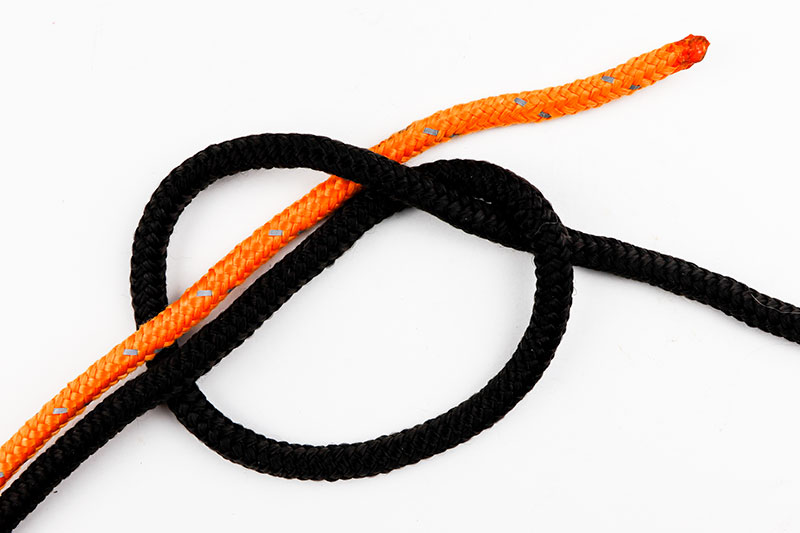
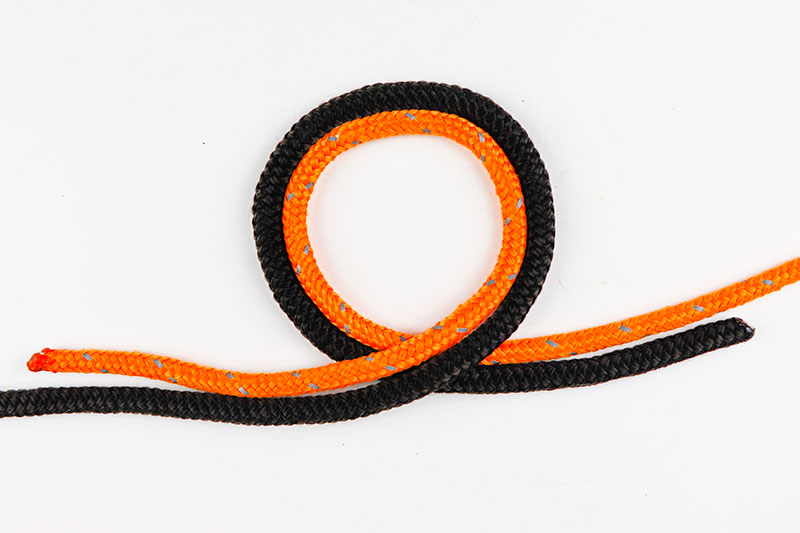
This is an excellent knot for joining two ropes together. You’ll need two ropes for this one, or just both ends of one rope. You can easily create a continuous loop with one rope if you wish. To tie this knot, first tie a loose overhand knot with one of your ropes. As you can see, I’ve done that in the photo below with the black rope. After that, begin to trace that knot with your other rope. For this, I’ll be using the orange rope.
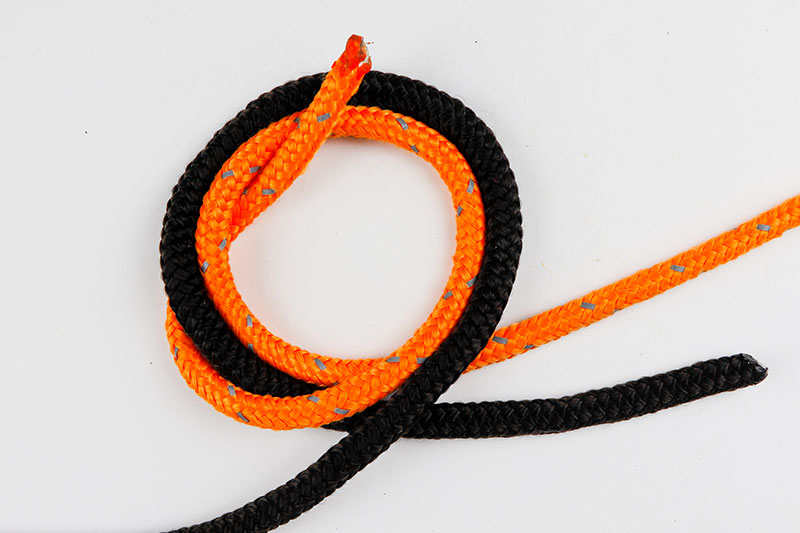
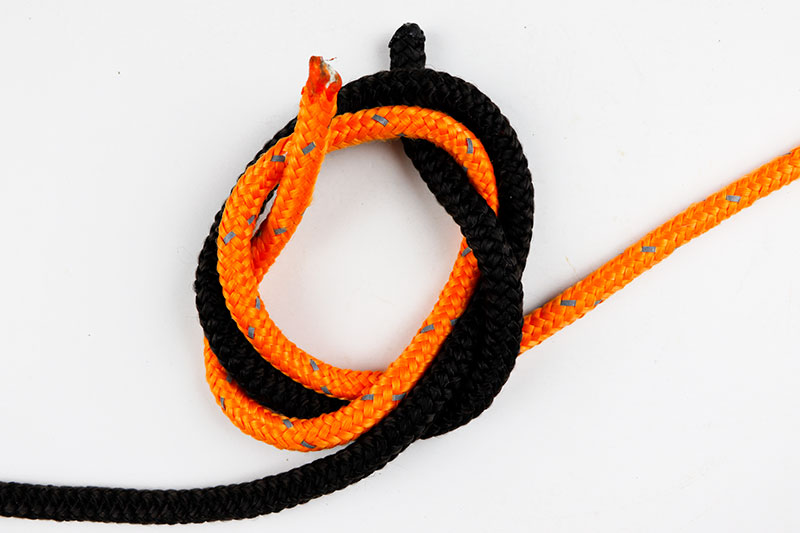
What you want to do is tie two overhand knots, one for each rope, but have them intertwine with one another. The only way to do this, however, is slowly and by hand. To continue on, I took the orange rope and copied the knot of the black rope exactly. I merely followed it along. I went around the bend and then under the working end. Then up and around and under again. Take a look.
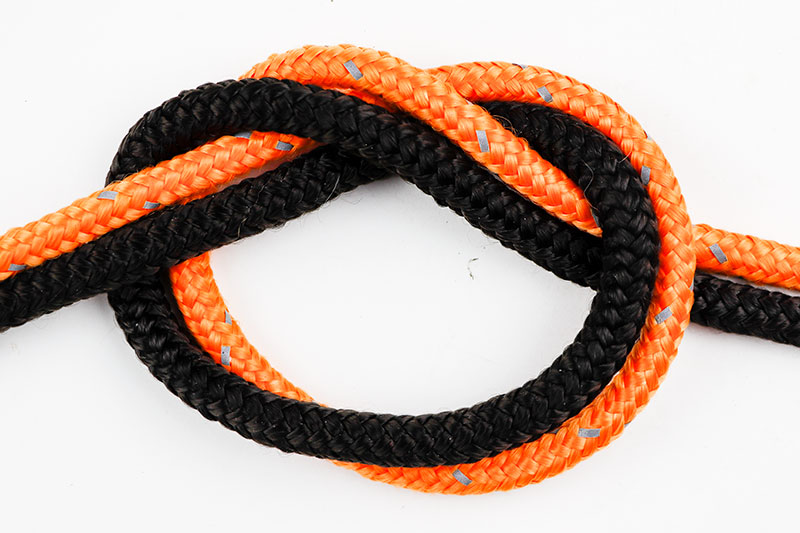
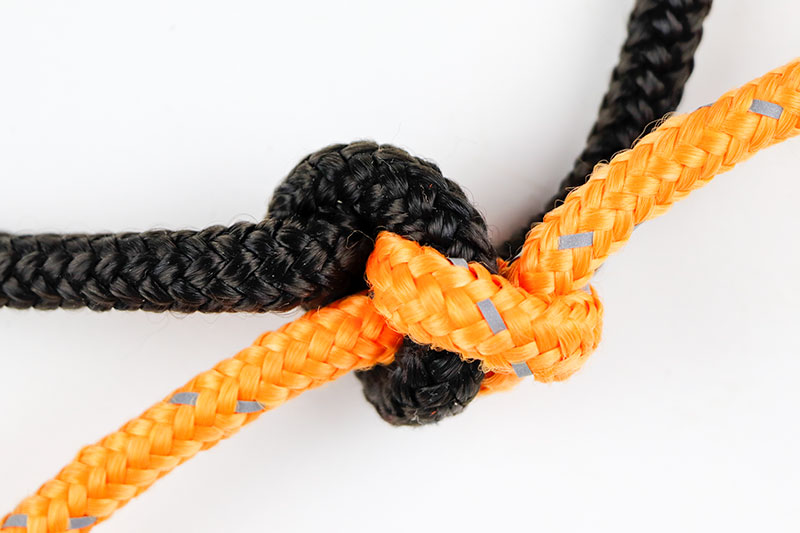
After I completed this, I pulled on both ends, just as if it were only one rope. The knot tightened wonderfully and easily. I made sure to fix the knot as I did this so it was as pretty as possible. Take a look.
When tying this knot, be sure to be conscious of where you place the second rope in relation to the first. If it’s supposed to go under a bend, then go under the bend. If above, go above. That way, it’ll come out nicely in the end.
Fisherman’s Knot
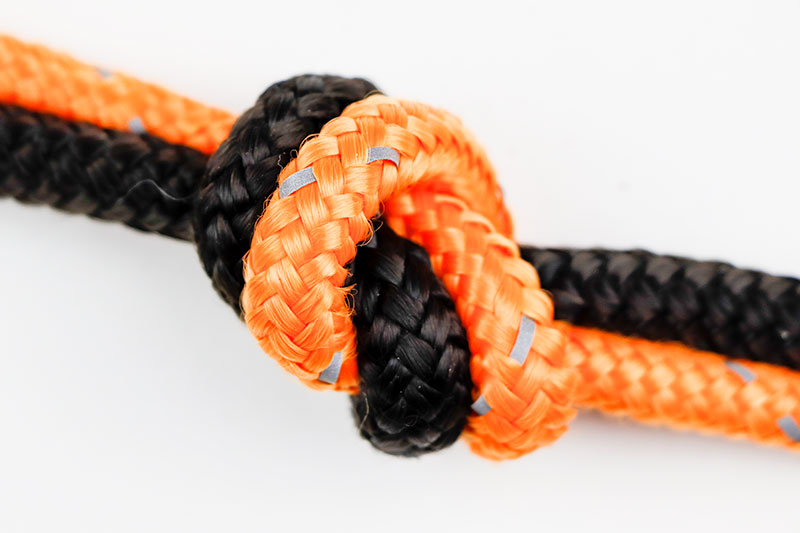
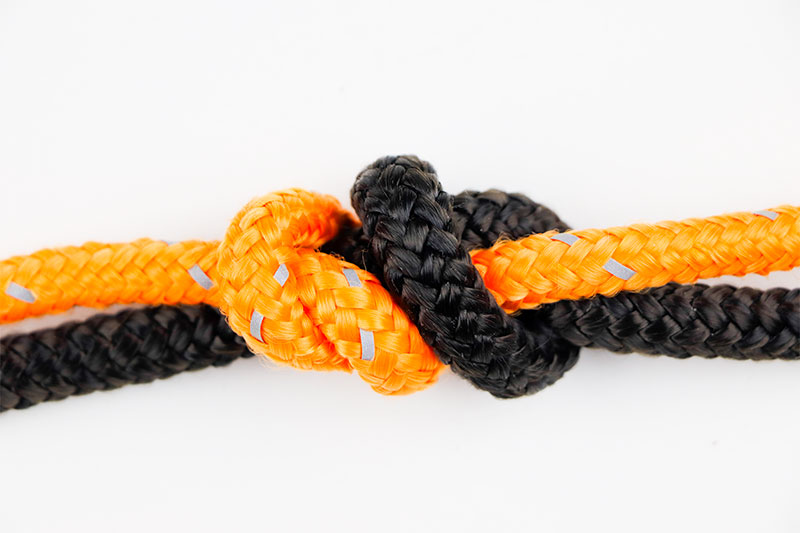
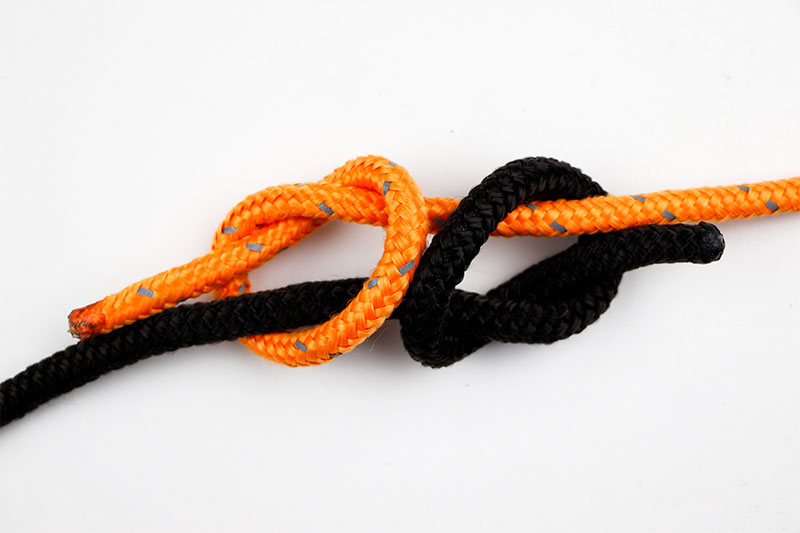
What a handy knot this is. It can easily attach two ropes to one another and if it’s tied with rope, you can actually untie it. If you use string, however, you’ll definitely need to cut that string to remove these knots. Ropes are large enough to work with, unless, of course, if you super tighten these things. Then you’ll never get them out.
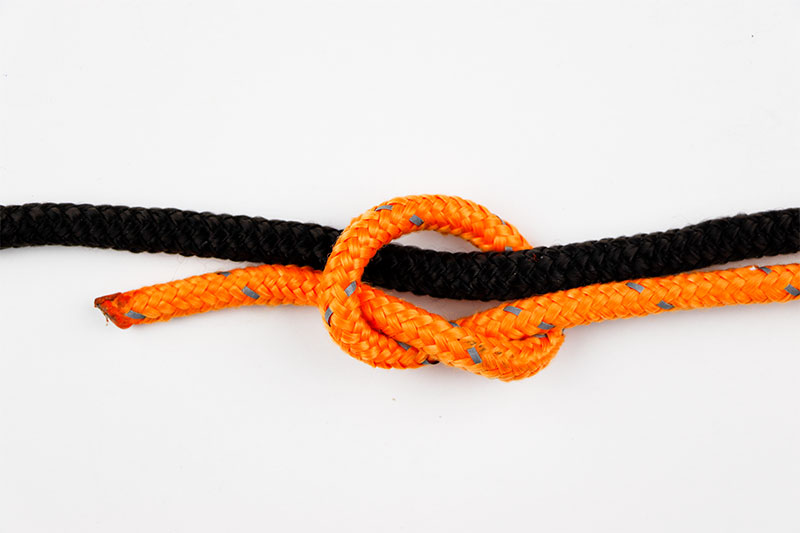
To start out, lay the ends of both ropes opposite and parallel to one another. Then, with the working end of one rope, tie an overhand knot around the standing end of the other.
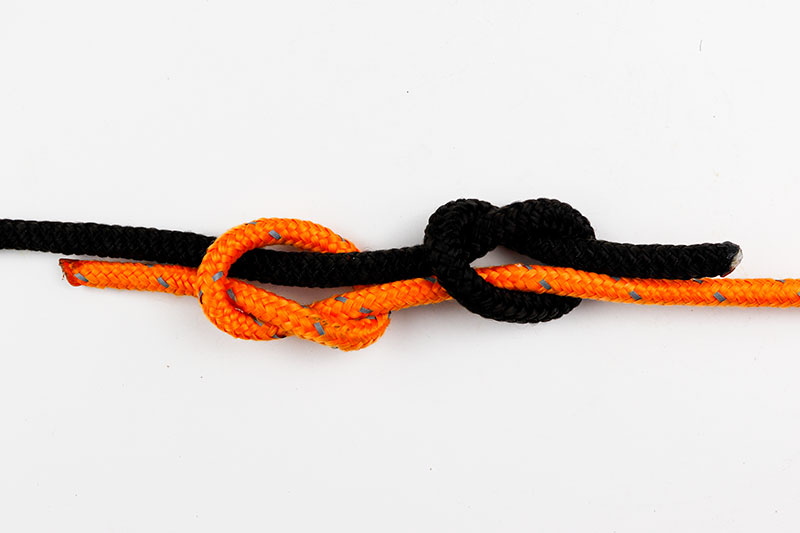
Next, follow the same pattern with the working end of the other rope.
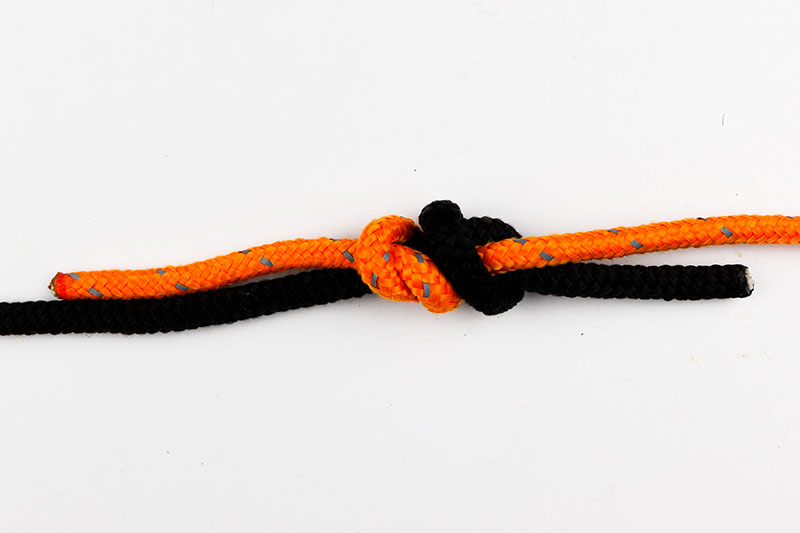
Finally, pull the ends of the ropes to tighten the knots and then pull the standing ends of each rope to slide the knots toward one another.
UPDATE: If you’ll notice in the first four pictures below, I tied the overhand knots unevenly. With one rope, I guided the working end under the standing end of the other and with the other rope I guided the working end over the standing end of the other. This made for a dirty fisherman’s knot when it was tightened.
I just tried this one again and did it correctly. I followed the same exact pattern for both ropes and it resulted in a much neater looking and probably better functioning and more reliable knot. Take a look at the last two photos below. Take notice of how the rope ends travel around the opposing rope.
That’s better. That was annoying me. Just having an incorrectly tied knot in this post would have caused me to lose sleep.
Double & Triple Fisherman’s Knot
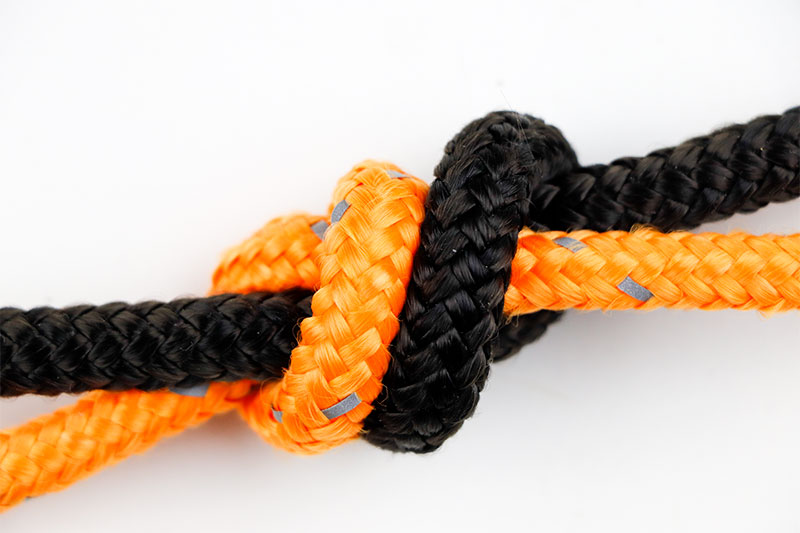
These knots are also quite often referred to as the grinner and the double grinner knot, respectively. Both of these are stronger than the single fisherman’s knot. While the single version of this knot is fairly strong, the double is stronger. The triple, however, is used with lighter rope, as that’s easier to work with. I’ll tell you though, the way these knots are tied is straightforward. I think you’d have no problem tying the double grinner knot with heavy rope.
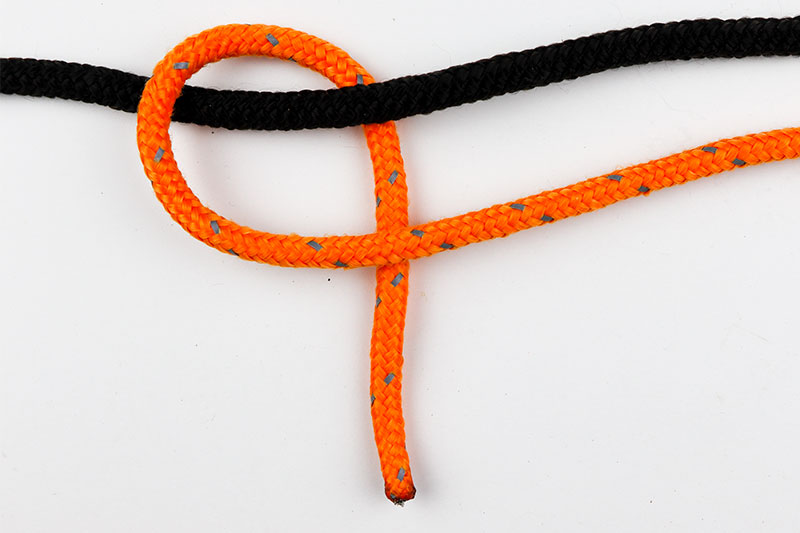
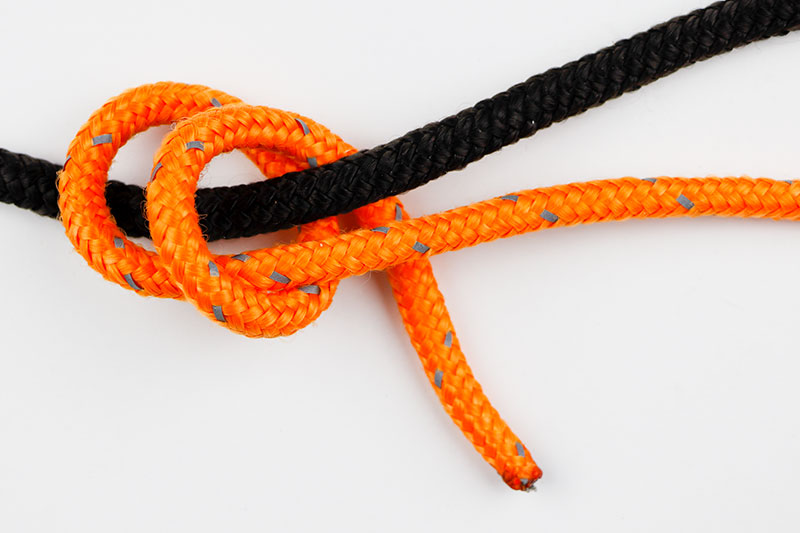
To start off, lie the two ends of rope opposite one another and in parallel. Then, take the working end of one of the ropes and bring it over and then under the other rope.
Next, bring the tail end of the same rope over the other rope again, making sure to overlap itself. Notice how I’m working my way toward the tail of the black rope.
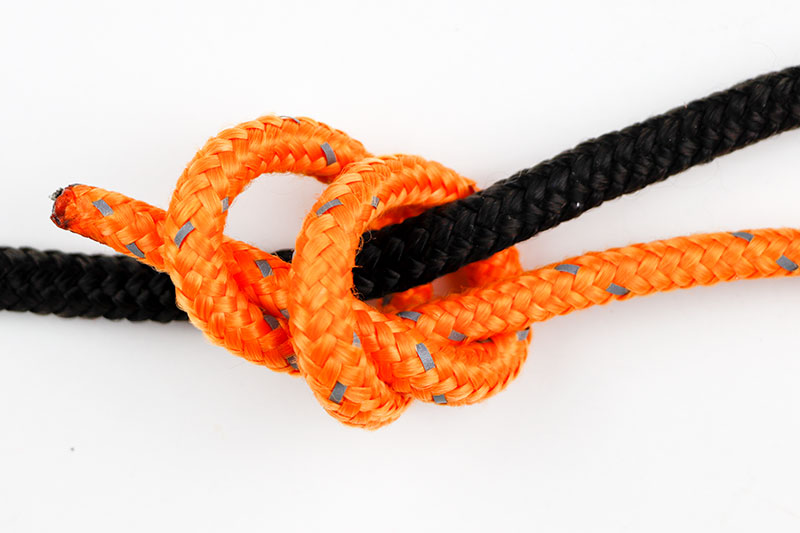
Then, bring the working end under the standing end and through both bends in the rope.
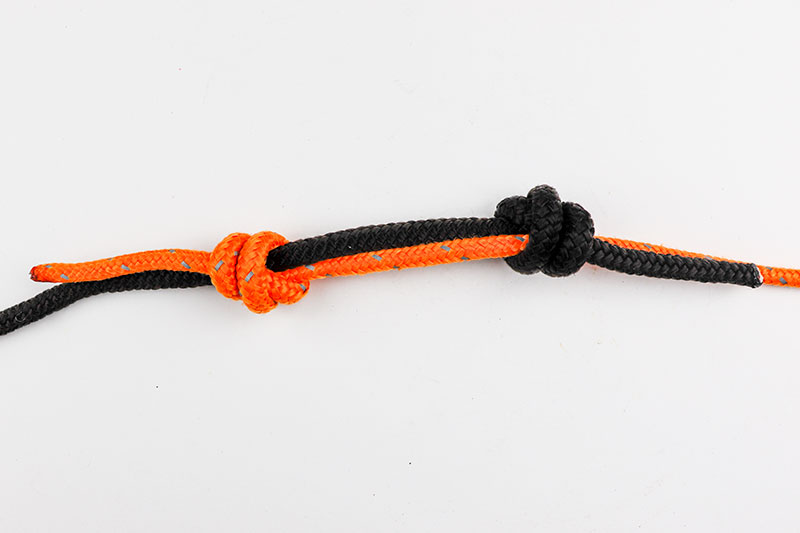
Pull the ends of the working rope to tighten the knot. Then, do the same exact thing with the other rope. So in this case, once I was finished with the orange rope and tightened that knot, I repeated the process with the black rope.
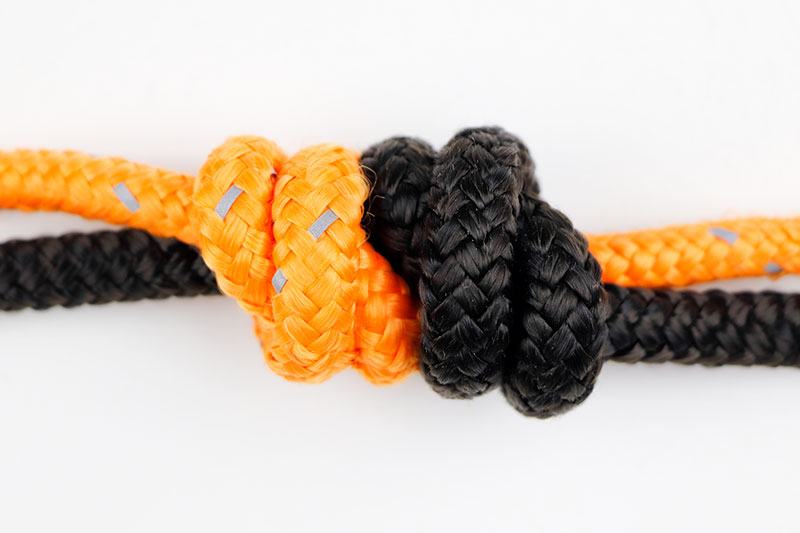
Pull both ropes apart from one another and the knots will meet in the middle. Notice the view of the bottom of the knot. Also the top.
To tie the triple fisherman’s or the double grinner knot, all you need to do is follow the same process as above, but add one additional wrap around the rope you’re tying. So instead of going around the rope twice in the beginning, just go around three times. And then snake the working end through and you’ll be all set. Below are two pictures of this knot.
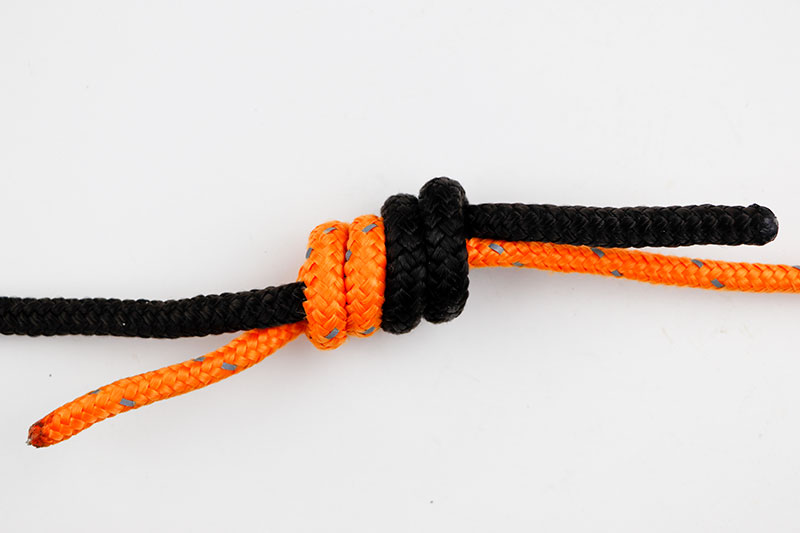
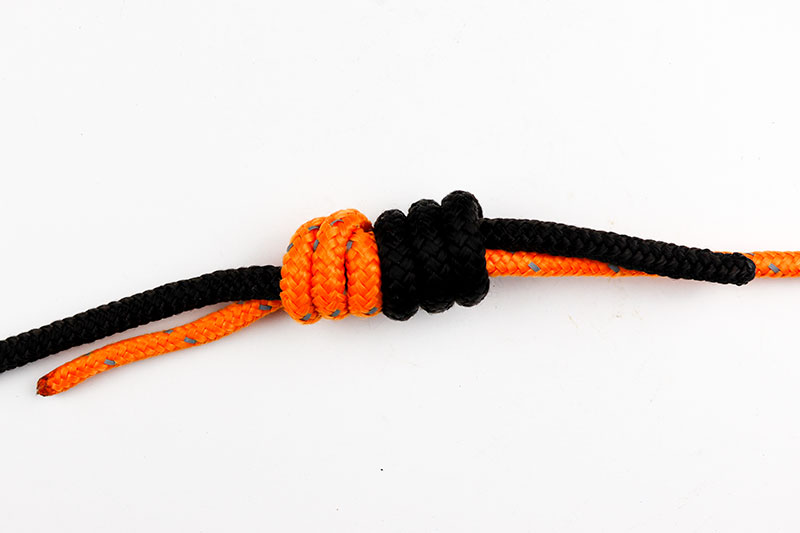
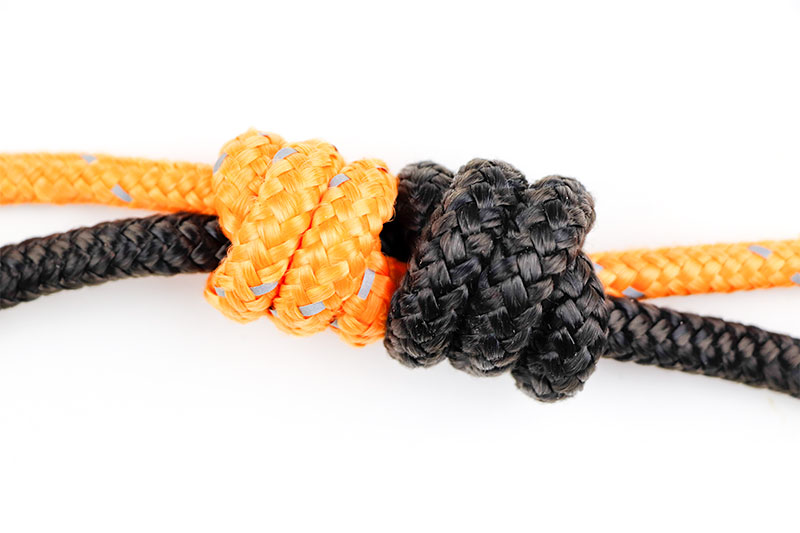
Flemish Bend
Bends are very cool knots intended to connect two different ropes. Sometimes bends connect two ropes of the same type, but other times they connect two very different types of ropes. I’ve got a bunch of bends to show you, so sit tight.
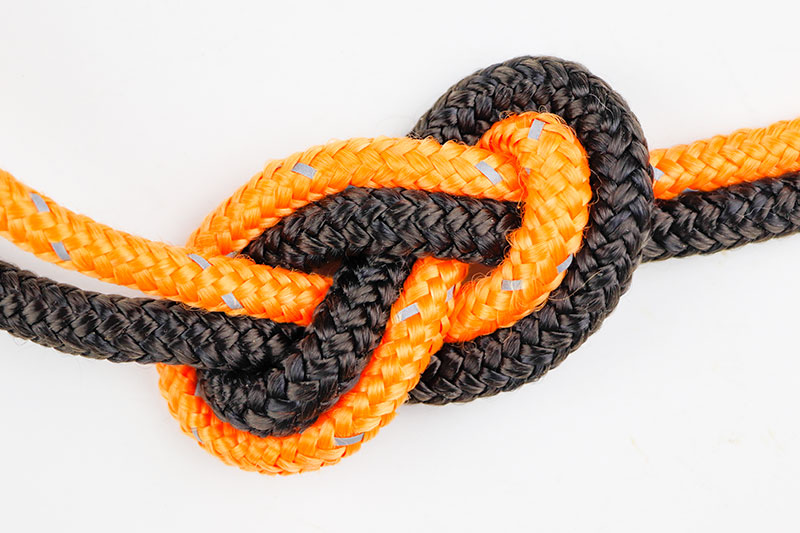
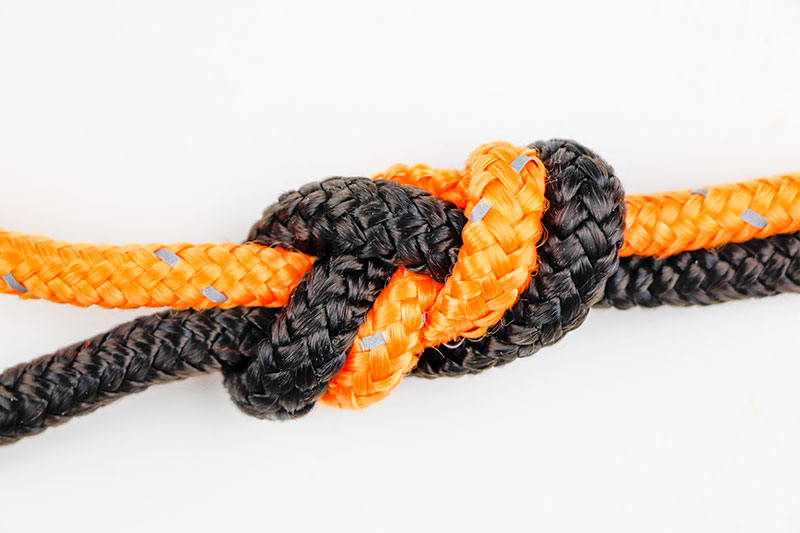
For today’s bend, I’ve got the Flemish. Flemish bend that is. This is a knot that has fallen out of favor with those who have used it to tie natural fiber ropes because when tightened, those people would have difficulty untying it, which is one characteristic that bends enjoy. They’re meant to be untied. When it comes to synthetic ropes though, this is a great knot. It ties well, is plainly visible to see if it’s been tied correctly, and it just looks good. It’s got a cool name too. Plus, it does a great job connecting the two ropes, which is why climbers enjoy this one so much.
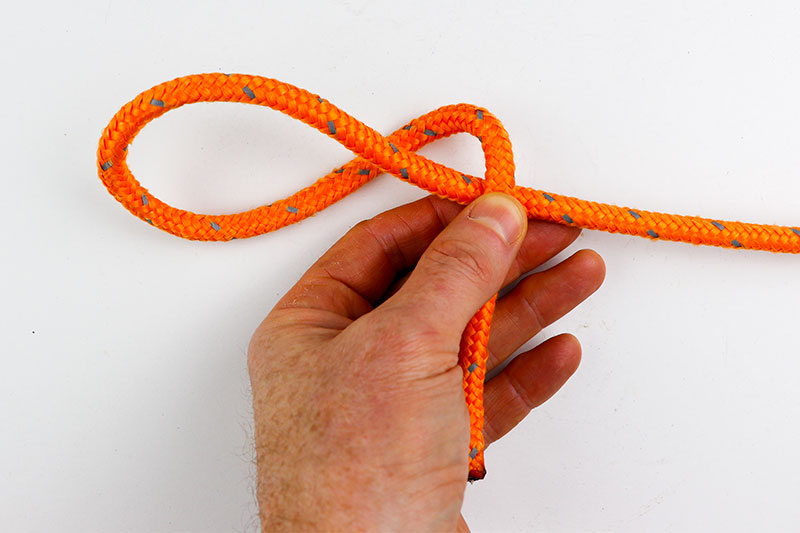
To tie this knot, start off with a loop in one end of one of your ropes.
Next, pinch where you crossed the rope to keep it securely in place and then twist the loop over once. In my case, I twisted it counter clockwise because I had originally placed the working end over the standing part.
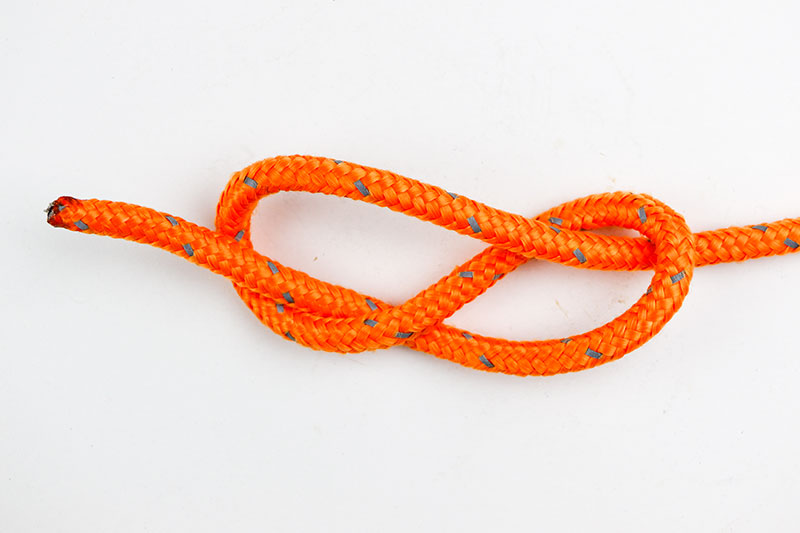
Then, take the working end of the rope and feed it under the loop and then through. You’ll see that your knot looks like a figure eight.
That’s pretty easy so far. That’s actually half the knot!
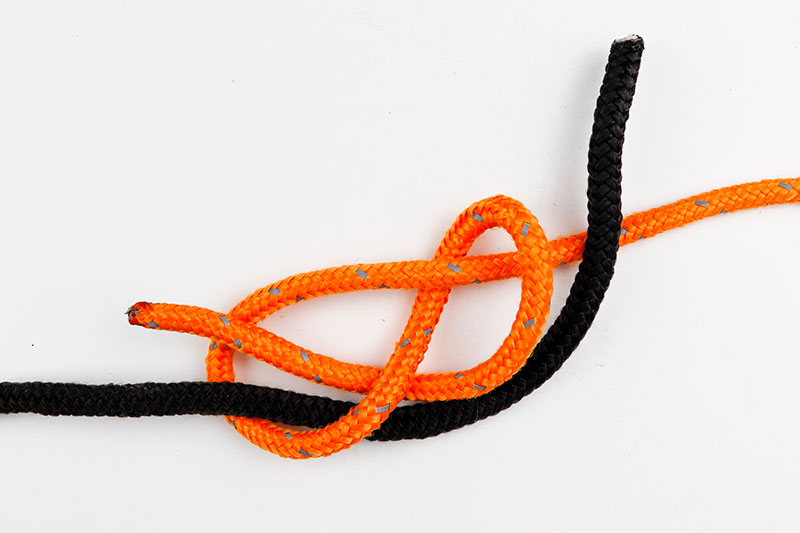
To continue on, you basically want to introduce the second rope to the knot and then trace the first knot with the second.
After feeding the black rope through the bend in the orange rope, I continued feeding the black rope along the orange rope.
It’s at this point you should neaten up the ropes as best as possible. Notice how I have my knot fairly flat.
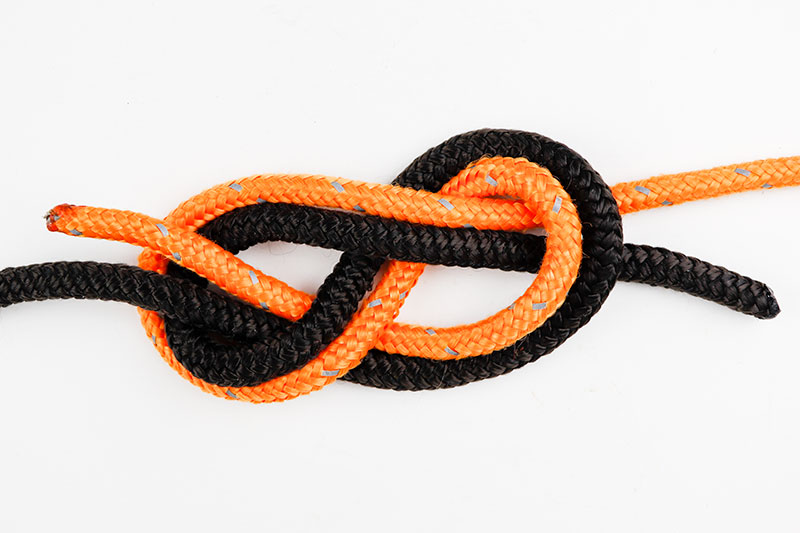
To tighten the knot, simply pull the working ends and then the standing parts away from one another. Do this slowly as to not disturb the knot.
Below you’ll see the classic Flemish bend knot. After tightening it some more, this is what it looks like.
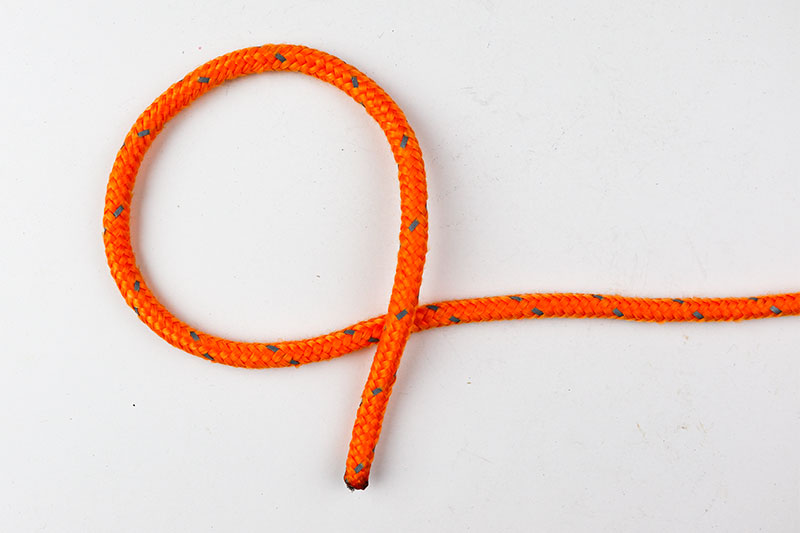
Common Whipping
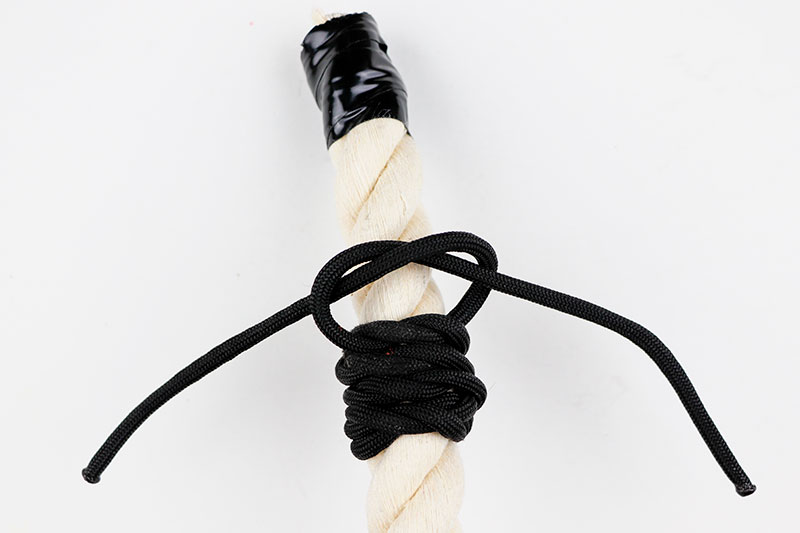
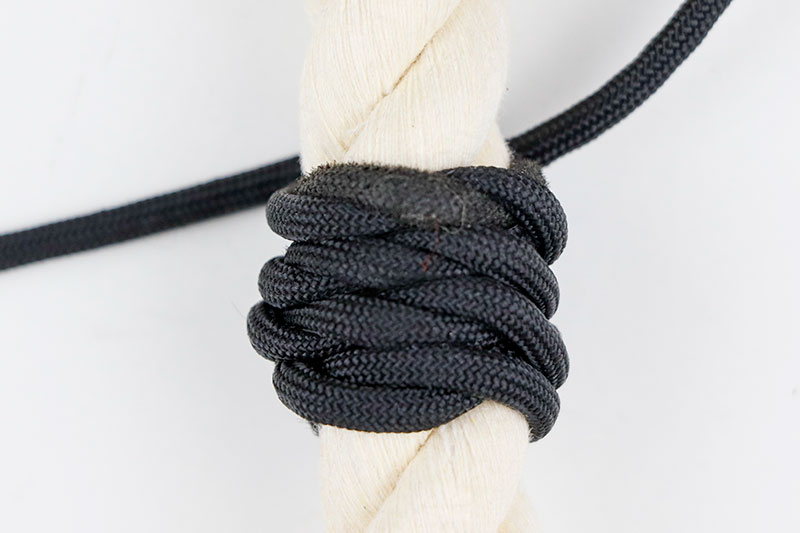
Using a whipping knot is a great way to prolong or avoid having the end of a rope come unwound. I actually just bought a piece of rope to use in this post at Tractor Supply. It’s a 3/4″ cotton 3-stranded rope and one end of it was completely undone for about six inches. It’s a shame too, because it’s nice rope. Someone at the store forgot to use electrical tape on it to keep those strands from coming loose. As you may have guessed, electrical tape hasn’t been available as long as rope has, so what fishermen, loggers, and anyone else who would want to keep the ends of their ropes nice and neat would do is tie a whipping knot at each end of them. It’s a neat little solution that’s actually new to me. After trying it out on my new rope though, I can definitely see the value.
For clarity purposes, I’m using paracord as my whipping rope, but in real life, you’d want to use something thinner. Something that really grabs on to itself, not that paracord doesn’t do that. After I was finished tying this knot, I had a tough time getting it loose and I didn’t even tie it too tightly.
Also, I didn’t cut the end of the larger rope after I was finished to make the whipping rope sit at the end. I’m going to be using this white cotton rope in future posts, so I wanted to keep it intact.
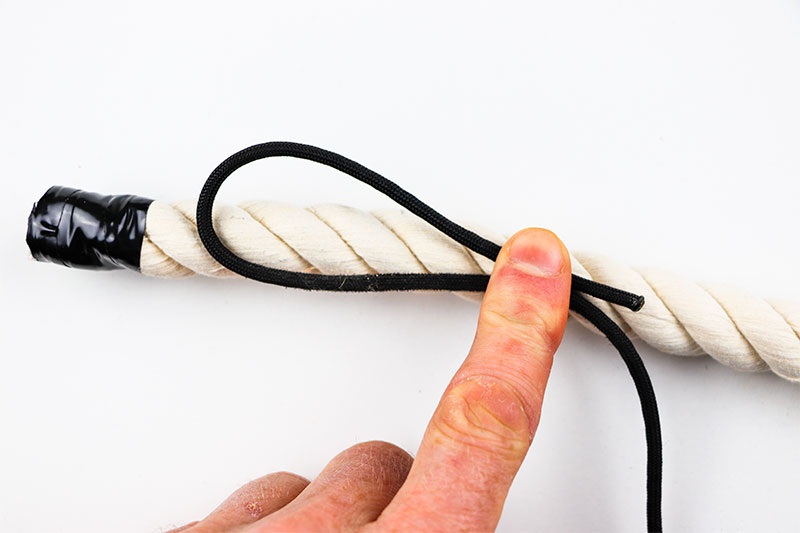
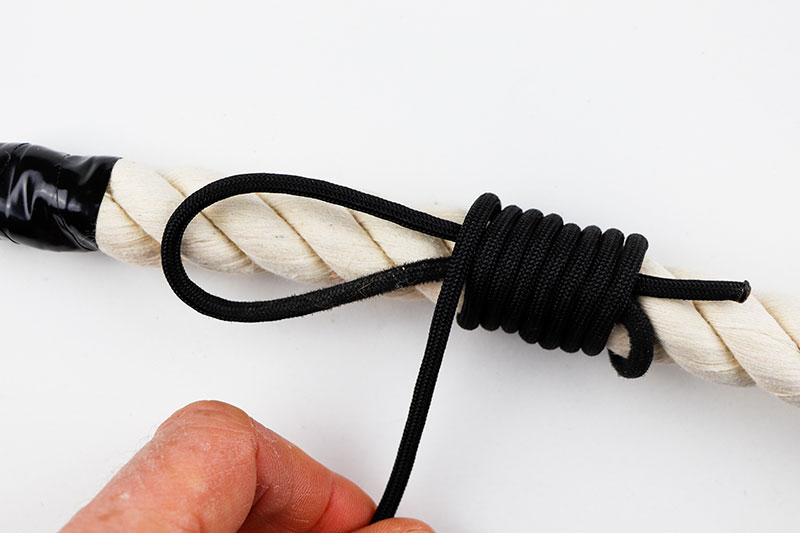
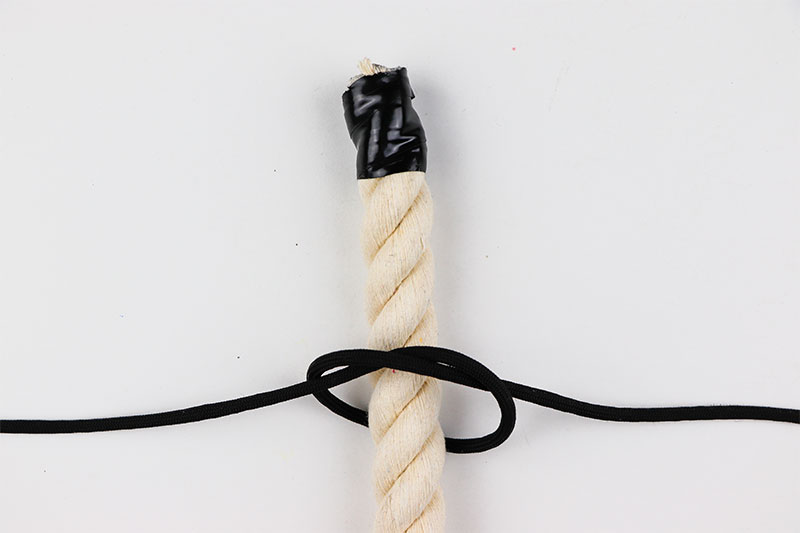
To tie this knot, create a bend in your thin rope or string at the end of your fatter rope. Hold that thinner rope in place with the tip of your finger.
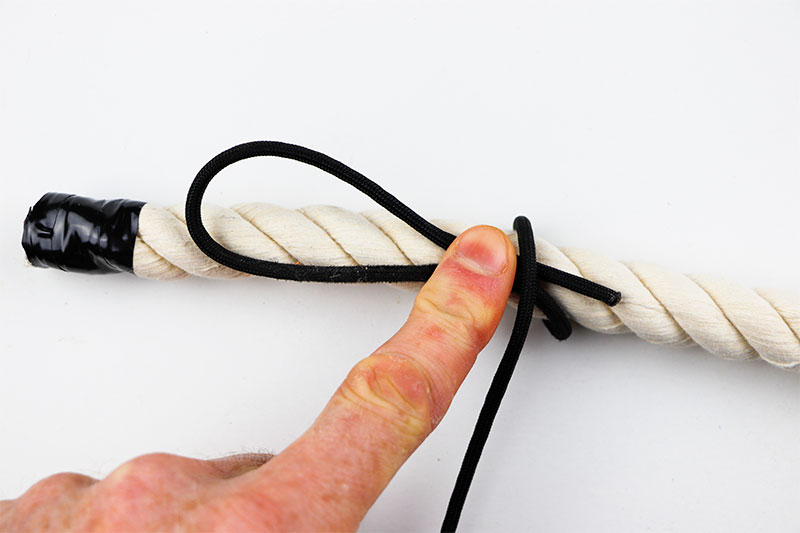
Next, take the working end of your thin rope and feed it underneath and around the larger rope.
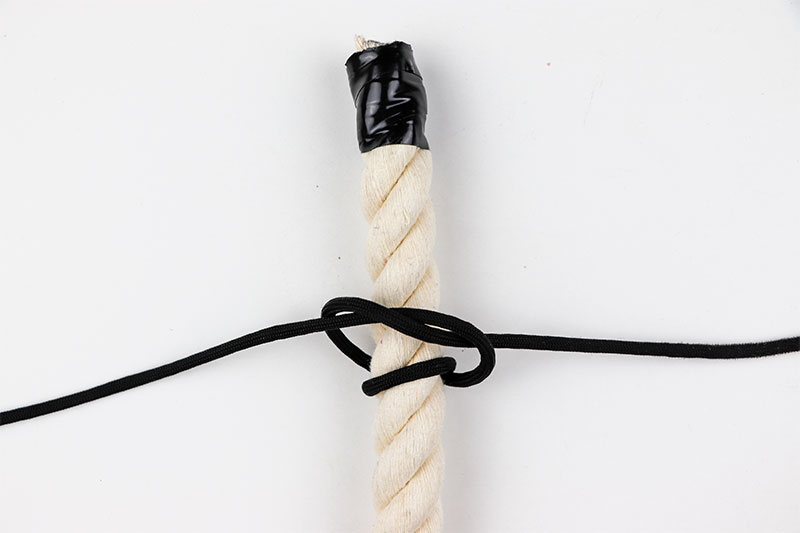
Continue wrapping the thinner rope around the fatter one until you only have a few inches of thin rope left. Also, be sure to wrap neatly and snugly. The tightness of the thinner rope will be what holds it in place at the end.
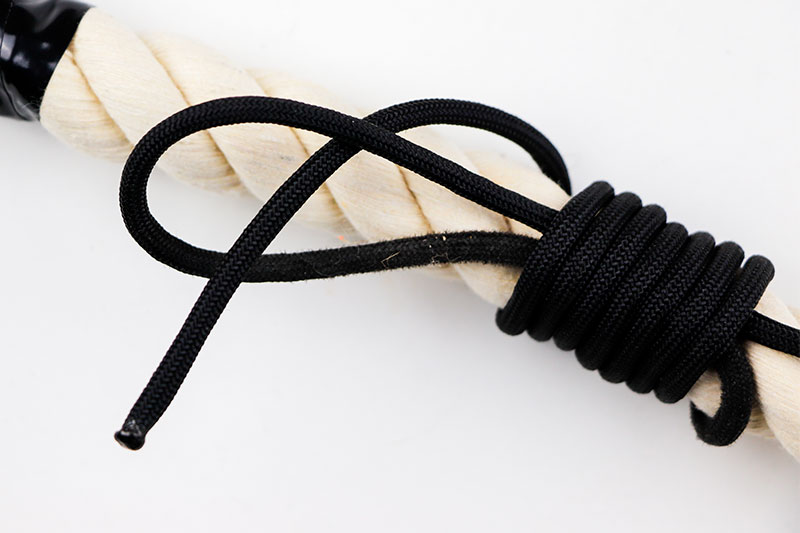
When you’re done wrapping, feed the working end through the bight.
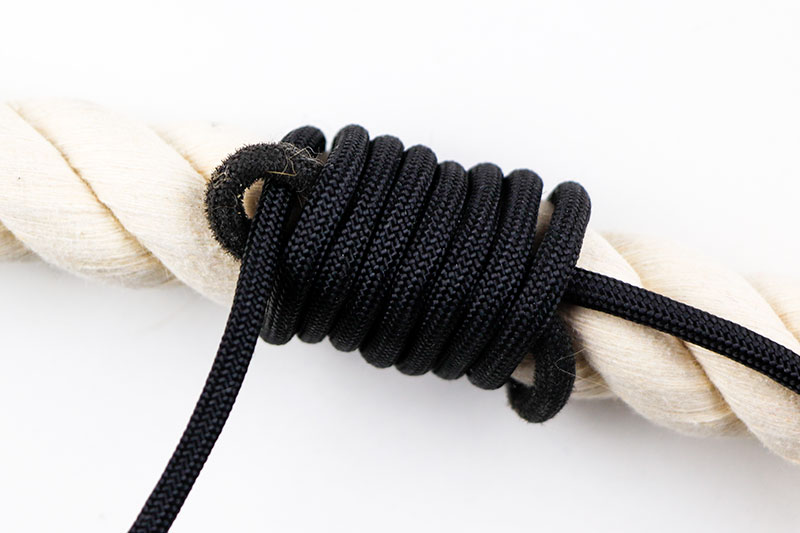
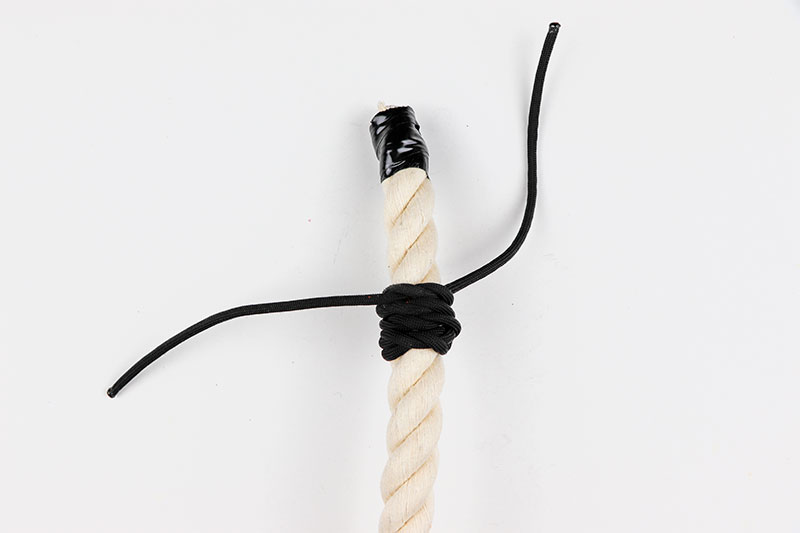
At this point, begin to pull the standing end of the thinner rope so it pulls the bight up against the wraps.
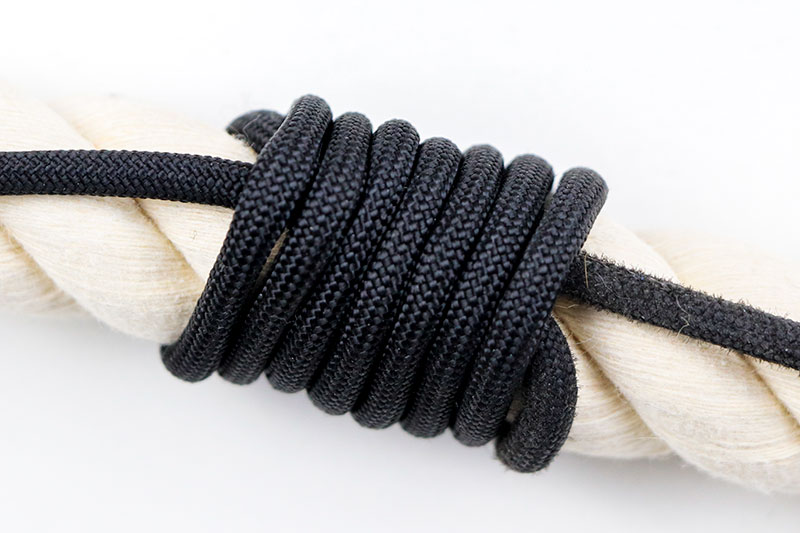
Continue pulling so that bight drags the working end underneath the wraps. Pull until it reaches about half way through the wraps.
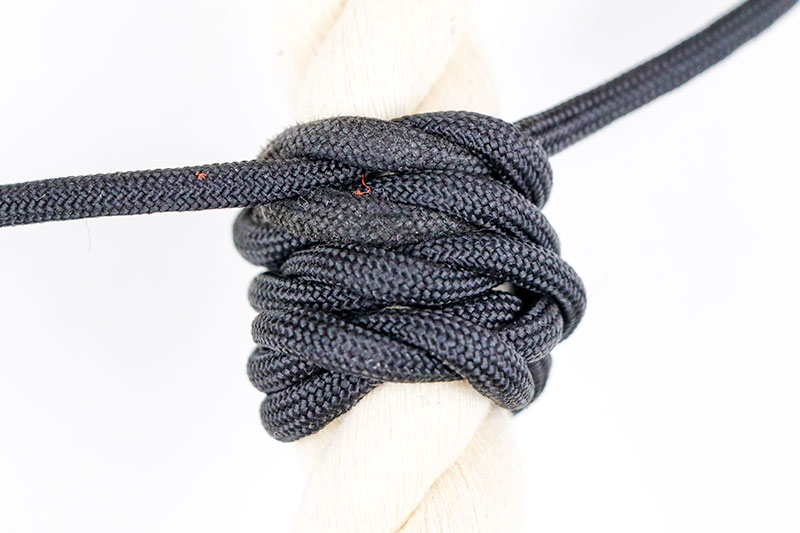
When finished, trim the ends of the thinner rope carefully. You’ll find that this knot is very secure. I didn’t trim the ends because I’ll need both of these ropes again.
West Country Whipping
Simply put, this knot consists of a bunch of overhand knots and a square knot at the end. It’s that easy. Basically, all you’re doing is tying an overhand knot around a rope, flipping that rope over, tying another overhand knot, flipping the rope over, and repeating that process until you’ve worked your way as far as you want to go. At the end, tie a nice tight square knot (reef) and tuck that under the whipping.
Below are a few photos. To start, tie your first overhand knot around the end of your rope. I’d say about two inches away from the end is good.
Pull the ends of your rope nice and tight so the first knot is secure. Then, flip the large (in this case, white) rope over and tie the same exact knot as before.
Again, make this one nice and tight too. To repeat this process, keep flipping the rope over like a pancake and tie a knot each time. After a few of these, your rope should look something like the #3 and #4 photos below.
When you’re all finished, tie a square knot as the final one. Tighten it firmly.
Once it’s very tight, you can tuck that square knot under the whipping to keep it secure. I suppose if you’re working with paracord like this, you can trim the ends first and then melt them with a lighter. I do that all the time. After that you can tuck the square knot under.
Double Figure-of-Eight Bend
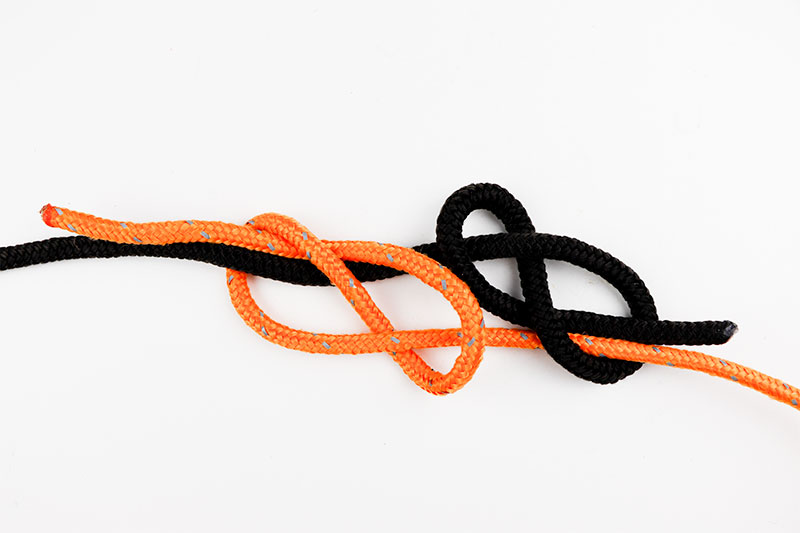
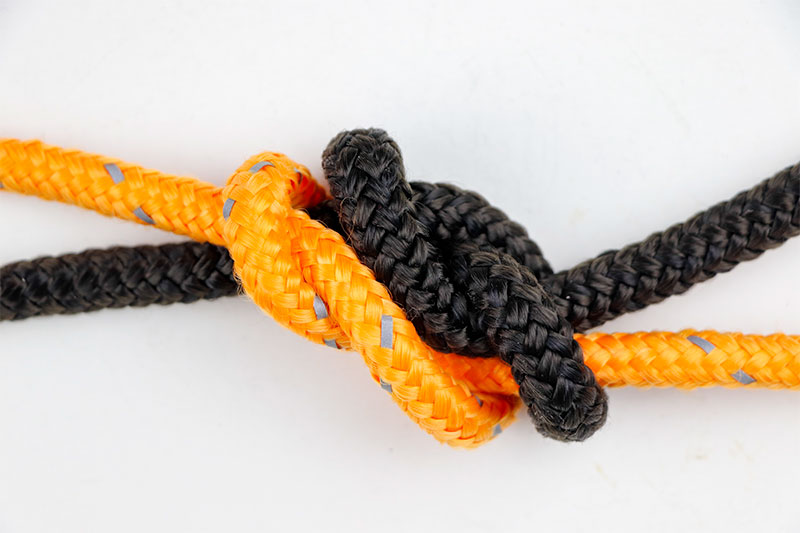
If you compare the fisherman’s knot and this one, you’ll see they serve the same purpose. They connect two ropes together securely. The difference between that one and this one though is that this one is symmetrical. If you look at the second photo below, you’ll see that both knots are identical and are identically positioned. Otherwise, the two knots are very similar.
To tie this knot, tie yourself a figure eight with the end of one rope, just as you did with the Flemish bend. In my case, I began with the orange rope. Once that was finished, I fed the working end of the black rope through the bend in the orange rope and then proceeded to tie the same figure eight with the black rope.
Next, pull the ends of each rope to tighten the knots. Then, pull the standing ends of each rope away from one another so the knots touch one another. And there you have your knot.
Zeppelin Bend
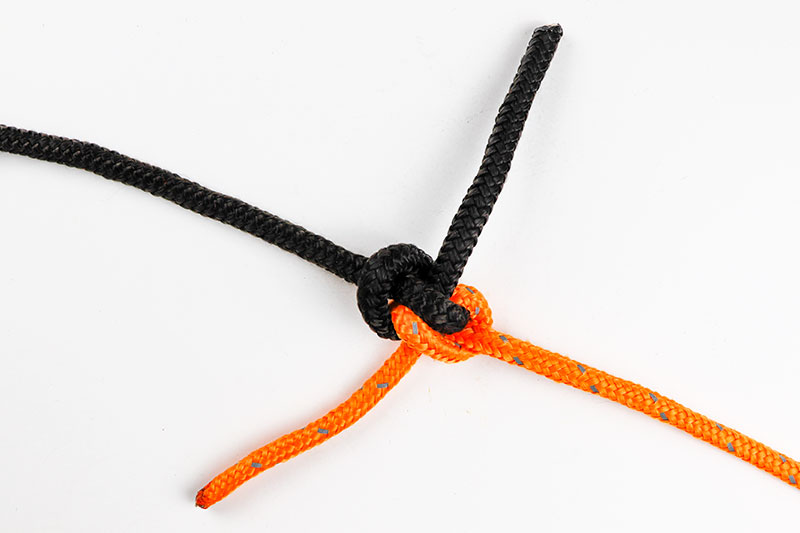
What a cool knot. This is big in the arborist industry because it connects the ends of two ropes well and it can withstand heavy loads, but unlike other knots of its kind, it’s relatively simple to untie. Essentially, this is just two overhand knots tied together. Once you tie this knot one time, you’ll remember it forever. It’s extremely easy to tie. There’s no reason you shouldn’t use this knot to tie two ropes together, unless you have something against the two working ends sticking out of the sides. Sure, it may not be the best looking out there, but this is a good one.
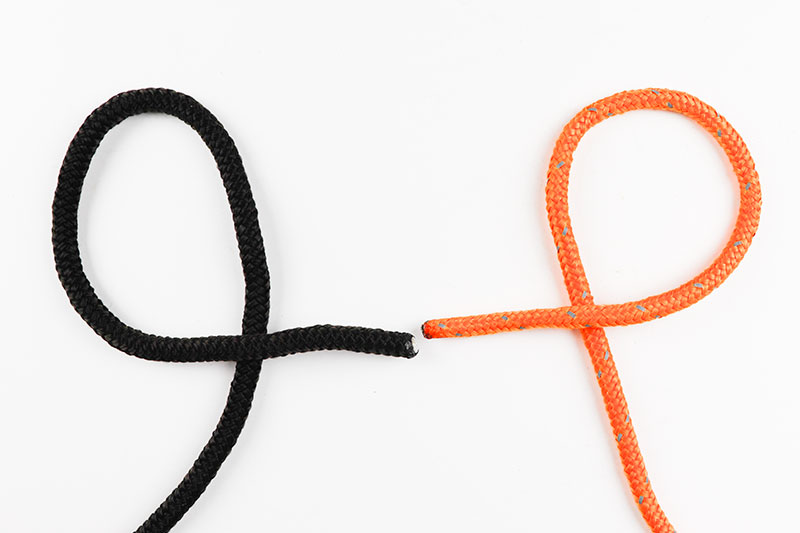
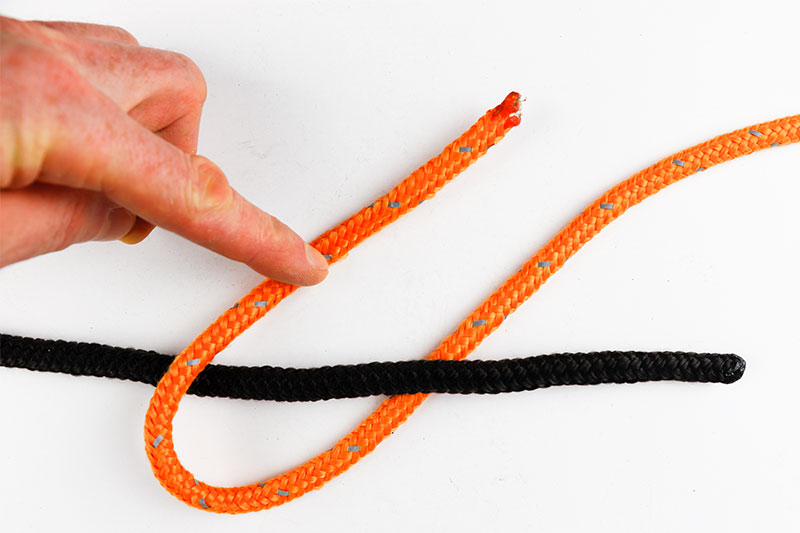
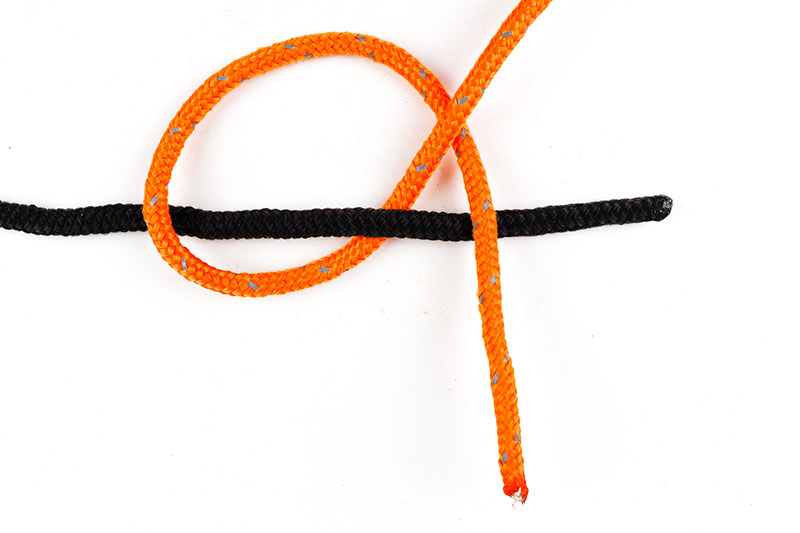
To tie the zeppelin bend knot, start off with making a loop at the end of each line. Notice how I tie this in the photo below. Both working ends go on top of the standing parts.
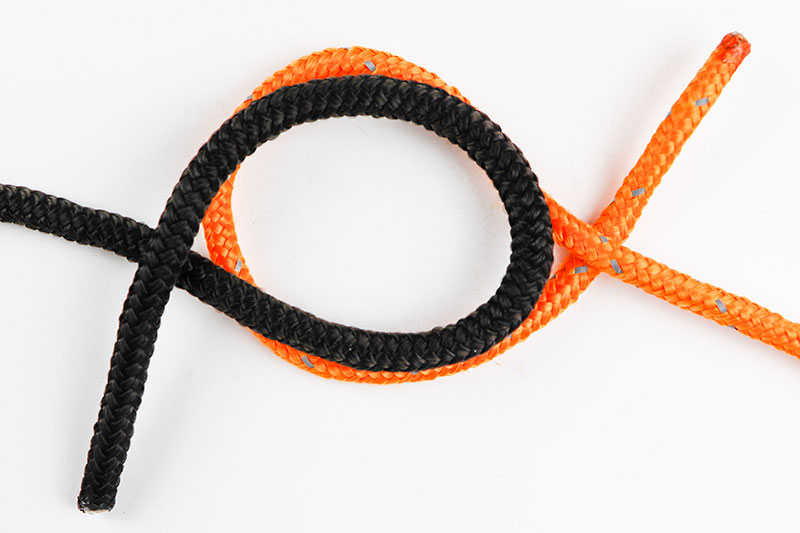
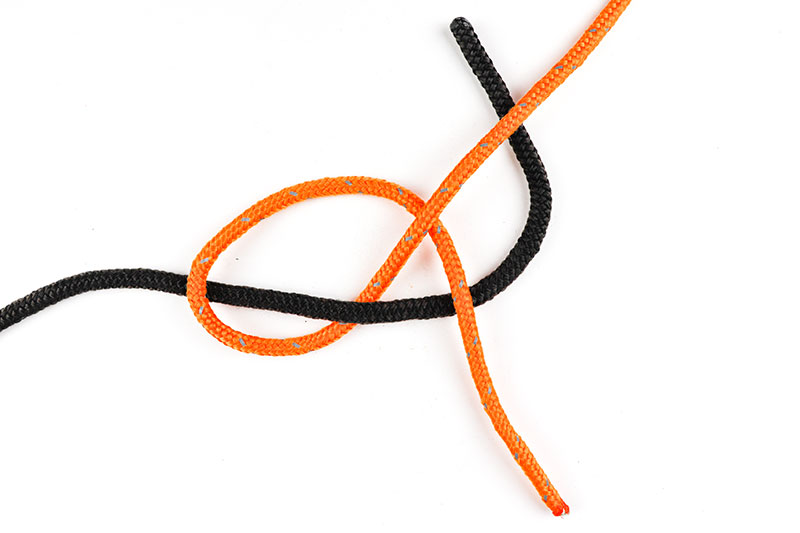
Next, flip one of the loops over and place it on top of or under the other loop. In my case, I flipped the orange rope over and put it under the black rope. Notice how the working end of the black rope is on top of the loops and the working end of the orange rope is underneath the loops. These placements are very important.
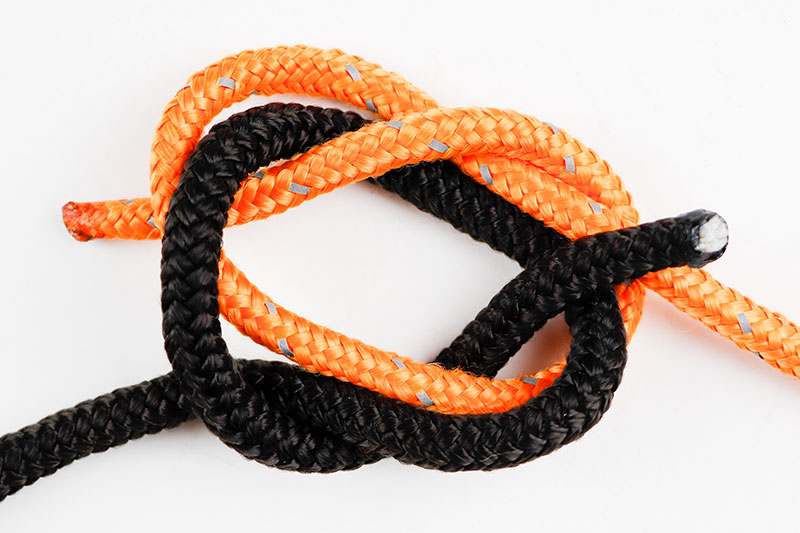
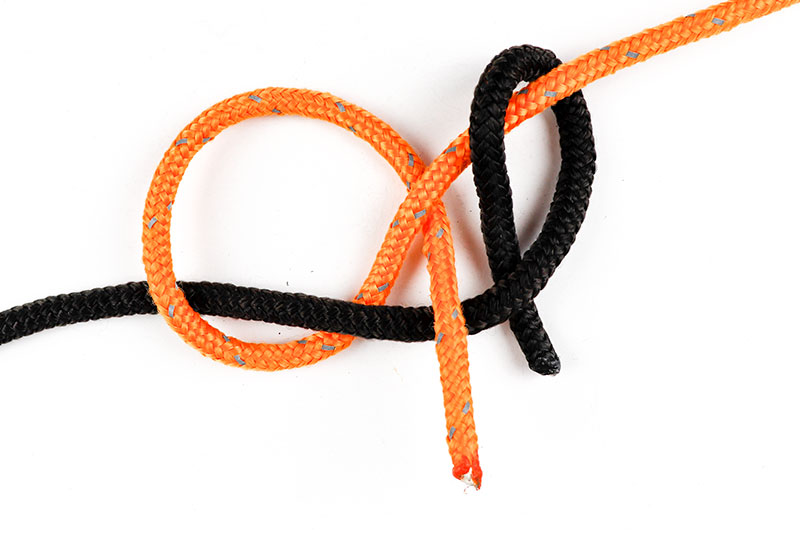
This next step is the most important. Take the working end of one rope and pass it under or over itself and through the other rope’s loop. In my case, I took the working end of the black rope and passed it under itself and through the orange loop rope. Then, I took the working end of the orange rope and passed it over itself and through the black rope loop. Notice how I’ve tie two overhand knots.
To tighten the knot, simply pull the ends of each rope away from each other. This next photo is of a semi-tight zeppelin bend.
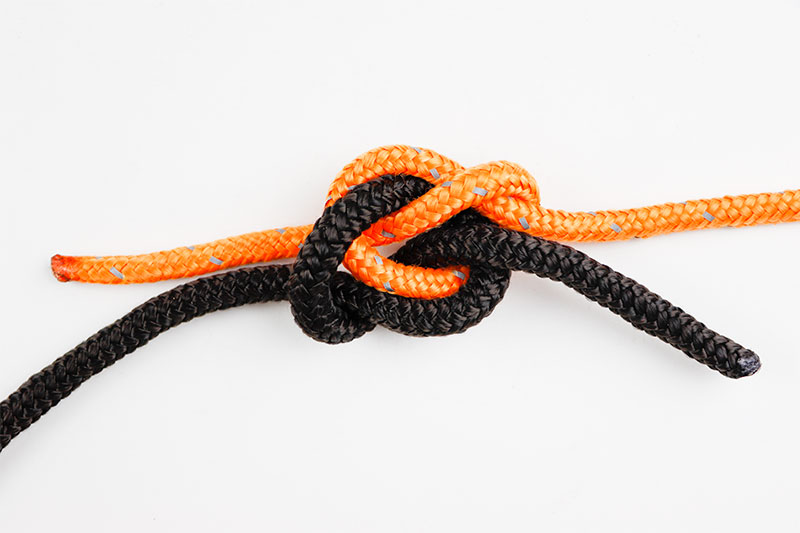
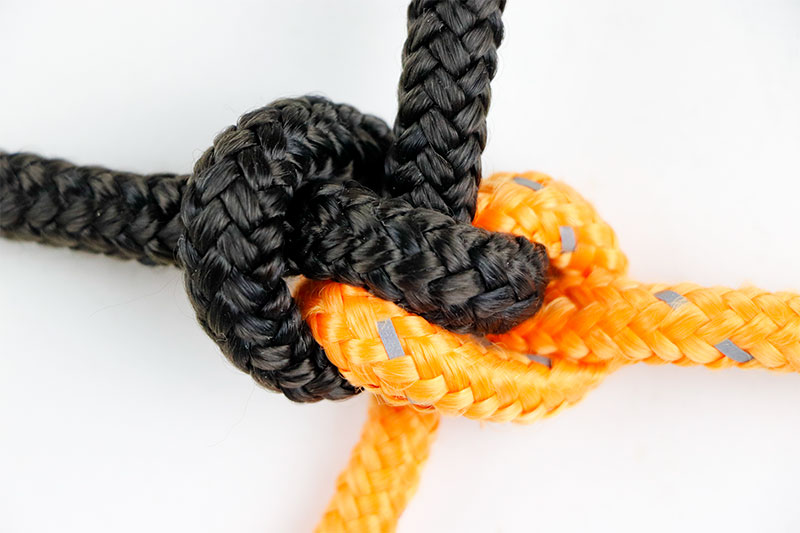
If you keep pulling and dressing the knot, you’ll have a nice tight zeppelin bend. The last two are the final photos. One regular and one up close.
Adjustable Bend
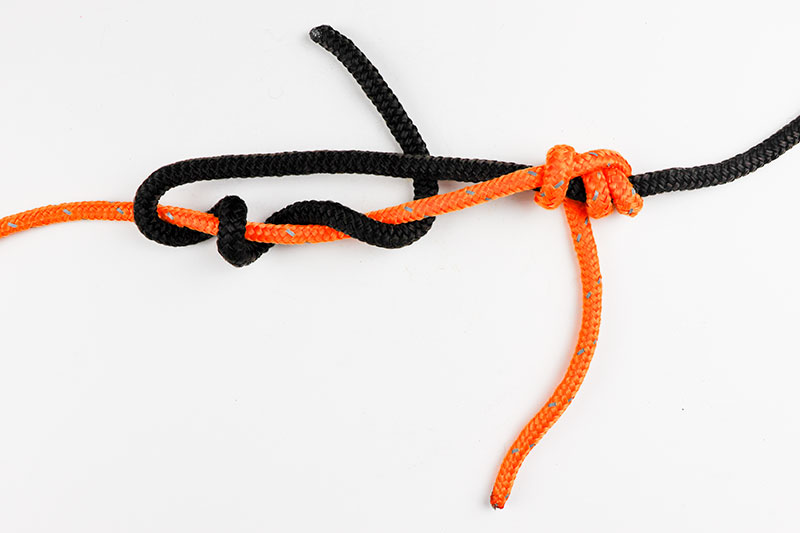
This is another knot that connects two ropes, but it’s somewhat different than the others I’ve already shown you. If you tie this knot, but keep each one apart from the other, they’ll act as sort of a cushion. While under light load, the knots will stay separated, but if the load suddenly becomes heavier, the knots will slide toward one another, reducing the strain of the rest of the rope.
It’s sort of confusing to tie this knot for the first time, but it gets easier with every subsequent effort. The confusion stems from tying the second rope, but I’ll make that easier when I explain it below. Here goes.
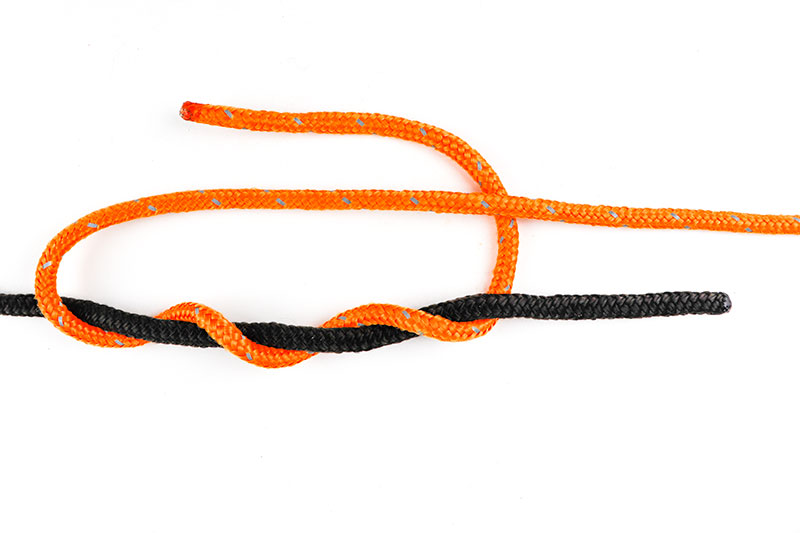
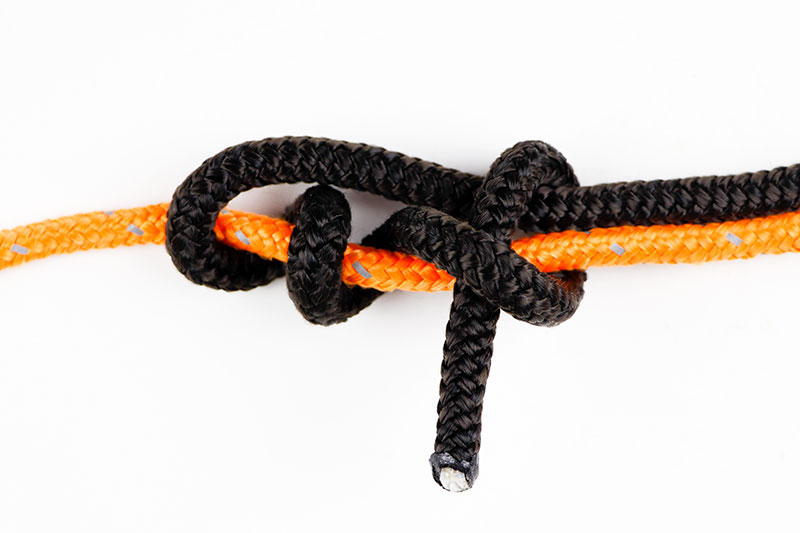
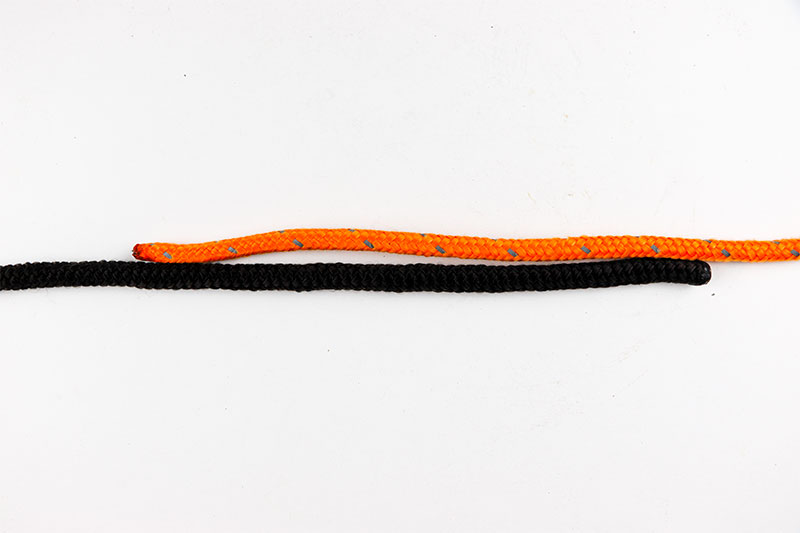
Start by lying the ends of both ropes in parallel with one another, but end to end. Give yourself about a foot and a half of overlap with each rope. Then, bend one of the ropes and feed it over and then under the other rope. After that, feed it under the other rope two more times. And finally, feed it under itself. Take a look.
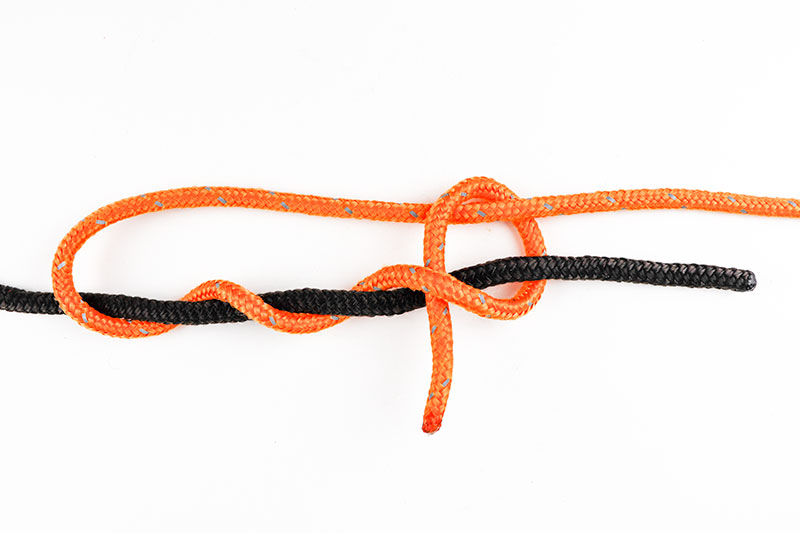
Next, take that working end and feed it over itself and through the last wrap you made earlier.
There’s your first knot. All you need to do is dress it. Pull the ends (in this case, the orange rope) tight and fix it so it looks pretty.
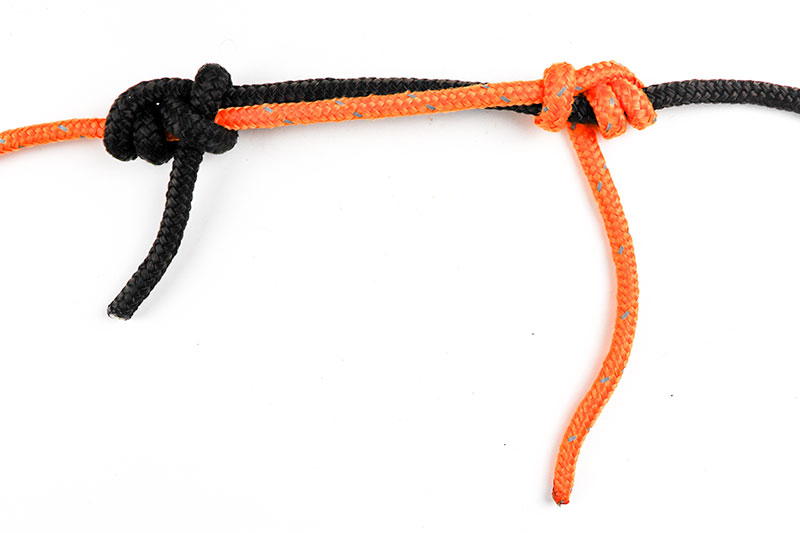
This is where things get slightly confusing. To continue on, pick your ropes up and flip them over, end to end. So, in my case, I flipped my orange rope so it changed from coming in from the right side to coming in from the left side and then I did the same with the black rope. That one originally came in from the left side, so I flipped it so it came in from the right side.
After that, all you need to do is tie the identical knot as you just did, but with the other rope. Here is the beginning of my effort.
After I had the second knot tied, I tightened it and dressed it nicely. And that was it.
Hunter’s Bend
They say this knot is related to the zeppelin. I’ll admit that it does sort of look like it. Both knots hold together very well and they connect two ropes with great strength. I think this one’s a bit more difficult to tie though. You be the judge.
To tie this knot, take two ropes and lie them down, end to end, opposing one another.
Then, make a loop like I did below, making sure to keep both ropes parallel.
After that, take the working end of the left (orange) rope and feed it underneath both ropes and through the loop. Continue on out of the loop after that.
Then, feed the other rope’s (black) working end through the loop, but this time take it above the loop first and then under and out.
To finish up, very carefully take both ends of each rope and pull away from one another. You’ll need to switch between ropes as you do this to keep things neat.
And there you have the Hunter’s Bend!
Surgeon’s Knot
Here’s another great knot that binds two ropes together. It’s good with synthetic rope, or any type of rope for that matter. Once tied, it does take some pulling on the standing parts to fully tighten the knot, but that’s not a problem if you’ve got the room.
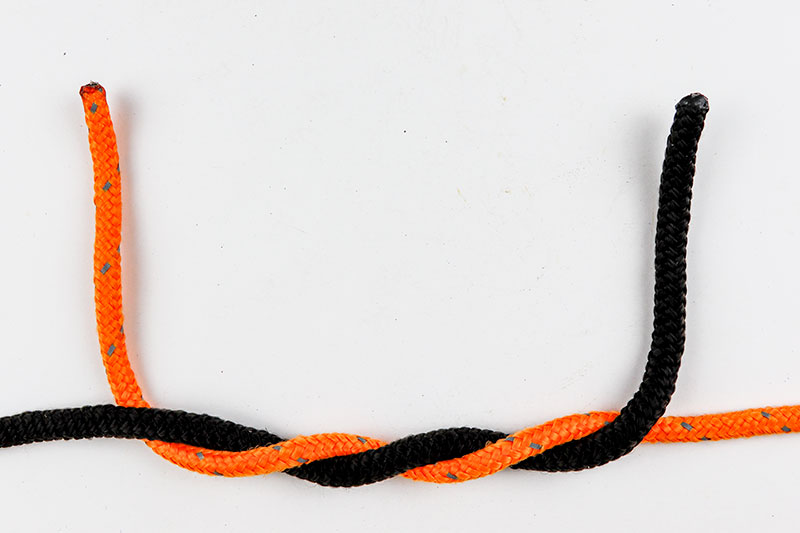
To tie this knot, the the ends of both ropes and give them two wraps around one another.
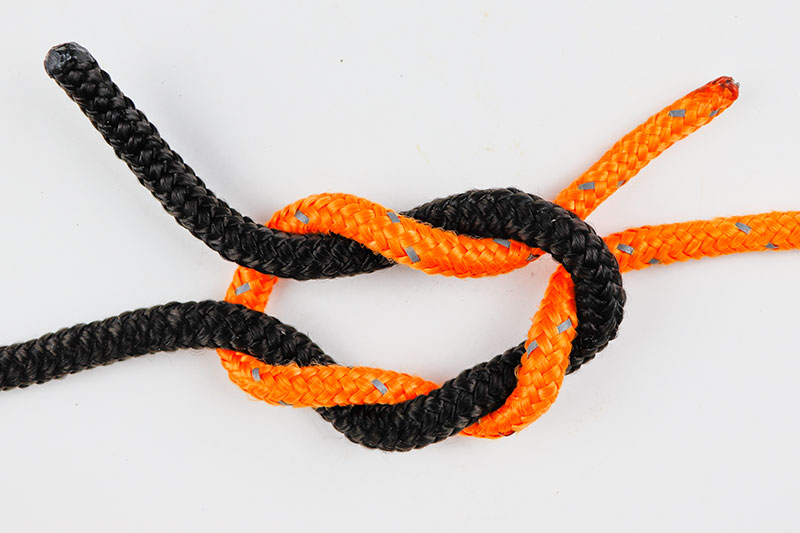
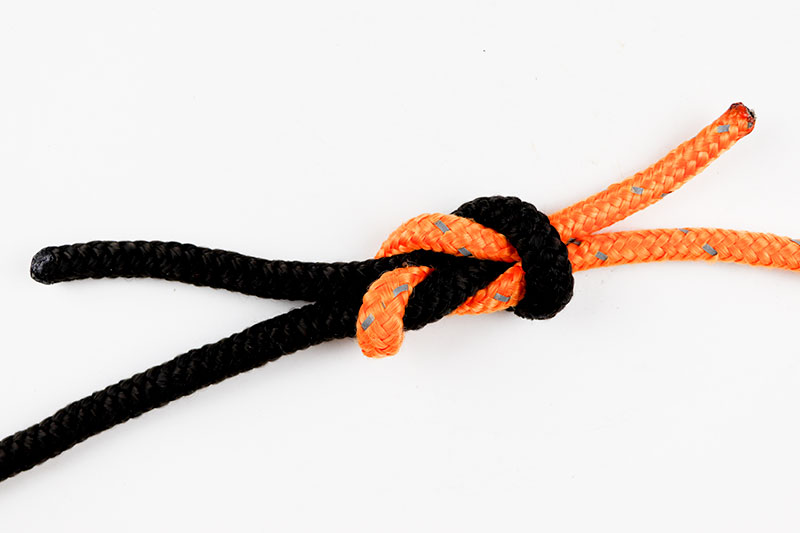
Next, take the working ends and tie an overhand knot, but be sure to follow the example in the photo below. You need each working end to feed over or under in a specific way.
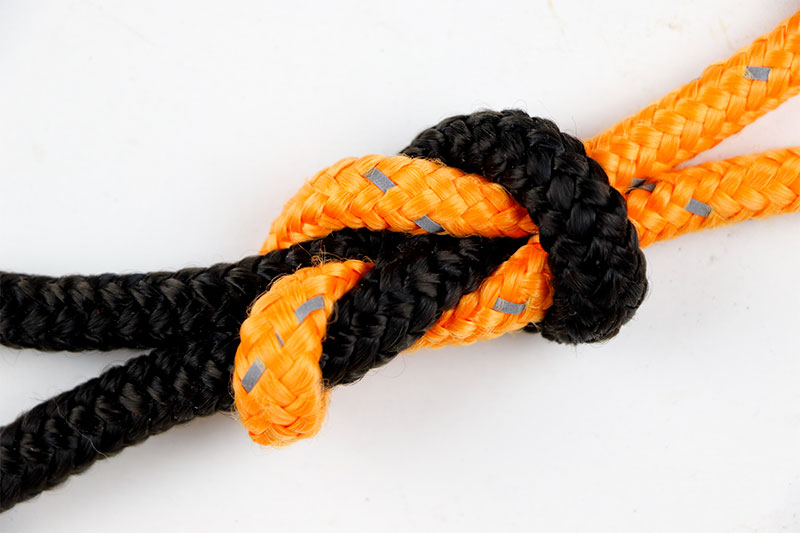
Finally, pull the standing parts of the rope away from one another. The knot should tighten well. You’ll find that this one is quite strong. The more you pull it, the more this becomes apparent.
Harness Bend
This is a great knot that binds two ropes together. It’s perfect for not only rope, but for leather straps, nylon tie down straps, and light wire. This is a knot you might want o consider when tying down a load in the back of a pickup truck or trailer. It’s got many uses.
To tie this knot, lay down two ropes in parallel fashion, overlapping end to end. Then, take the working end of one rope and feed it under the working end of the other rope and then back over the top of the other rope.
After that, take the same rope (orange) and feed it under itself and then over the working end of the other rope (black) again.
Next, take the working end of the other rope (black) and feed it under the standing part of the first rope (orange).
And then feed it up and over the first rope and through the loop that it creates.
And that’s it! Pull gently on the working ends and the standing parts of both ropes to tighten and you’ve got yourself a Harness Bend.
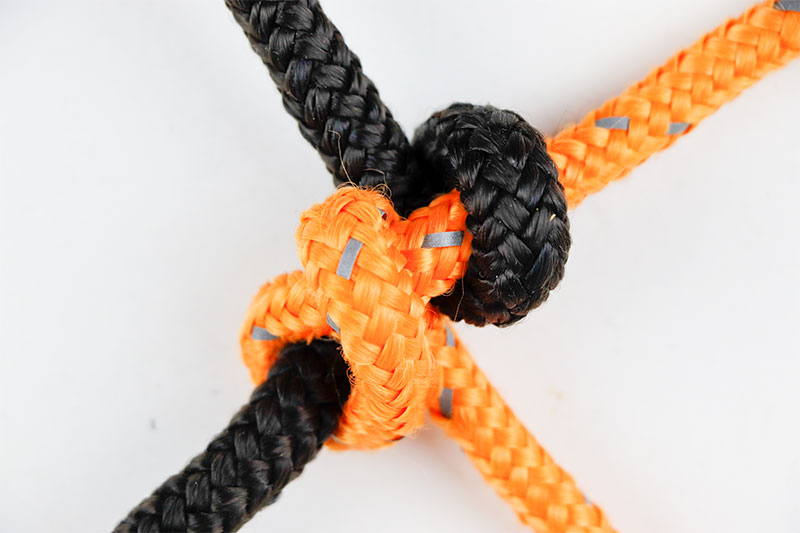
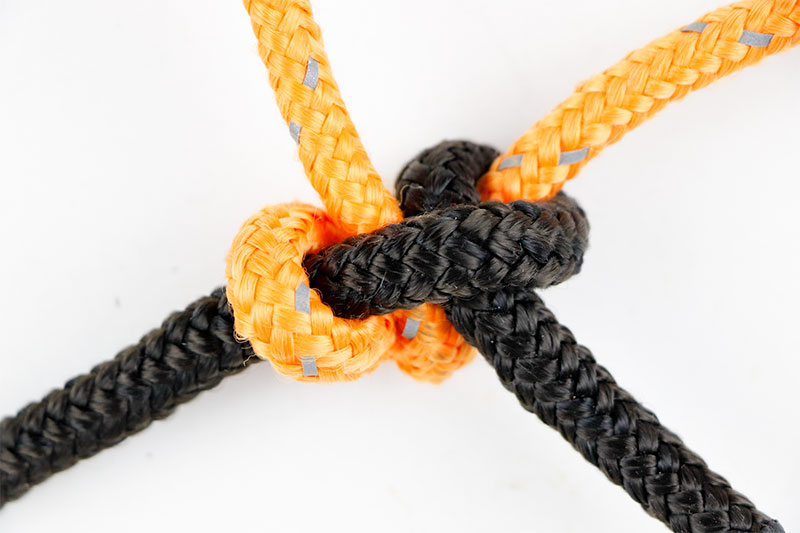
The last two photos below; one of the top of this knot and one of the bottom.
Klemheist Knot
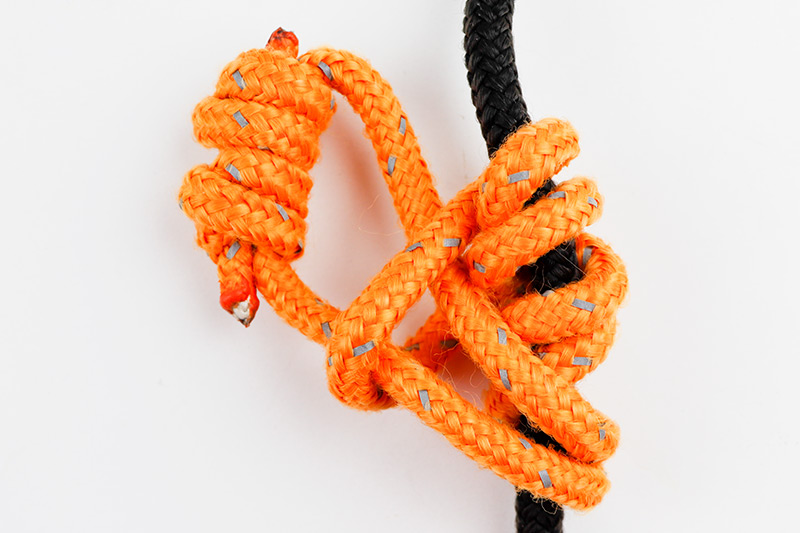
Similar to above, this knot is another that works on friction. When weight or tension is applied to it, the knot locks onto a climbing rope or lanyard. When the weight is removed, the knot loosens slightly allowing it to move freely along the rope again. This knot is similar and works in the same way the Prusik, Bachmann, and Blake’s hitch work to ascend and descend a climbing rope.
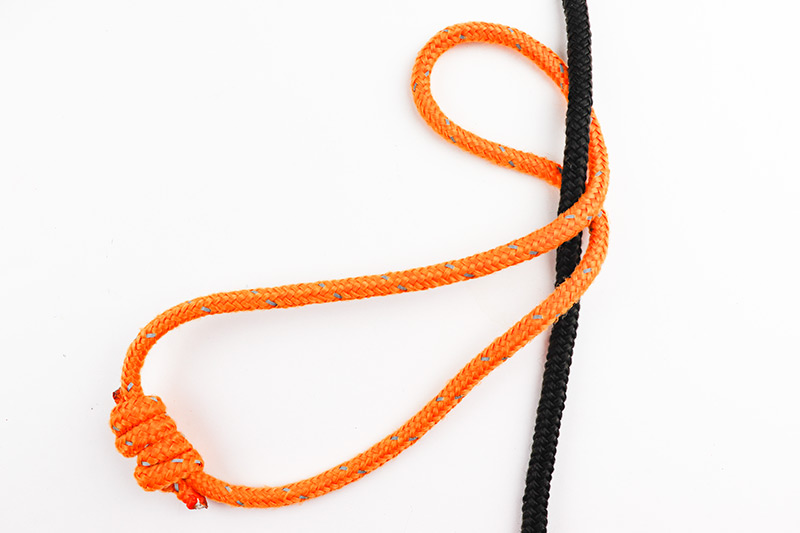
To start this knot, I first took my homemade prusik and folded it over my demo climbing rope.
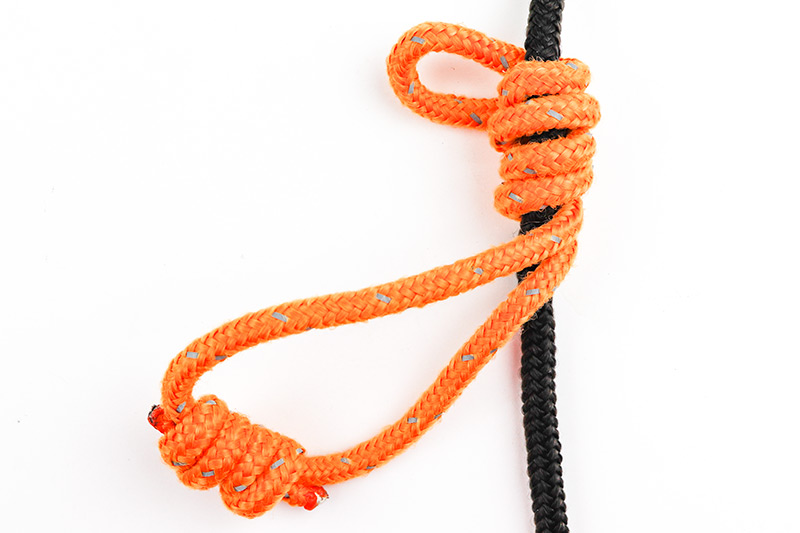
Then, I wrapped the prusik around the climbing rope four times. In the photo below, there are only three wraps because I ran out of rope. Apparently my homemade prusik was too short.
Next, I fed the bottom part of the prusik through the bight at the end of the wraps.
And finally, I pulled downward on the prusik to add some weight to it. It’s the bottom part I’d add my carabiner to to ascend the tree.


Leave a Reply