I’ve talked a lot about exposure when it comes to photography on this website. Much of my discussion focused primarily on how to set your camera properly for the lighting conditions you face as a photographer. And most of the time, through the settings you choose, accurate and appropriate exposure is achieved. There are occasions though, when you might need to “compensate” for tricky lighting situations. Times when your camera simply can’t do it on its own. And for these instances, exposure compensation is the answer.
In this post, I’m going to talk about many topics surrounding exposure compensation. I’ll discuss what it is and when you might need to use it. I’ll even offer some example photographs to demonstrate the differences between various compensation settings.
What Is Exposure Compensation?
The idea behind exposure compensation is to give the photographer control over lighting when the camera doesn’t do a good job at deciphering what the photographer’s intent is. Just a few evenings ago, I was attempting to take some photographs of the blue moon when I ran into difficulties – the pictures I was taking came out wildly over exposed. It wasn’t until I adjusted my camera’s exposure compensation that I began taking photos that were an accurate representation of what I was seeing with my eyes.
When setting exposure compensation on your DSLR camera, you’re generally given the ability to adjust exposure in one stop increments, with one third stop increments between them. When compensating exposure, all the camera is doing is overriding it’s previous selections relative to its new setting.
To better explain this concept, take a look at the photos below.
Canon T3i Exposure Compensation Setting
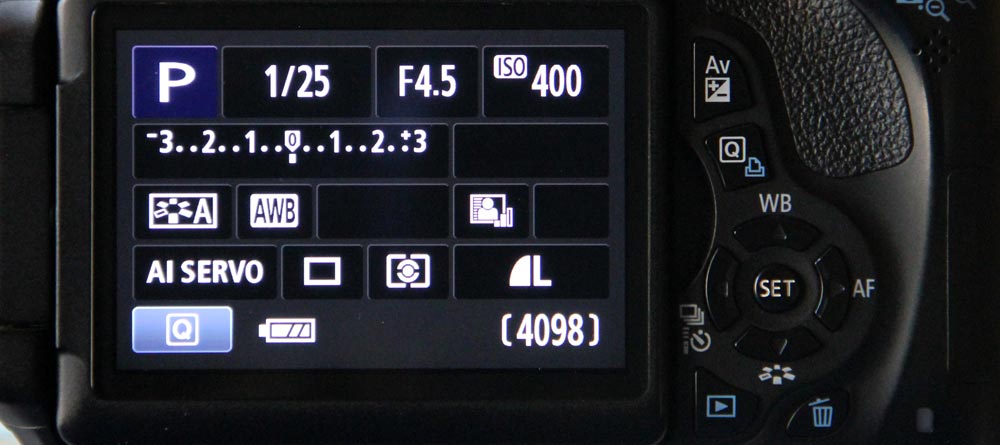
First, just to explain what you’re looking at, the exposure compensation setting is the scale that runs from -3 to 0 to +3. By holding down the small button towards the upper right that says “Av+-” and turning the dial right behind the shutter button back and forth, you can scroll up and down this scale.
In this first picture above, I simply turned the camera on and metered it. As you can see, in “Program” mode, my Canon T3i feels that, because of the given light, the shutter speed should be set at 1/25 of a second, the aperture should be open to F4.5 and the ISO should have a sensitivity of 400. Now, take a look at this next shot:
Canon T3i Exposure Compensation Setting Under Exposed by One Stop
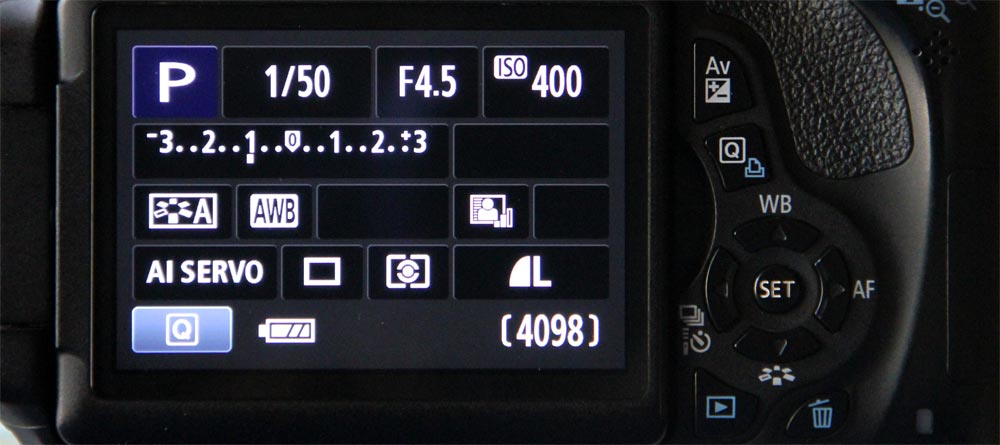
For this picture, I merely adjusted the exposure compensation down one stop, to under expose any resulting photos. Look at the small tick mark beneath the “1” on the right side of the scale. If you’ll notice, the shutter speed has increased to 1/50 of a second, while aperture and ISO remained the same. This isn’t always the case. If I was under different lighting conditions, all these of these parameters may have changed, depending on what the camera thought was best.
Because I was purposefully underexposing this shot by one stop, the camera adjusted the shutter speed by one stop. Remember, a “stop” is simply a halving or doubling of light.
Canon T3i Exposure Compensation Setting Over Exposed by One Stop
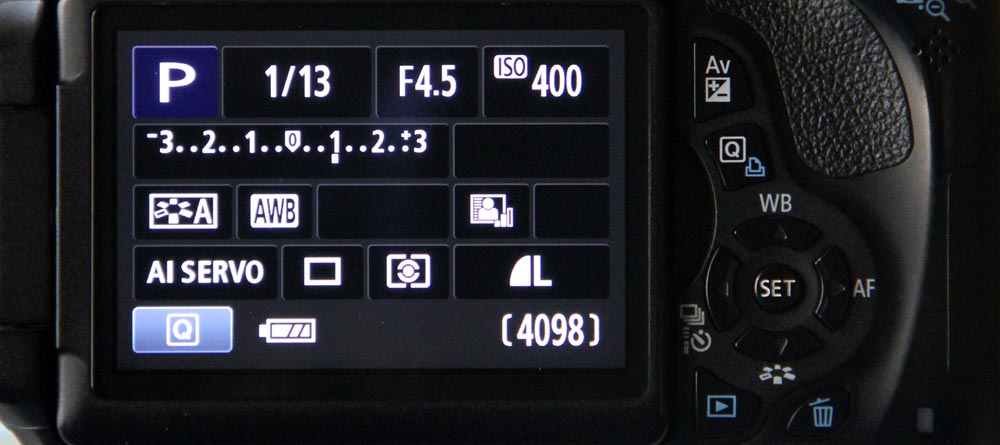
In this final example, I set the exposure compensation on the camera to over expose by one stop. Again, the camera only adjusted shutter speed, and since I wanted more light to hit the sensor, it decreased shutter speed by one stop (increasing light), resulting in the shutter staying open twice as long it it would have if there was no compensation at all.
What About Priority Modes?
You may be wondering what happens if you adjust exposure compensation while shooting in priority modes. This is actually an important topic, because without being aware of its effects, exposure compensation can, and will, affect the sensitivity of shutter speed and aperture settings in ways you might not expect. It you’re in action or creative environments, this type of adjustment could be detrimental to your results.
Here’s the rule: If you’re in shutter priority mode and adjust exposure compensation down one stop, the camera will shrink your aperture by one stop, while maintaining your shutter speed. This change in setting will under expose your resulting photograph by one stop. Similarly, if you’re in aperture priority mode and adjust exposure compensation up one stop, the camera will slow down shutter speed by one stop, resulting in a photography that’s over exposed by one stop. It’s really that simple. By adjusting exposure compensation, all you’re doing is telling the camera to change the exposure of the photograph by altering a setting that isn’t “locked” in by a priority mode. You do need to be careful though, because, as I mentioned above, if you adjust exposure too far, your photographs might not come out as you expect them to.
Exposure Compensation Example Photos
For the examples below, I took seven photographs of the same flower. I began by adjusting the exposure compensation to the lowest possible setting and then continued up to the highest possible setting. As you’ll see below, the results are quite dramatic.
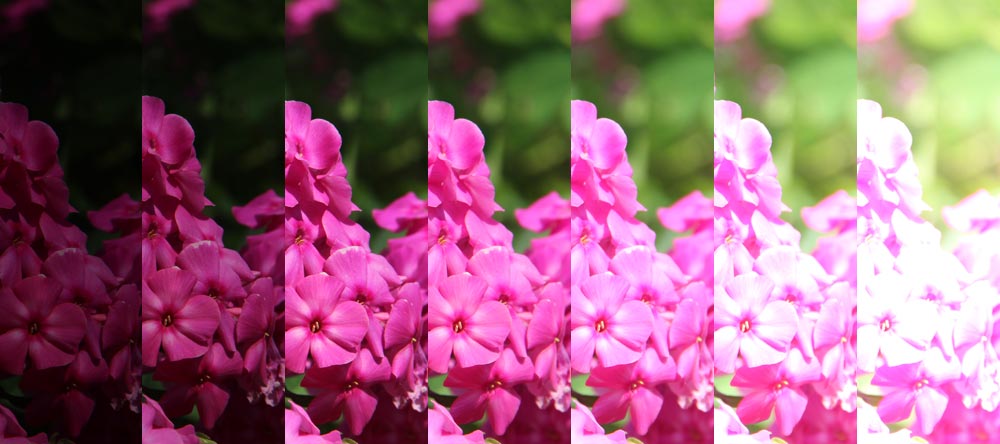
Bright flowers like this oftentimes cause cameras to over expose, so I wanted to view the output throughout the entire range. Also, it was interesting to watch the camera adjust settings as I metered for each shot. Below, I’ll list the metering settings:
Camera Settings Based On Exposure Compensation
I’ll list each group of settings in the order of exposure compensation, shutter speed, aperture size and ISO. While viewing the above photo, you can apply these setting from left to right. Also, while taking these pictures, I had the camera in “Program” mode.
Compensation, Shutter Speed, Aperture, ISO
-3, 1000, 11, 100
-2, 800, 10, 100
-1, 500, 9, 100
0, 400, 7.1, 100
+1, 250, 6.3, 100
+2, 200, 5.6, 200
+3, 200, 5.6, 400
In my opinion, while taking photos of bright flowers like this, it may be beneficial to set the exposure compensation down by one stop. I think more detail becomes apparent at that setting. If your photos are too dark, you can easily brighten them up to your liking in post-processing.
When To Use Exposure Compensation
If you’ve ever tried to take photographs of subjects that contrasted greatly with their backgrounds, you’ve surely experienced your camera having difficulty correctly setting exposure for those situations. These types of settings may include objects of normal brightness that are situated against very bright backgrounds, such people, animals, trees or flowers against the bright blue sky. When you let the camera set for this type of shot, you’ll usually end up with a picture of a silhouette. The sky is simply too bright and the result is an underexposed photo of the subject.
Conversely, like I mentioned above, if you’ve ever attempted to take a picture of a very bright object that’s set against a dark background, such as the moon at night, the result will be a severely overexposed photo. The camera meters for all that darkness and the bright moon gets washed out in the process.
For both of these situations, utilizing the exposure compensation setting is a great solution. You can take multiple photographs at multiple settings and then choose the best ones while reviewing them on your computer.
Lastly, cameras also face challenges while taking photos of objects that vary greatly in shade. So, if you attempt to take a picture of a black and white yin and yang symbol, for instance, you’ll likely end up with either an under or over exposed photograph, depending on your background. It’ll take your manual input to gauge what “correct” is.
I hope you enjoyed this post on camera exposure compensation. If you did, please share the post with friends or those who you think might appreciate it. Also, if you have any comments or questions, please leave them in the space below. If you’d like to learn more photography tips and tutorials, check out the “Photography” link at the top of this page. Thanks!
Here’s another perspective…
More Exposure Compensation Example Pictures
When you press your camera’s shutter button half way down, your camera meters the scene and sets its exposure based on the entire scene. Most of the time, your camera gets it right and the lighting is perfect. But if you’ve got very bright or very dark elements in your scene, the exposure can be thrown off. As an example, think about taking a picture of someone who’s standing in front of the sun. Their image will likely end up looking like a silhouette (the camera had to compensate for all that brightness by reducing its exposure, making the person too dark). Now think about someone who is standing in a very dark room, but who’s holding a lit flashlight up to their face. Their face will likely end up far too bright and washed out looking (the camera had to compensate for all that darkness by increasing its exposure, making the face too bright). It’s times like these when you’ll need to override your camera’s exposure choice and set your own. It’s time to use your camera’s exposure compensation feature.
To adjust your camera’s exposure compensation, look for a button that’s got a +/- symbol on it. On the Canon T6i, the button can be found on the back and looks like this:
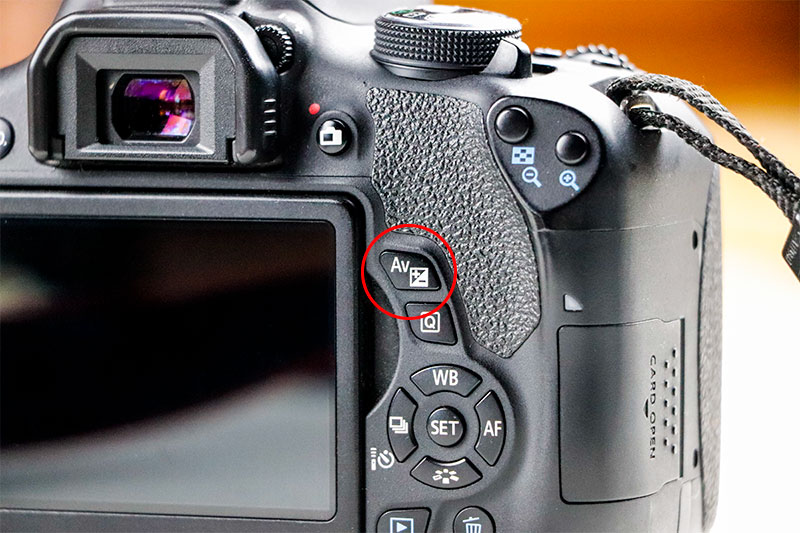
Basically, when the exposure compensation button is pressed and the top dial is rolled to the left or the right (on the T6i), the overall exposure of the scene will increase or decrease. Essentially, the scene, through the camera’s eyes, will become brighter or darker. When set to Auto, the camera will accomplish this adjustment a number of ways, from increasing or decreasing the ISO value, making the shutter speed faster or slower, increasing or decreasing the size of the lens’s aperture, or a combination of these things.
To test this out, view your scene on the rear LCD screen and adjust the exposure through the exposure compensation feature. You’ll see it get brighter or darker.
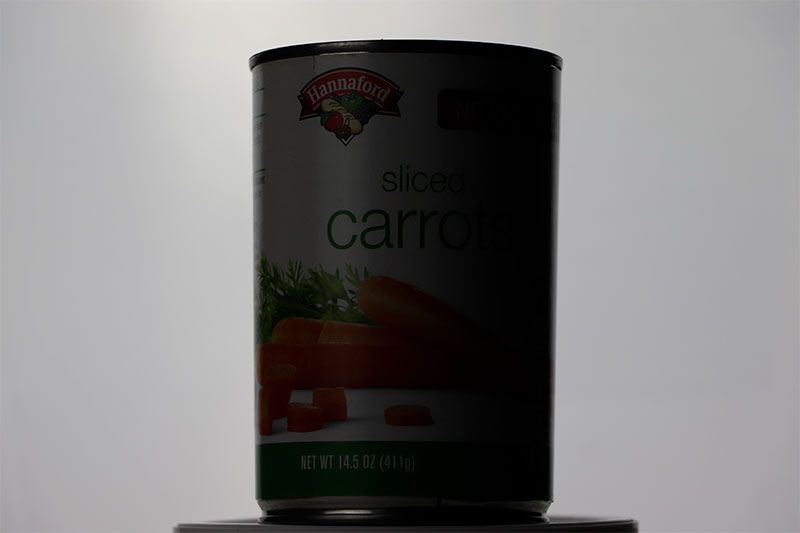
I’ve already mentioned when you might want to use this feature, but let’s take a look at an example. To demonstrate, I set a can of carrots in front of a bright light. I knew the face of the can would show darker than I wanted it to. Here’s the original shot, taken without any compensation.

Because the can was dark, I increased the exposure by 1, 2, and 3 stops. Here are the resulting photos. I think the second one is best.


Sometimes, to get the correct exposure of your subject, a bit of compensation is in order.
To continue on with this example, I thought I’d show you what -1, -2, and -3 stops looks like. None of them are any good in this instance, but this’ll give you a good idea of how something that’s too bright might be tempered by using this feature.

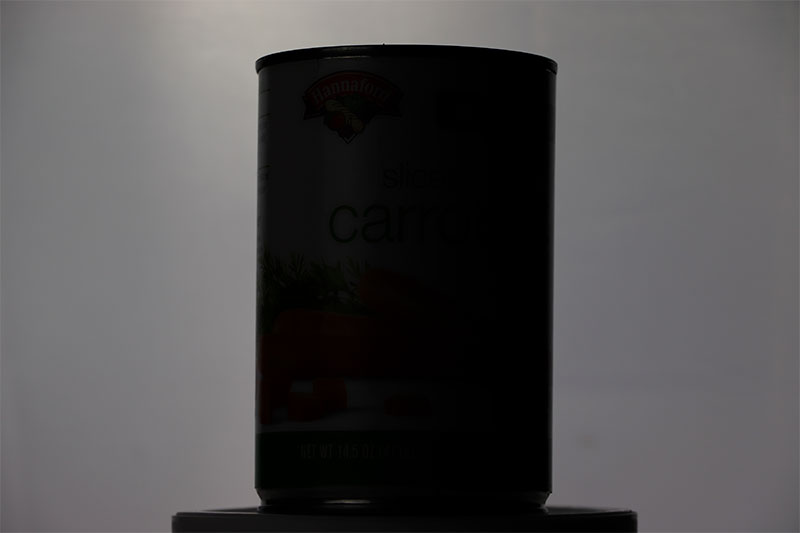
It’s that easy. Do you have experience with your camera’s exposure compensation feature? If so, please share what you know or any tips and tricks you have up your sleeve. Thanks!
Here’s another perspective…
How to Use Exposure Compensation for Canon Cameras
I’ll use Canon cameras as an example here, because that’s what I’ve got. If you look at the back of your Canon DSLR camera, you’ll likely see a few buttons. One of those buttons probably has a Q written on it. If you press that button while in Live View, you’ll see the menu that was on the LCD screen come alive. It’ll become editable. There’s a scale on the screen that runs from -3 to 0 to +3. That’s the exposure compensation scale. While that’s highlighted, use the arrow keys on the back of your camera or the dial up on top to change from zero exposure compensation to something more or something less. Doing this will result in brighter photos or darker photos. There you have it in a nutshell; exposure compensation.
When I usually think about this feature while pondering photography, I always come back to the generic use of it. You’re taking photos and feel that your resulting images are either took dark or too bright. While I’ve encountered those types of situations a fair share, what I actually encounter much more often is a scene that’s too dark because of something that’s bright in it. Just the other day, I was attempting to capture landscape images and all of my shots were coming out really dark. And land was nearly black while the sky was blown out with brightness. This can be especially prevalent at dusk, when there isn’t enough light on the land to counter the brightness above.
So yes, if your overall scene is too dark, increase your exposure compensation up a notch and if it’s too light, decrease it a notch. Just be sure to keep your eye on your shutter speed because it can slow down quite a bit, causing camera shake and blur. If you notice that you’re in a situation like the one I just described, with the very dark land and very bright sky, the trick is to increase your exposure compensation by at least a value of 1 (one). You may have to go up even more. You’ll need to counter the sky and even though that will appear especially blown out, you’ll likely be able to correct it in post-processing. What’s an even better solution is bracketing. If you capture the first photo with a value of -1 and then the second with a value of 0 and then the third photo with a value of +1, you can combine these images in post-processing to give you either an HDR image or you can use masks to remove any areas you don’t like, leaving you with a fully well exposed photograph.
Do you have any suggestions for when to use your camera’s exposure compensation feature? What do you like about using it and what don’t you like? I firmly believe that it oftentimes takes more than one shot (using a tripod) and then a combination of the multiple photos to get the one you want. The dynamic ranges on our cameras simply can’t capture all the light correctly that’s in the atmosphere.
And even more for the Canon camera…
How to Set Exposure Compensation for a Canon Rebel DSLR Camera
The exposure compensation feature in the Canon Rebel DSLR digital cameras is awesome. I use it all the time and I have to tell you that it’s been a lifesaver in so many situations. Usually, I use it most for overblown, overexposed scenes. Either that, or for scenes where the dynamic range is simply too great and my camera isn’t making the best choices for me. A typical example would be while photographing some landscape shots. The sky is usually what gets in my way. If something bright is in the same scene as something that offers lots of shadows, there’s bound to be trouble.
Working with the exposure compensation feature inside Canon Rebel cameras is super simple. Once you do it a few times and get the hang of it, you’ll wonder how you ever managed any photography without it.
In this section, I’ll demonstrate the manual steps necessary to adjust exposure compensation in the Canon Rebel T6i. Really though, these instructions are good for all Canon Rebel cameras, such as the T2i, T3i, T4i, T5i, T7i, and the T8i. There are only a few steps involved, so this should be a relatively quick and straightforward post.
The Program Mode (P)
To take advantage of the feature I’ll be discussing in this post, you’ll need to have your camera set to one of the manual modes. Since Program Mode is the easiest to grasp out of all of them, I’ll use that one. To enter Program Mode, I’ll turn the dial that sits on top of my camera so the P lines up with the small white line.
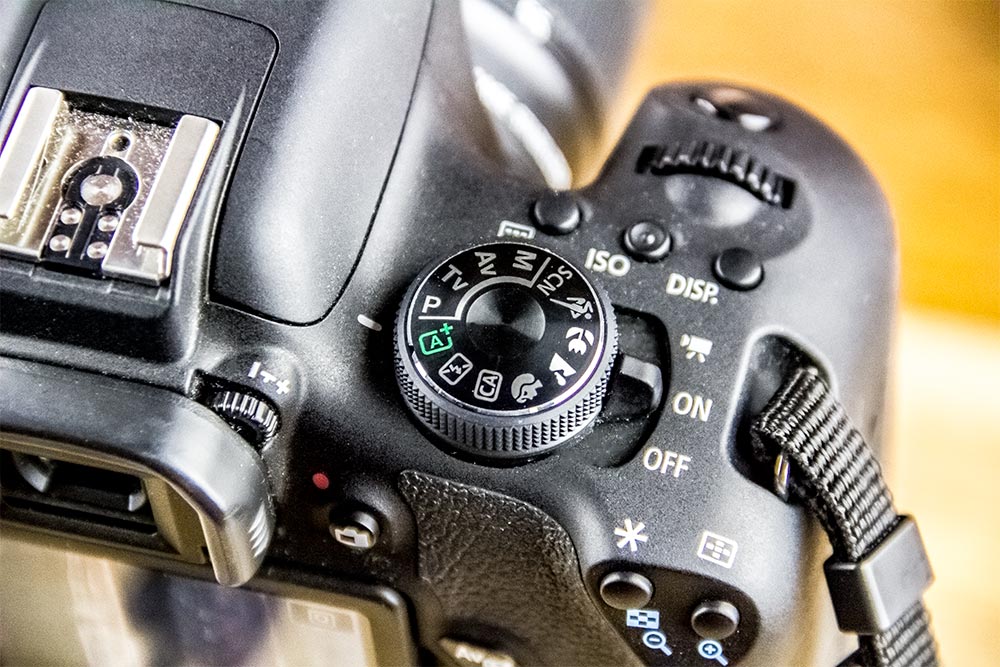
Once that’s done, I’ll notice that the LCD screen has a bunch of data on it. It’s some of this data that is able to be adjusted while in this mode.
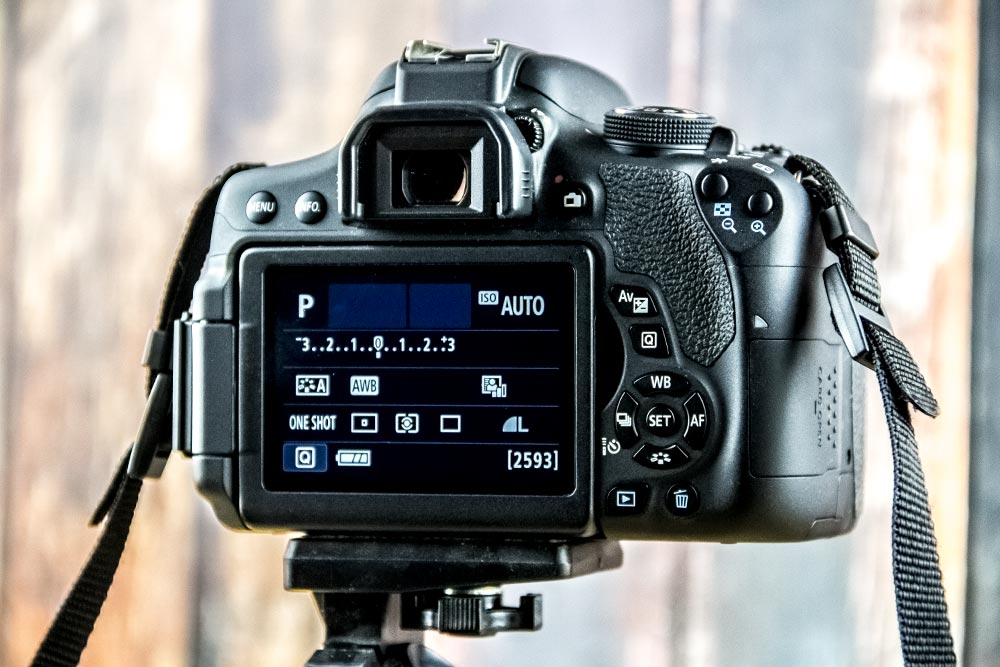
If you’ll take a close look at the screenshot above, you’ll see there is a scale on the LCD screen. The scale runs from -3 to +3. This is the exposure compensation scale. It’s able to be adjusted in 1/3 stop increments.
Adjusting Exposure Compensation
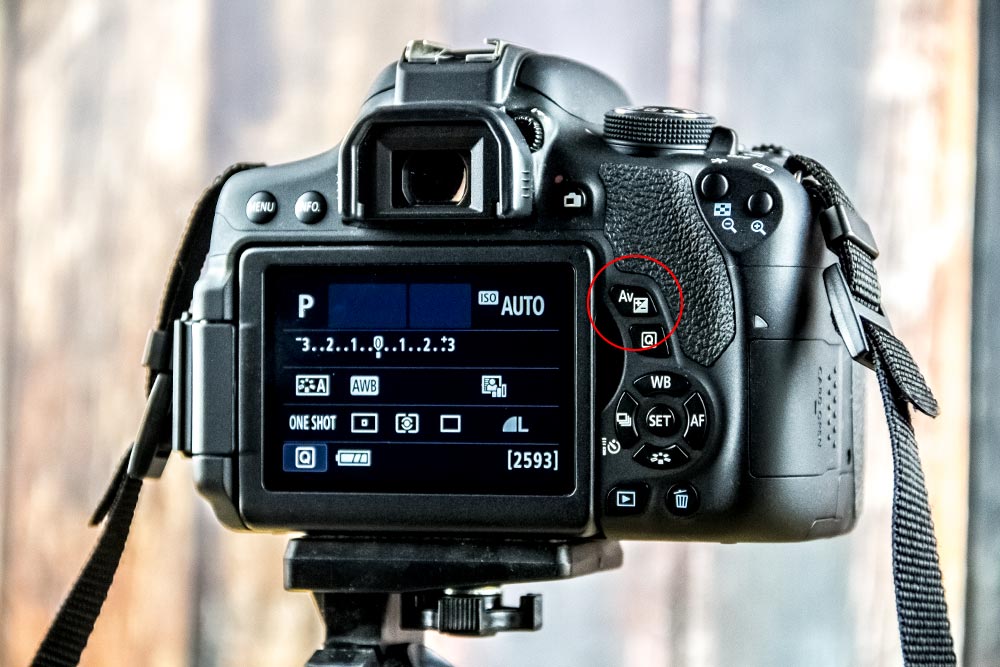
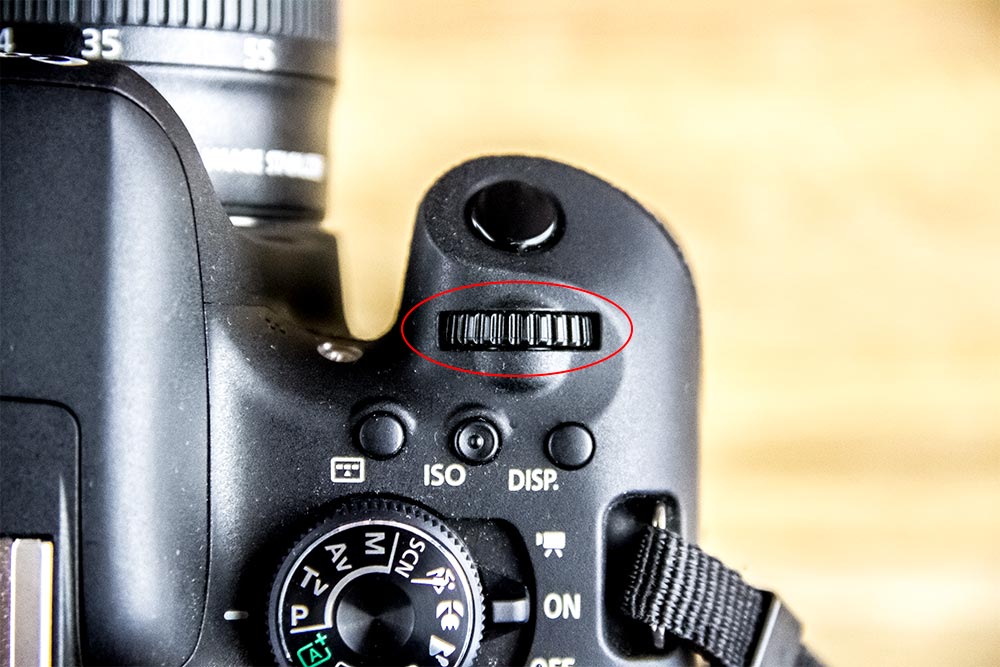
To actually adjust the exposure compensation in this particular camera, all you need to do is to press and hold the exposure compensation button on the back of the camera and turn the dial that sits on the top front of the camera either to the left or to the right. Turning to the left decreases the exposure and turning to the right increases it.
In this next photo, I have the exposure compensation button circled in red. It’s the one that says Av on it.
In this photo, I have the dial that needs to be turned left or right circled as well.
If I press and hold the rear button in and turn the dial to the left a few clicks, I can change the tick mark on the gauge on the LCD screen. Take a look at it now.
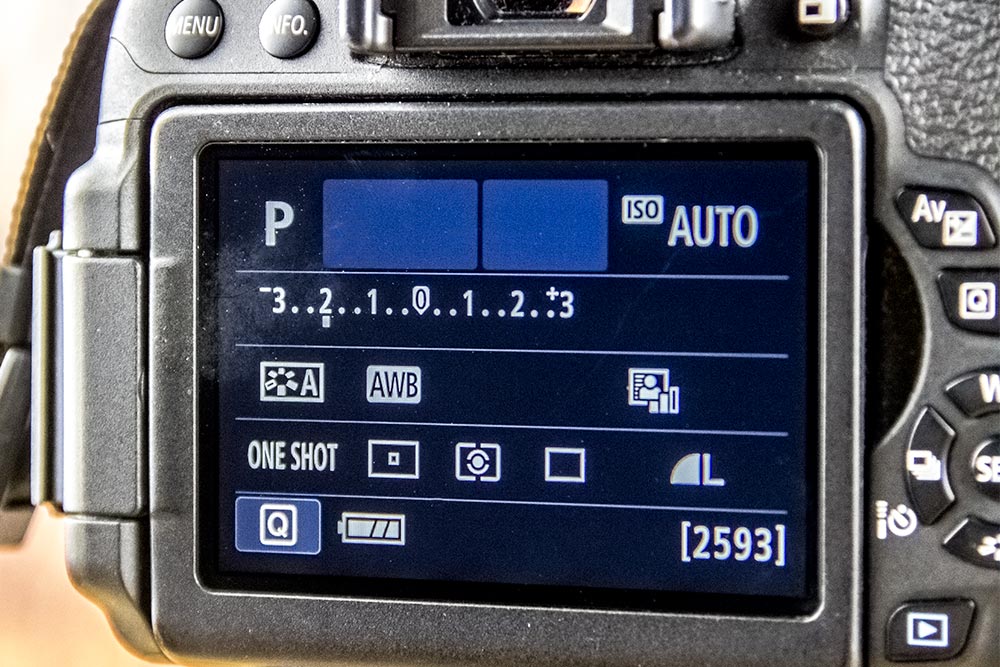
What’s really cool is that this same meter appears in different view modes. In the case below, the meter shows while shooting in Live View. And what’s even better than that is that as the exposure compensation is adjusted, the image on the LCD screen will get darker or lighter in real time to represent how the photo will ultimately appear after it’s been captured.
And that’s it. It’s that easy to adjust the exposure compensation on this camera. When you’re ready, you can press the shutter button to take your photo.

Leave a Reply