We now know about default versus standard transitions as well as how to add transitions to the timeline in the Cut page in DaVinci Resolve. We can now move on to learning how to customize a transition once it’s applied. True, there are many transition to choose from in the Transition panel, but did you know that each transition can have its properties adjusted? In this tutorial, I’ll show you exactly how that can be done.
Add the Transition
I’ll start off by first adding a transition to a break between clips in the timeline in the Cut page. I’ve got a project open and I’m currently using three clips on the timeline. I’ll click and drag the Push transition from the Transitions panel and drop it on the break between the first and second clips.
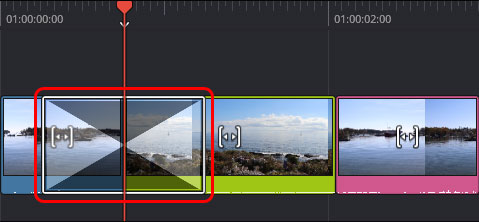
The transition looks pretty good as it is, but I’d like to make a few changes to it. How can I do that? I’ll demonstrate that next.
Open the Inspector
Each transition has its own properties and those properties can be adjusted in the Inspector panel. As you add transitions in Resolve and begin working with them, you’ll find that some have certain adjustable properties while others have different ones. That’s just the nature of what we’re dealing with. Since each transition is unique, its properties will apply only to itself. In this tutorial, I’ll be working with the Push transition. If you’re working with a different one, the properties associated with that one will likely look different too. Luckily, they’re very easy to figure out and adjust.
In the timeline, I’ll click to select the transition I just added. Then, I’ll click the Inspector link in the upper right corner of the workspace. Let’s see what that panel shows us.
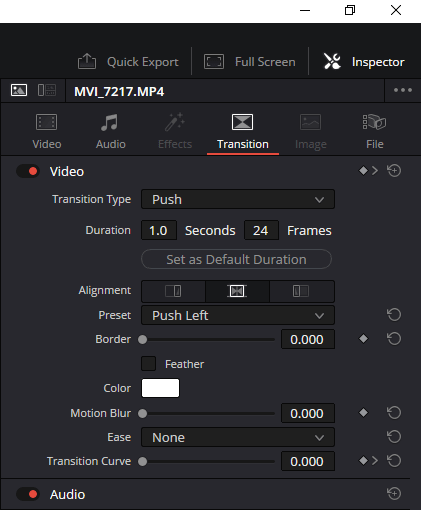
As long as the transition in the timeline is selected and highlighted, the Transition tab in the Inspector panel will be highlighted. For this particular transition, there are two sections, Video, which is expanded, and Audio, which is collapsed. You can see both of these sections in the above graphic. They have switches with red dots to the left of them. Those switches activate and deactivate each section. At present, both sections are activated and the properties contained within are ready to be adjusted.
Basic Transitions
The settings inside the Inspector are fairly self-explanatory. Many of the basic transitions in the Dissolve, Iris, Motion, and Wipe sections of the Transitions panel contain a Transition Type dropdown that you can change the transition from. You can also adjust the transition duration as well as set that duration as the default. Below those settings are usually settings that relate to the transition at hand. For instance, since I’m dealing with the Push transition in this tutorial, there are options to choose which direction the push comes from as well as how the push is aligned. Other settings for this transition have to do with its border, whether or not to feather the distinction between one clip and another, the color of the border, a motion blur, the ease, and the transition curve. Again, you’ll find different settings for different transitions.
Fusion Transitions
Fusion transitions are an entirely different ball of wax that I’ll cover in later tutorials, but I do quickly want to mention that some of their attributes are also available for adjustment in the Inspector. I’ve applied the Radial transition to the timeline in my project and this is what I see inside of the Inspector for that transition.
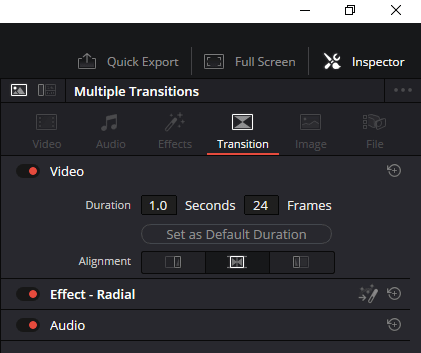
As you can see, the option to choose a different transition is gone as is many of the other options. The Duration option is still available along with the Set as Default and Alignment. I’ll cover these types of transitions later on.
If you have any questions regarding how to adjust and customize transitions in the Cut page in DaVinci Resolve, please ask in the comment section below. Thanks!
If you’d like to learn more, click through for all of my free DaVinci Resolve Tutorials.
Leave a Reply