If we combine what we learned in my tutorials about how to add video clips, transitions, and titles to the timeline in the Cut page in DaVinci Resolve, adding and editing audio should be no problem. So many tasks are very similar to each other in this application. When it comes to dealing with audio though, there are a few extras that need to be given special attention. Volume is one of those things. Transitions are another. Not to worry though – adding audio to the timeline and editing how it sounds is straightforward.
In this tutorial, I’ll explain how to access an audio clip in the Media Pool, how to adjust the length of the audio clip in the monitor, how to add the audio clip to the timeline, how to adjust the length of the clip in the timeline, how to adjust the audio’s volume, how to edit the audio in the Inspector, how to add transitions to the audio clip, and finally, how to edit those transitions. While this might seem like a lot, each task is actually quite intuitive and there’s hardly even a learning curve. In just a few minutes, you’ll know how to accomplish each item I discussed above.
Accessing Audio in the Media Pool
After importing media to the Media Pool in the Cut page in DaVinci Resolve, accessing the various types of media is exactly the same as accessing video content. Let me show you a screenshot of the Media Pool.
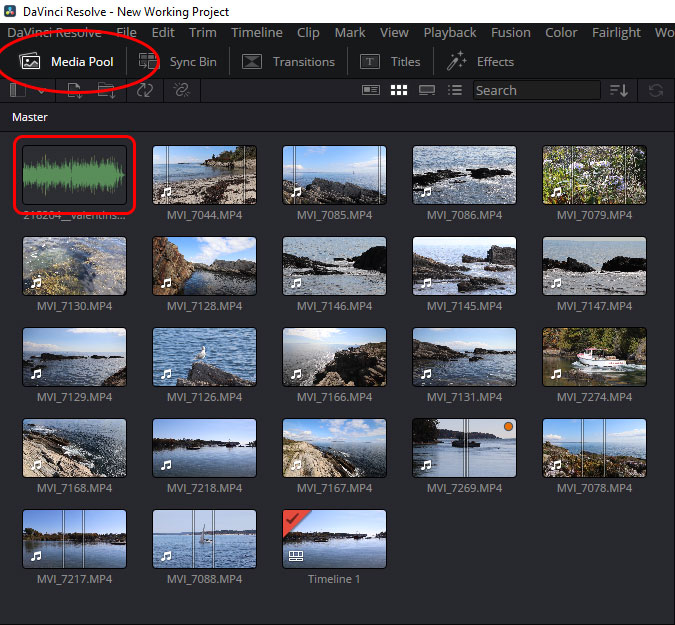
If you review the above graphic, you’ll see the Media Pool link in the upper left. That’s how I accessed the panel. By clicking that link. Also, I’ve outlined the audio clip thumbnail in the Master folder. Audio clips generally display the green sound waves with a grey background. To access the audio, simply open the Media Pool like you would for any other type of media.
How to Adjust the Length of an Audio Clip
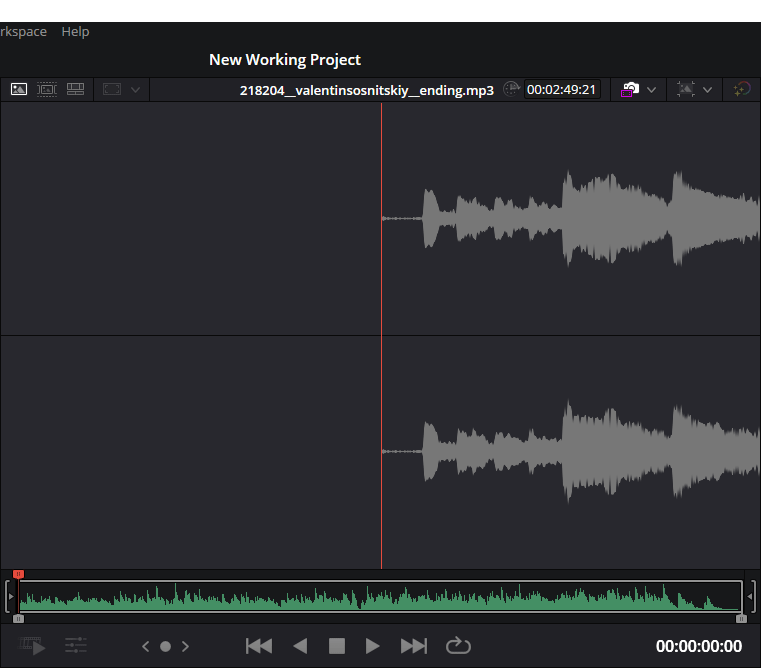
To have the audio appear in the Monitor, simply double-click the clip thumbnail in the Media Pool. I just did that and this is how the Monitor appears displaying the audio.
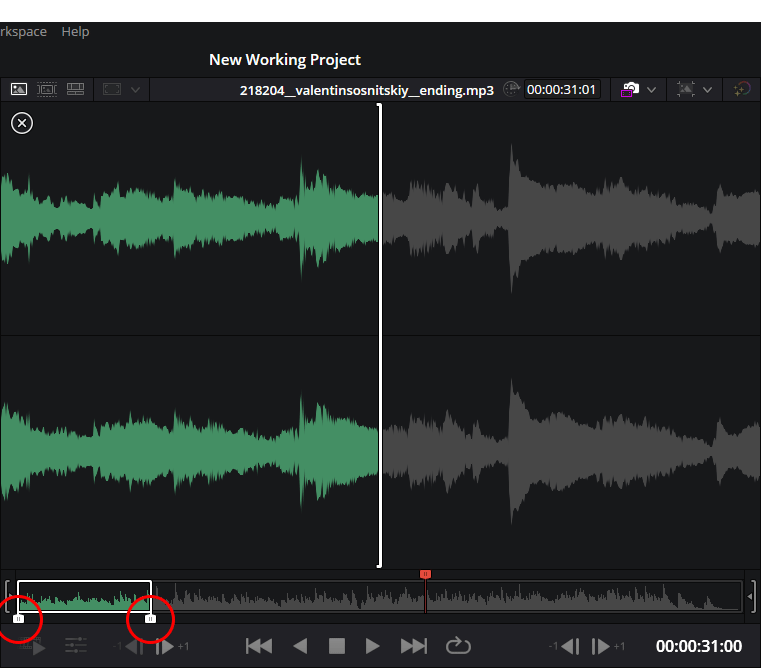
To adjust the length of an audio clip, simply click and drag the two handles at the bottom of the monitor to the left and the right. To play, stop, and play backwards, use the controls all the way at the bottom of the monitor. In the graphic below, I’ve outlined the time durations handles I mentioned above. I dragged them to reduce the length of the video.
Since my demo video clips only last a few seconds in length, I only need a few seconds of audio. As you can see from the timestamp in the lower right corner of the above graphic, I’ll be dragging about 30 seconds of audio down to the timeline in the next section. I’ll reduce the length of the audio even further in the timeline after that.
How to Add Audio Clips to the Timeline
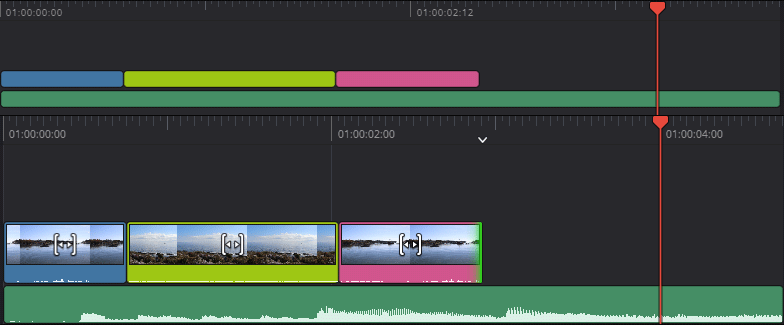
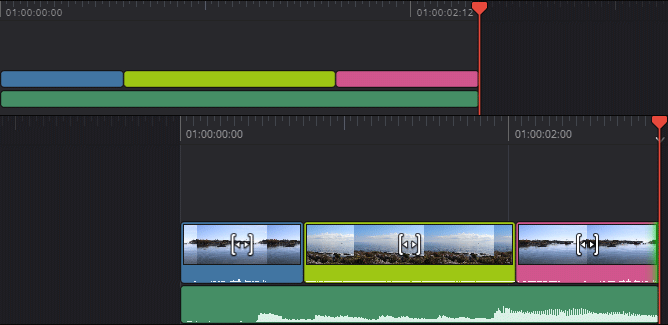
Now that the audio has been trimmed, I can add it to the timeline. How can I do that? It’s easy. I’ll simply click and drag the audio thumbnail from the Media Pool to the the area directly below my video clips in the timeline. I can drop the audio either in the upper or lower timeline. It doesn’t matter. In this next graphic, the green bar is the audio clip.
How to Trim an Audio Clip in the Timeline
To adjust the length of an audio clip that’s already in the timeline, simply hover your mouse pointer over either end of the green bar and when the pointer changes into a single or double arrow, click and drag to the left or the right. This is the same technique used for editing the length of a video clip. I’ll go ahead and shorten the length of the audio clip in my timeline so it matches the length of the video.
How to Adjust the Volume of an Audio Clip
The first task to complete when dealing with audio volume in the timeline is to enlarge the bottom audio track so the sound waves are more easily visible. To do this in my project, I’ll click the Enlarge/Collapse Track button that sits to the left of the timeline audio track.
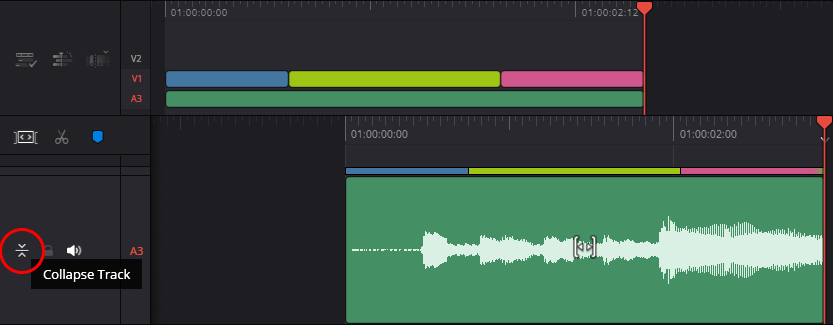
In the graphic above, you’ll notice that I circled the button in red. If the track is collapsed and you hover your mouse pointer over the button, it’ll read Enlarge Track. If the track has already been enlarged, as it has been above so you can see the result of that, the button will read Collapse Track, as it does above.
There are two options for adjusting the volume for an audio clip. The first is to adjust the volume of the clip itself; just that one clip. The second is to adjust the volume for the entire track; every clip on the track simultaneously. So if you have only one clip on the track, as I do in my demo project, it doesn’t matter which method is used. But if you’ve got multiple audio clips on the audio track, you’ve got the choice I laid out above.
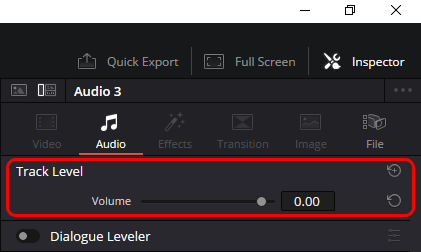
To adjust the volume of one single audio clip on the audio track in the timeline, click the Inspector link in the upper right corner of the workspace and then click on the audio clip itself in the timeline. You should see this in the Inspector:
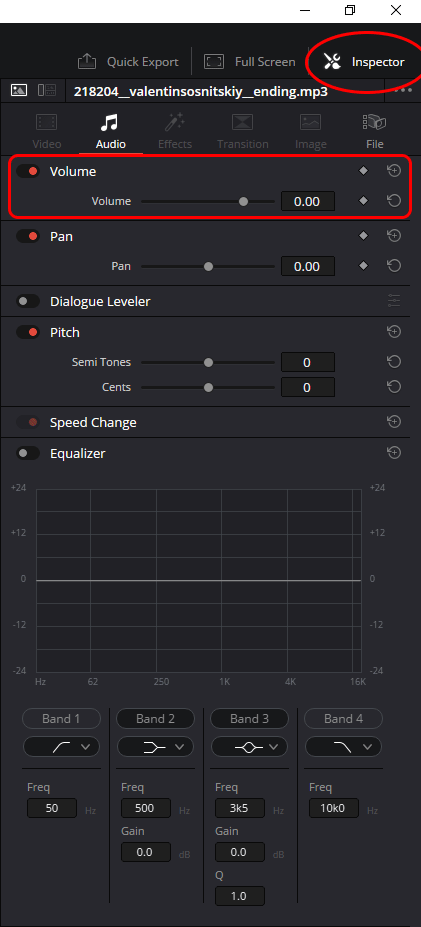
To set the volume, slide the Volume slider back and forth. As you do this, you’ll see the sound wave in the clip itself grow and shrink. Viewing the sound wave size is a good indication of how loud or soft the sound will be. That’s why it was important to enlarge the track earlier in this tutorial.
To adjust the volume of the entire track, click your mouse pointer somewhere in the light grey area to the left of the audio track in the timeline. This will select the track for editing.
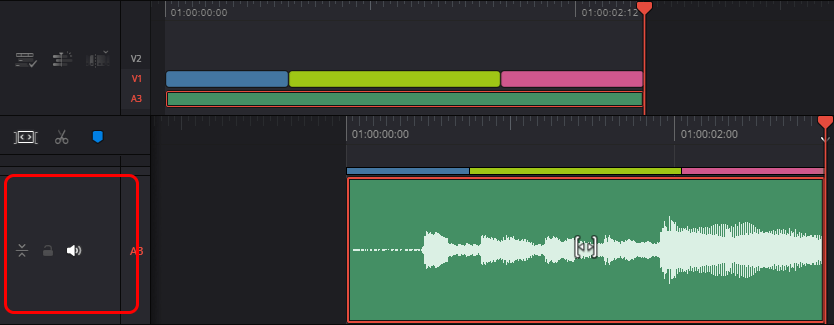
When you do this, you’ll see the Inspector change. It should look like the graphic below. When it does, again, click to move the Volume slider to increase and decrease the volume level. Note that when you push the Volume slider, the audio wave in the clip won’t grow and shrink as it did earlier. This is because it’s controlling all audio clips in the track and they can’t all move simultaneously with the same ratios.
How to Edit Audio in the Inspector
If you browse three graphics up, you’ll see the Inspector panel. It’s in this panel you’ll do most of your audio editing in the Cut page. I’ll cover the dedicated audio editing Fairlight page in later tutorials, but for now, know that you can do some light editing in this page. In the Cut page, you can control the volume, pan, dialog leveler, pitch, speed change, as well as an equalizer. The way to access this Inspector panel is to click the Inspector link in the upper right corner of the workspace. Be sure to click to select the audio track in the timeline first though or the Inspector won’t know what you’d like to edit.
How to Add Transitions to an Audio Clip
If you’d like to have your audio fade in from nothing to full sound, you’ll need a transition. People often use audio transitions while editing video because the effect is quite elegant. When I edit my videos, I usually add a transition to both the beginning and ending of my projects. So for me, having the music fade in at the beginning and then fade out at the end is perfect.
To add an audio transition, simply click the Transitions link at the top left of the workspace and then click the Audio link inside the panel.
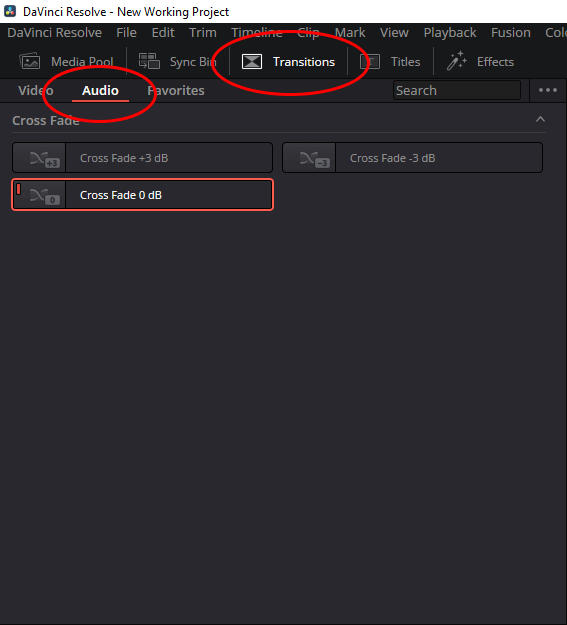
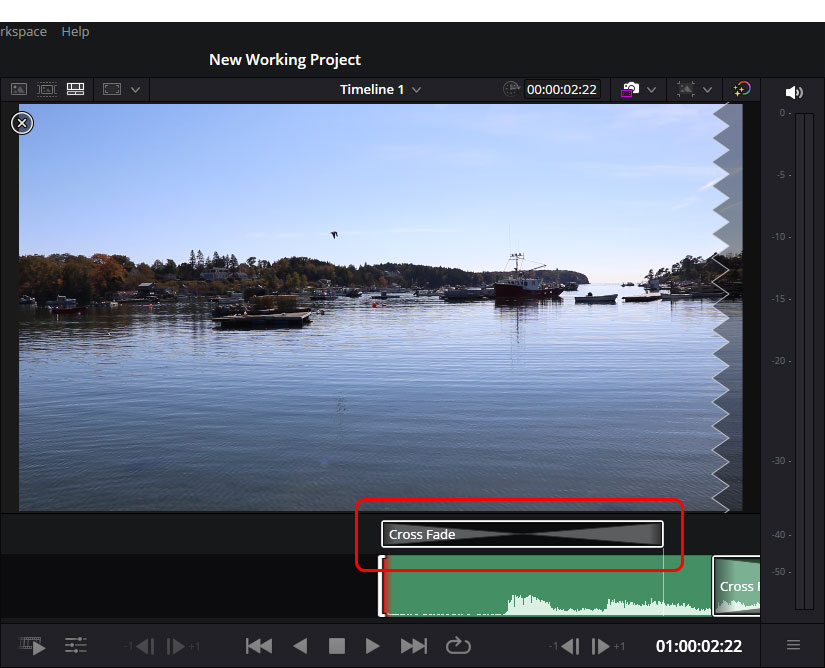
To apply a fade that will start at zero decibels and end with full sound, choose the Cross Fade 0 dB transition. Click and drag that transition down into the beginning of the audio track and drop. If you’d like to fade the sound out to zero decibels at the end of the track, drag the same transition down to the end as well.
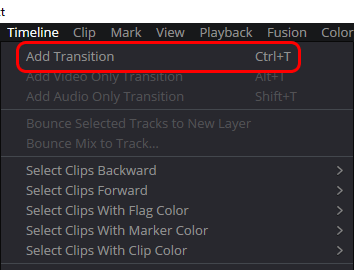
If you’d like to use a keyboard shortcut to add these transitions, select the audio track you’d like to add the transitions to by clicking on it and then, after making sure the transition in the Transitions panel has been selected by clicking on it, press Ctrl+T on your keyboard. This will add two transitions to the track; one at the beginning and one at the end.
You can also use the Timeline > Add Transition menu item to accomplish the same thing.
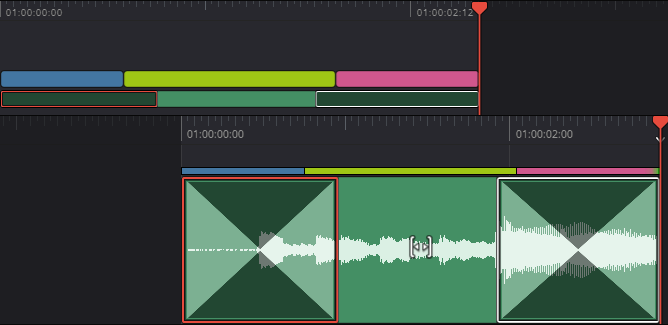
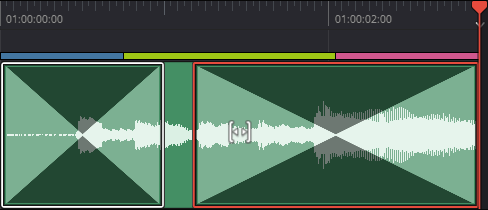
This is how my project looks with both transitions in the audio track.
How to Edit Audio Transitions
To edit an audio transition, be sure to click to select the transition in the timeline and then open the Inspector panel. Inside, you’ll find a few controls.
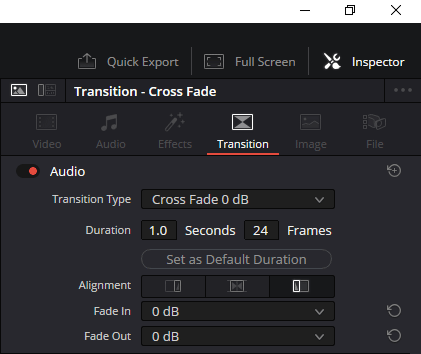
Inside the Inspector, you’ll find controls for the transition type, duration, alignment, fade in and fade out decibels. It’s a simple panel without too much going on. It should give you what you need for a simple project though.
How to Change the Length of an Audio Transition
If you’d like to make your audio transition longer or shorter, you’ve got a few options. The first is to hover over and click on the inside edge of the transition itself in the timeline and drag to the left or to the right. If you take a look at the graphic below, you’ll see that I clicked and dragged the left side of the ending transition to the left, making it longer. This means the sound will fade out more slowly than it would have initially. By default, the fade would have lasted for one second. Now it’ll last for 1.8 seconds.
The second method for altering the duration of an audio transition is to do it right in the Inspector. If you look at two graphics up, you’ll find an option for duration. You can adjust either by seconds or by frames.
The third option is to click to select the transition in the timeline and then head up to the monitor. You’ll see the transition there and if you click on the inner edge of it, you’ll be able to drag to the left or the right, altering the duration.
And there you have it – a nice full tutorial about how to deal with audio in the Cut page. If you have any questions about this post, please ask in the comment section below. Thanks!
If you’d like to learn more, click through for all of my free DaVinci Resolve Tutorials.
Leave a Reply